Helping People Live in Nature.
We furnish the legacy of log, timber, and structures.
Quality products, complemented with contractor referrals and DIY advice. www.loghelp.com 1-800-359-6614
What is the best way is to apply Shell-Guard RTU, diluted Shell-Guard Concentrate and/or solutions of Armor-Guard? Without a doubt the easiest and most effective way to apply any of these products is with a simple compressed air sprayer, a fancy way of referring to an inexpensive pump-up garden sprayer available at most Do-It-Yourself outlets for less than $20.00. Of course there are some available for a lot more money but they are really not needed for applying borate solutions. A basic pump-up garden sprayer works just fine.
What about using an airless sprayer? Airless sprayers put out a fine liquid mist. The droplet size is quite small and is easily carried away with even a slight breeze. In addition, the high surface area of the small droplets allows the water contained in the solution to rapidly evaporate leaving behind a high concentration of borate and mixed glycols. Rather than penetrate into the wood this combination forms a sticky film on the surface of the wood that takes a long time to dry. Not only does this negate the benefit imparted by a borate treatment but unless the sticky film is thoroughly washed off it will interfere with the adhesion of the finish. This can happen even if Shell-Guard RTU is applied with an airless sprayer. With solutions of Armor-Guard the loss of water results in a white coating of borate powder on the surface rather than penetrating into the wood and the white powder will show through our transparent finishes. In other words, don't use an airless sprayer for applying any of our borate preservatives.
For small jobs it's better to use a hand sprayer or a plant mister to apply borate solutions than it is to try and brush them on. Since the viscosity of the solutions is about the same as water it's just about impossible to apply any of them with a brush and not have them run down the wall.
Questions on maintaining the legacy of your wood structure? Give us a call- 1-800-359-6614
Pickup in store - or ship to your door -in whichever woods your cabin dwells.
Cobra Rods
are a safe, Environmental Protection Agency (EPA) approved wood decay
protection and prevention system for log homes. Cobra Rods are a wood
preservative, fungicide, and insecticide that's safe to handle and made
entirely of a unique Boron and Copper Hydroxide complex. Cobra Rods
include the addition of Copper Hydroxide which provides extended
protection from fungus species not affected by borates, effectively
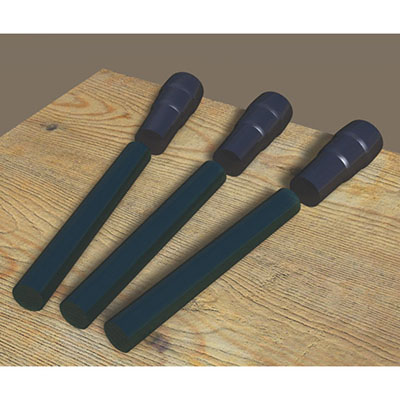
providing more protection then Impel Rods. Photo shows Cobra Rods and Cobra Rod Plugs.
Cobra Rods take the form of a solid cylindrical rod that is
approximately 7/16" in diameter (use a 1/2" drill bit for installation)
and comes in 2" and 4" lengths. Cobra Rods are a deep green color and
has a glass-like look and feel. When used for logs, the Cobra Rods can
be "plugged" with caulking or chinking to aesthetically hide them.
CobraRod Plugs are also available (included with the 2" 10 pack and 3"
12 pack of Cobra Rods). Cobra Rods can be used in logs, landscape
timbers, deck joists, posts, and other places where moisture is present.
The treatment cycle is 8 to 10 years if wood moisture is 20% or higher.
Cobra Rods are placed into holes drilled in wood at specific high risk
locations (such as at the groundline or near joints and exposed
endgrain) and are dependent upon moisture in the wood to work.
Cobra Rod Installation
The highest incidence of wood rot and decay happens at the ground line. The CobraRod targets this area and prevents fungal decay, termites, carpenter ants, various beetles and other wood-boring insects. This revolutionary combination of copper and boron is proven effective, safe and easy to use. North American utilities have trusted the CobraRod to extend the life of their wood poles. Now you too can benefit form this simple solution.
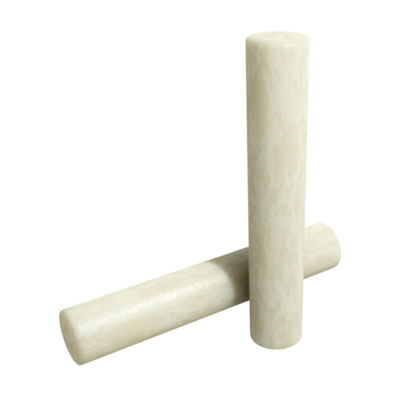
Bor8 Rods (previously known as Impel Rods) are a
highly effective preservative system for the prevention and control of
fungal decay (log rot) and many destructive insects in wood structures.
When moisture contents reach levels suitable for decay (i.e. around
25%), Bor8 Rods slowly dissolve and begin to diffuse throughout the
wood. Under 25%, the preservative becomes dormant.
Directions: Drill appropriate sized holes to
accommodate the predetermined number and size of Bor8 Rods required;
Insert the suitable size and number of Bor8 Rods into the holes; and
seal the hole with a treated wooded dowel, wood filler or caulk. Drill
holes 1/16" greater in diameter than the preservative rods to result in a
snug fit. This will ensure proper
diffusion in all directions from the rod. In addition, leave a minimum
of 1/8" of head space between Bor8 Rods and hole plug to allow for
expansion. After installation, paint or any other type of surface
coating may be applied to the wood if desired. Install Bor8 Rods in the
general vicinity of where the potential for decay is greatest or where
decay exists. Bor8 Rods can be inserted through any wood surface
depending on access, in either
a staggered, linear or angled pattern. Start at 1" from a joint or the
end of the wood and cover the entire affected length. Linear spacing
along the grain should not exceed 12" and spacing across the grain
should not exceed 3" on the center.
Questions on maintaining the legacy of your wood structure? Give us a call- 1-800-359-6614
Pickup in store - or ship to your door -in whichever woods your cabin dwells.
Armor-Guard
is a 100% powder borate wood preservative that you dissolve in water to
use. Armor-Guard protects uninfested wood from wood decay and wood
destroying insects. Like all borate treatments, your exterior wood
surfaces should be protected with a log home finish to seal in the
borates. Do not apply Armor-Guard over a stain or finish. Armor-Guard
stays near the surface and so should be reapplied if your log home
finish is physically or chemically removed. For a more penetrating
borate treatment for your log home see Shell-Guard RTU.
Remedial & Preventative Treatment: for remedial
control of organisms attacking wood, apply 10% aqueous solution of
Armor-Guard by brush or spay until surface is thoroughly wet
(approximately 5 gallons of solution per 1000 sq.ft.). Application may
also be made by drilling and then injecting the solution under pressure
into sound wood or until run-off is observed from entry/exit holes of
infested wood. * Alternatively, apply Armor-Guard powder to infested
members by drill and injection into galleries or dust generously on wood
surfaces and in wall voids at a rate of approximately 0.5 ounces (12-14
grams) per square foot.
Pre-Treatment: spray or powder/dust applications of
Armor-Guard may also be made to wood during construction. Apply solution
to all accessible surfaces of bare wood at a rate of approximately 5
gallons per 1000 sq.ft. Application should be performed after framing
and roofing are in place and before insulation and dry wall are
installed. Avoid spaying electrical components. Protect treated wood
from excessive rain. End-cuts of wood may also be treated by spray or
brush methods listed above, or by 5 minute dipping in Armor-Guard
treatment solution.
Armor-Guard Protects Against:
Ambrosia Beetles, Carpenter Ants, False Powder Post Beetles,
Furniture and Deathwatch Beetles, Longhorn Beetles, Old House Borers,
& Powder Post Beetles
Termites: Dampwood, Drywood, & Subterranean
Wood Decay Fungi
Features and Benefits
Can be used on all wood and wood composites
Provides a shell of protection around all treated wood
Will prevent and kill termites, carpenter ants, wood boring beetles and wood rot
Does not affect the color of wood
Does not interfere with the application of high quality wood finishes
Is easy to mix and apply and labeled for home owners to use
EPA approved
Application Temperature: 40° to 90° F. Coverage: Approximately 200 sq. ft. per gal. of mixed solution. A 17 lb. pail covers approximately 3,400 sq. ft. Coats: 1 coat application. Mix 1 pound (4 cups or 2 of the enclosed scoops) of powder with one gallon of water. Surface Prep: Must be clean dry bare wood. Do not apply over a finish. Drying Time: 1-3 days. Clean up: Soap and Water Shelf Life:
5 years; the stability of Armor-Guard in a liquid solution has a
limited life cycle. This is why we recommend to mix up only what you're
going to use and store the powder for later.
Questions on maintaining the legacy of your wood structure? Give us a call- 1-800-359-6614
Schroeder Log Home Supply, Inc.
1101 SE 7th Avenue
Grand Rapids MN 55744
For restoring log ends like the ones pictured and maintaining the natural gray patina of the logs.
1. First, use a borate product like PeneTreat (see Tim-bor) to saturate the logs and keep them from rotting any further. 2. Next, use LiquidWood to seal cracks and create an undercoating for the WoodEpox to adhere to. 3. Then, use new lumber or a piece of straight grained salvaged or similar material to cut a "plug" to fill the cavity. 4. Saturate the plug with Tim-bor. 5.
After the Tim-bor has dried, coat the plug with Liquid Wood, insert the
plug and use WoodEpox to finish filling in around the plug and the
cavity wall. Note you can use Liquid Wood and sawdust to create a putty or a paste to fill the cavity as well. 6.
You can use a charcoal colored masonry pigment (available from masonry
stores). Just add enough of the pigment to color the WoodEpox gray like
the rest of the building. Just knead it in with the WoodEpox. Remember,
you only have to color the last 1/2" of the end of the log. 7. Use an end grain sealer like Log End Seal to seal the ends of the wood.
To add strength and stability to these log ends without replacing
them with new crowns: Drill 1' from the log end back horizontally into
the more stable wood and use 1' lengths of Fiberglass Reinforcement Rods to act as an internal strength pin. Use the Liquid Wood as a glue around the rod. You should use at least three rods per log.
To hide the end of the rods, you can cut a wooden end plug coated with LifeTime (LifeTime will turn the new wood gray to match the rest of the building).
Note: You can also spray the entire building with
LifeTime to keep it gray. What is really nice about the LifeTime is that
it is a one time application. You can also use products like Sansin WoodForce Clear, Outlast Q8 Log Oil 00 Clear, Woodguard or WR-5 Clear as a water protection for the building.
Questions on maintaining the legacy of your wood structure? Give us a call- 1-800-359-6614
Schroeder Log Home Supply, Inc.
1101 SE 7th Avenue
Grand Rapids MN 55744
Cobra Rods
are a safe, Environmental Protection Agency (EPA) approved wood decay
protection and prevention system for log homes. Cobra Rods are a wood
preservative, fungicide, and insecticide that's safe to handle and made
entirely of a unique Boron and Copper Hydroxide complex. Cobra Rods
include the addition of Copper Hydroxide which provides extended
protection from fungus species not affected by borates, effectively
providing more protection then Impel Rods.
Cobra Rods take the form of a solid cylindrical rod that is
approximately 7/16" in diameter (use a 1/2" drill bit for installation)
and comes in 2" and 4" lengths. Cobra Rods are a deep green color and
has a glass-like look and feel. When used for logs, the Cobra Rods can
be "plugged" with caulking or chinking to aesthetically hide them.
CobraRod Plugs are also available (included with the 2" 10 pack and 3"
12 pack of Cobra Rods). Cobra Rods can be used in logs, landscape
timbers, deck joists, posts, and other places where moisture is present.
The treatment cycle is 8 to 10 years if wood moisture is 20% or higher.
Cobra Rods are placed into holes drilled in wood at specific high risk
locations (such as at the groundline or near joints and exposed
endgrain) and are dependent upon moisture in the wood to work.
Made in Canada.
Wood ends and joints are particularly susceptible to fungal attack and an appropriate size rod should be inserted within 3 inches of any end or joint in high-risk areas.
Linear spacing along the grain should never exceed 15 inches on center and spacing across the grain should
not exceed 6 inches on center. After the rods are in place, the holes should be plugged using a plastic plug,
wooden dowel, caulk, chinking or wood putty. The treated area can be painted, stained, or coated with any appropriate finish.
Application Steps
Drill appropriate size holes to accommodate the number and size of CobraRods required. Drill hole
size should be approximately 1/16” larger than rod size. Plug size should be approximately 1/16”
larger than hole size. (Consult the recommended Application Rate Table for this information).
Insert the CobraRods into the hole or holes.
Plug the hole with a plastic plug, wooden dowel, caulk or wood putty.
Questions on maintaining the legacy of your wood structure? Give us a call- 1-800-359-6614
Schroeder Log Home Supply, Inc.
1101 SE 7th Avenue
Grand Rapids MN 55744
Rot, weather, insects, fungi all pose a serious threat
to your logs. Protect your investment—treat your logs
first to make them last.
All wood faces the possibility of rot and insect infestation—even in dry climates. Fungi and insects actually
consume the cells of dead wood, often causing severe
structural damage, damage that often requires log
replacement—a costly repair.
Tim-bor® helps protect your home from the costly
damage caused by rot and insect infestation.
What is Tim-bor® ?
Tim-bor® is a borate-based wood preservative.
Borates are well-known across the world for their
protective qualities. And like other borates, Tim-bor®
is highly effective in the prevention of most rot and
wood-boring insects.
When using Tim-bor®, a protective “shell” coating
helps defend your home against dry, wet, and brown rot
as well as termites, house borers, powderpost beetles
and carpenter ants (to name a few).
Tim-bor Professional Borate in 6 gallon and 1.5 pound
The Tim-bor® Difference
Tim-bor® is registered with the Environmental
Protection Agency (EPA) for spray and brush application, which makes it perfect for remedial treatment
when you follow all application and use guidelines.
Do not mix Tim-bor® into stains. For borates to be
effective and to provide long-term protection, they must
soak into the wood itself, not remain in the coating.
Although some stains contain borates, the low percent-
age of borate in the stain (generally 2-3%) provides lit-
tle to no appreciable benefit. Follow the Tim-bor® mix-
ing and application guidelines to achieve recommended
BAE (borate acid equivalent) levels that truly provide
long-term, effective protection.
Tim-bor® can be applied by brushing, spraying,
dipping, kerf-flooding or hole flooding. It comes in
powder form and just needs to be mixed with water for
application. Tim-bor® is packaged in two convenient
sizes: 6-gallon pails that are easy to carry and double as
a handy source for mixing the solution and the 1.5 lb.
packet—perfect for smaller jobs.
The active ingredient in Tim-bor® (disodium octaborate tetrahydrate, a refined form of the natural mineral
borax) is less toxic to people and animals than many
other chemicals used for wood preservation. However,
since no pesticide is completely safe, Tim-bor® must be
handled and used as directed. Borates do not affect the
natural color or strength of wood they are completely
odorless they’re not corrosive to metal fasteners, nails
or screws. And when a “Tim-bor® home” is properly
sealed against moisture, the borates can provide many
years of effective protection.
More Protection for Your Money
The best part about Tim-bor® is the money it saves
you. Not only is Tim-bor® affordable, it reduces the
risk of potential log replacement.
According to the most comprehensive study avail-
able, the depth of penetration of Tim-bor® is as deep or
deeper than other borate products that use slow-drying
and toxic solvents (like ethylene glycol) in their formulations. Contact Sashco at 1-800-767-5656 if you’d like
a copy of this study.
The Basics in Applying Tim-bor®
1. Read this entire Data Tec and the container label
before applying Tim-bor®. It is a violation of Federal
law to use this product in a manner inconsistent with
its labeling.
2. Mix Tim-bor® at a rate of 1-pound (1 loosely packed
quart) to 1-gallon of water.
3. Wood must be clean and bare; free of dirt, wax, mill
glaze and surface finishes, and wood surface temperature above 40̊F.
4. Apply Tim-bor® at the rate of 1 mixed gallon per 150
ft2 of wood surface. Apply a second coat 4 to 24 hours
later. Thoroughly soak cut ends, checks and cracks.
5. Coat the logs with a water-repellent finish after the
Tim-bor® solution has thoroughly dried. Use a moisture meter to verify that the log’s moisture content
doesn’t exceed 19%.
Where to Use Tim-bor®
Use Tim-bor® on above-ground wood surfaces,
including logs, timbers, dimensional lumber, siding, etc.
Wood subject to direct moisture contact must be coated
with a good water-repellent finish after treating with
Tim-bor®.
Surface Preparation
Wood surface must be bare: free of dirt, wax, mill
glaze and surface finishes. Remove all previous coat-
ings by media blasting, sanding, chemical stripping and/
or power washing. Surface discoloration from mold
or mildew should be treated with Sashco’s CPR® Log
Cleaner & Brightener before applying Timbor®. Read
“Keeping the Dream Alive,” Sashco’s complete staining guide, for more detailed instructions on this and the
finishing process.
Do not apply to frozen wood. Log (not air) temperature must be between 40̊F and 90̊F. It is best to apply
Tim-bor® to dry wood.
Mixing Tim-bor®
Mix at the rate of one pound, or loosely packed quart,
to one gallon of water. The Tim-bor® mixture requires
only mild stirring before application. The mixture will
be clear and water thin.
With this mixture, all application methods described
herein will yield a minimum retention level of 0.24
pounds per cubic foot boric acid equivalent to 1/2”.
Methods of Application
Tim-bor® may be applied by brushing, spraying
(with a garden sprayer), dipping, kerf-flooding or hole
flooding. Full immersion dipping yields the deepest and
most complete protection, especially with large logs.
Kerf-flooding accompanied with brushing or spraying,
yields nearly the same level of protection as dipping.
Brushing and spraying can completely penetrate dimensional lumber and can provide excellent “shell” protection for timbers and logs to a depth of 1/8” to 1/2” —
which is adequate for most applications.
NOTE: Diffusion of Tim-bor® into the wood begins
immediately and requires several days for completion.
With “shell” protection in large logs or timber, pre-existing insect larva may not be killed. Upon maturing,
they may emerge from the wood. Insects must ingest
the substance to be killed. Tim-bor® is not a contact
killer. Further insect infestations, however, will be prevented.
Brushing or Spraying
Apply Tim-bor® at a rate of 1 mixed gallon per 150
ft2 of wood surface. Apply a second coat 4 to 24 hours
later. Thoroughly soak cut ends and apply to checks and
cracks.
Kerf-Flooding,
Hole Flooding,
and Spraying/
Brushing
Logs 9” in diameter
and larger are often kerfed to control unwanted
checking. When kerfing
a log in the shape of a trough (with 3/8” wide chain saw
to a depth of 3”), simply pour the Tim-bor® solution
into the kerf. Fill the kerf at a rate of 15 to 20 lineal feet
per mixed gallon. Let soak. It will take 1 to 2 days for
the logs to absorb all the liquid.
Protection may also be
gained by pouring powdered
Tim-bor® into the kerf (0.2
to 0.3 pounds per lineal foot).
Pour water into the kerf to
dissolve and carry the Tim-bor® into the wood.
Brush or spray the exterior
of the logs with more Tim-bor® after either of these
methods as described above.
NOTE: Be sure the kerf or
holes do not affect the structural strength of the log.
HINT: Runoff from vertical walls may be contained
by using plastic sheeting to form an accumulation
basin. The trapped liquid may then be recycled and will
be prevented from injuring nearby foliage.
Dipping
Dip logs or lumber in Tim-bor® for 6 to 10 minutes, depending on log diameter. Let excess liquid
drain back into the tank, dip again 24 hours later. Cover
wood with a tarp or place in a shed for at least 48 hours
prior to coating with a good exterior finish.
After Applying Tim-bor®
Treated wood must be protected from direct contact
with moisture or the active ingredient may leach out.
It’s best to wait at least 48 hours (in warm, dry weather;
longer in cool, humid weather) after applying Tim-bor®
to coat wood with a water-repellent finish. Let the surface thoroughly dry and brush away any crystals that
appear before staining. Use a moisture meter to verify
that the logs’ moisture content doesn’t exceed 19%.
Clean Up
Use soap and water to clean equipment, skin and
clothing.
Please download the Tim-bor®
full info sheet for details on:
• Storage and Disposal
• First Aid
• Enviromental Hazards
• Warranty
www.sashco.com/timbor-sds-info
Questions on maintaining the legacy of your wood structure? Give us a call- 1-800-359-6614
Schroeder Log Home Supply, Inc.
1101 SE 7th Avenue
Grand Rapids MN 55744
On February 15 we hosted our third annual Demo Day with
Sashco’s Grizzly Bob. This has been a recurring opportunity for
contractors to spend a day continuing their education on log care.
In addition to giving product demos and instruction on how to
use Sashco’s log finishing products, Bob also shared his wealth of
knowledge on proper log home finishing and restoration practices.
We are fully stocked with Sashco’s log products line and appreciate
the partnership of education and experience Bob brings to share
with our area contractors.
For more extensive training, Sashco offers the Zero Failures training at
their headquarters in Colorado. Interested contractors can contact us
for more information on dates and sponsorship opportunity.
Questions on continuing your contractor education? Give us a call- 1-800-359-6614
Schroeder Log Home Supply, Inc.
1101 SE 7th Avenue
Grand Rapids MN 55744
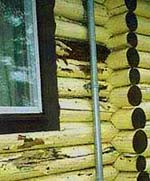
This log house was originally coated with house paint instead of a Log Home Finish.
You can see where the house logs have cracked or "checked" leaving open
cracks in the paint for rain water to penetrate into the wood causing
further log rot. The density of the paint coating acts like a plastic
sheeting that traps in moisture causing blisters and flaking paint. In
winter when the logs freeze, the trapped moisture expands by becoming
ice particles. This causes more subsurface damage making tiny cracks
larger and allowing more space for water to penetrate farther into the
log causing more damage. In the photograph, the dark area behind the
pipe is totally rotted.
In a situation like this all of the paint needs to be
removed with either a chemical stripper or blasted with media (glass is most common now). The
next step would be to cut out the rotted areas of wood and use Tim-bor or Boracol to saturate the logs and keep them from rotting any further. If the rotted areas are relatively shallow, LiquidWood can be used to seal cracks and create an undercoating for the WoodEpox
to adhere to. Next, apply the WoodEpox and form it so that it conforms
to the rest of the log. Dry pigment can be added to WoodEpox to color it
(especially if you will be coating with a stain). Allow to dry
thoroughly, then apply a new finish.
If large portions of the logs are rotted away, you will
either have to replace portions of the log with half-log inserts or
replace the entire log. You may need the services of a professional log
home restoration contractor.
Questions on maintaining the legacy of your wood structure? Give us a call- 1-800-359-6614
Schroeder Log Home Supply, Inc.
1101 SE 7th Avenue
Grand Rapids MN 55744
Preventing log rot is as easy as keeping moisture out of the wood. Unfortunately, sometimes what is relatively easy goes unnoticed and time goes by until water has done its damage. Anything from upward facing cracks to leaky gutters to absence of gutters altogether can drive water into the wood and feed a situation of decay. Prevention is key, but if it's too late for that, here is a snap shot on how to repair rotten wood on your log home.
1. First survey the damage. If the log rot is extensive where full or partial log replacement is required, then you may want to call in a log home restoration professional if you're own carpentry skills are lacking. At Schroeder Log Home Supply we don't do the restoration work ourselves, but we have a collection of contractors listed in our system and we can put you in touch with them. Give us a call at 1-800-359-6614.
2. If the log rot is manageable, remove all wood that is decayed soft beyond the point of salvaging. i.e. If you can scoop it out by hand, get rid of it!
3. Drill small holes in the decayed area (1/8" or so) to perforate the wood and allow for better penetration of preservative and hardener.
4. Apply a borate wood preservative, such as PeneTreat, ArmorGuard, or ShellGuard RTU to kill the rot, and allow the wood to dry out. Brush and spray into the holes and throughout the decayed area. 5. Mix and apply a two-part epoxy wood hardener like LiquidWood or M-Balm. Inject into the holes and cracks and brush throughout decayed area.
6. Mix and apply a two-part epoxy wood filler like WoodEpox or E-Wood. Mix together the two parts, and add pigment to more closely match the surrounding wood. (although the epoxy filler will accept stain, its lighter color may show up contrasted against the rest of the log when using a semi-transparent stain). While still pliable, a brush or sharp tool may be used to etch in lines to mimic the surrounding wood grain.
7. After it's cured, the epoxy wood fillers can be sanded and painted or stained like wood. Finally, make sure that whatever issue caused water to flow into the wood in the first place is solved.
The restoration snapshot above is for informational purposes, but actually procedure required may vary by situation. Call us at 1-800-359-6614 with any questions or concerns or to find a local restoration contractor.
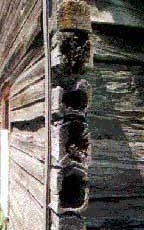 For restoring log ends like the ones pictured and maintaining the natural gray patina of the logs.
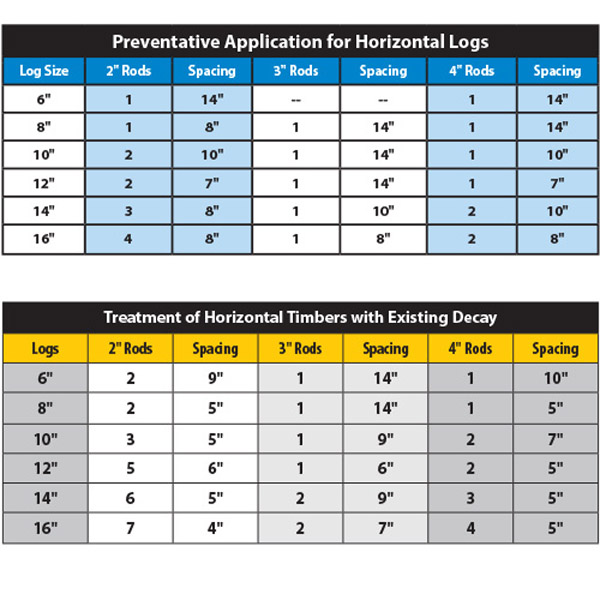


 This log house was originally coated with house paint instead of a
