You chose rugged, rustic logs and
timbers to create your perfect home-
stead. Now, use
Log Jam® to protect
it for years to come. Log Jam® is the
industry standard in synthetic chinking. Unlike old-time mortar or other
synthetic chinking, it holds tough
year after year. Its superior elasticity
means it moves with your logs with-
out cracking to seal your log cabin
from vermin, pollen, dust, rain and
wind alike. You get the rustic look
of old-time mortar without compromising modern-day comfort and energy efficiency. Keep
the cozy feel and rustic look of big timbers without compromise. Seal your logs with Log Jam®.
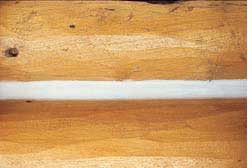
• Rustic look without the rustic application: The textured
formula is easy to apply, even for a novice, for a Daniel
Boone-approved mortar look.
• Keeps the weather where it belongs - outside: Moves
with your logs to create a permanently waterproof and
weatherproof seal.
• Helps you avoid repeated repairs: Just say no to crumbly mortar or cracked chinking. Stays soft and elastic over
time for a long-lasting seal.
• Easy to clean up: Easy to smooth and clean-up with
water.
• No special chemicals required
• OK to leave in your unheated garage overnight: Stable
through 5 freeze-thaw cycles.
Fundamental Chinking
Application Guidelines
Proper substrate preparation and application are
imperative for product longevity. Read this instruction
sheet before applying any product.
1. Best results are obtained when Log Jam® is applied to
clean, dry, stained wood. Make certain there is compatibility between your stain and Log Jam®. Log Jam®
has a lifetime warranty when applied with Sashco’s
stains: Capture Log Stain® / Cascade® staining system,
Transformation Stain® Log & Timber and Symphony®Interior Clear Coat. If using a different stain or finish,
contact Sashco for guidance. Call 800-767-5656, or visit
and chat live at www.sashco.com.
2. Check the weather forecast. Finishing products are best
applied in moderate weather conditions, i.e., out of
direct sunlight, in dry, warm conditions.
3. Check the log surface temperature. The surface temperature should be between 40˚-90˚F (4˚-32˚C).
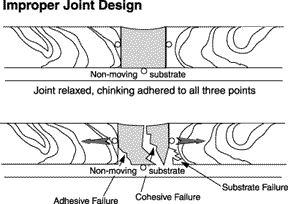
4. Install a bond breaker before Log Jam® is applied.
Backer rod, Grip Strip, and clear packing tape all perform this function well. If Log Jam® is applied over
white styrene bead-board or Tyvek™ house wrap, it is
best to cover the bead-board or wrinkle-free house wrap
with clear packing tape (to prevent adhesion to those
materials). We do not recommend the use of blue or
pink extruded polystyrene board as a bond breaker.
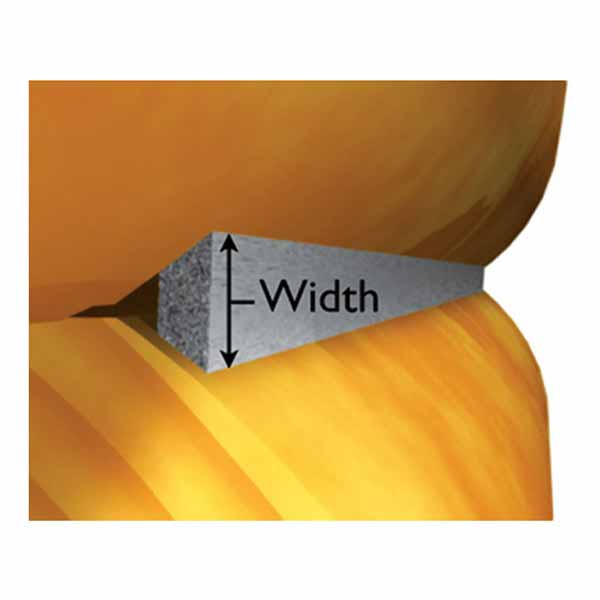
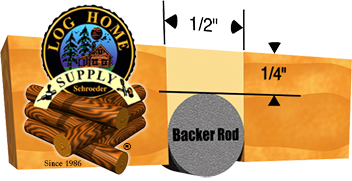
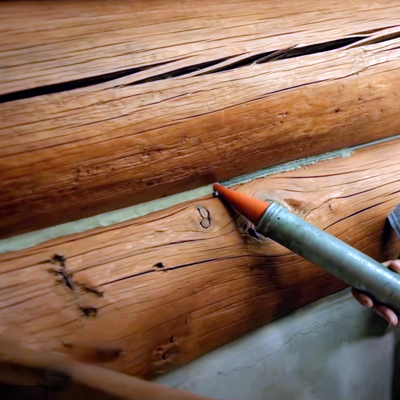
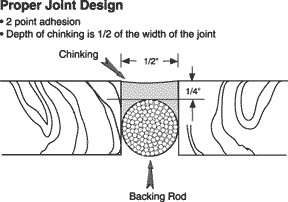
5. Gun the chinking over the backing material. Ideal seal-
ant depth is half of the joint width, but no less
than 1/4”, nor more than 1/2”.
6. Tool Log Jam® to ensure good contact with the log
surfaces, especially to the upper log; this will greatly aid
adhesion.
7. All chinking products may occasionally “blister”.
To avoid blistering:
• Do not apply in direct sunlight.
• Protect fresh chinking from direct sunlight for 1-2
days after application with white plastic sheeting
tacked over it.
• For detailed information, read Sashco’s Savvy
Bulletin, “Preventing Blisters”.
Application
Surface Preparation
Best results are obtained when Log Jam® is applied to
wood that has been previously coated with a compatible
and thoroughly cured stain.
Clean the log surfaces thoroughly to remove dirt, pollen, bird droppings and other surface contaminants.
The USDA Forest Products Laboratory and other
researchers around the world have reported that surface
wood exposed to sunlight for as little as 1-2 weeks can
become significantly damaged and unsound, which may
lead to premature adhesive failure of the stains or other
coatings applied to it. It can also hurt Log Jam®’s (or any
chinking’s) adhesion to the surface. Once bare wood has
been properly cleaned and prepped to remove unsound
wood, stain should be applied as soon as possible. Follow
with Log Jam® chinking.
If a stain is applied over Log Jam®, it will be tinted
the stain color, but will be affected differently than the
surrounding wood; therefore, test appearance before wide-
spread use.
A few coatings, especially those high in wax content or
non-drying oils, may interfere with adhesion, whether they
are applied before or after Log Jam®. We advise against
using Log Jam ® with such products. Contact Sashco if you
have questions about your particular product.
Cold Weather Chinking
Log Jam® can be applied in cold weather by following
these instructions:
1. Make sure the log surfaces are above 40˚F (4˚C). Use a surface
thermometer to double-check.
2. Keep the chinking at room temperature until ready to use.
3. Make sure the logs are free of frost.
4. Tent out the walls with clear plastic sheeting and keep them
warm with heaters, then apply chinking.
5. Make sure there is air circulation so moisture doesn’t form on
the logs, causing a washout. Some venting up high will help
with this problem.
6. Leave the tent intact day and night while chinking,
and for 2 to 4 days after chinking is complete.
7. Finally, remove the plastic sheeting.
This should be sufficient to let the Log Jam® skin over and slowly cure. Due to cold temperatures, it will take much longer than normal for the Log Jam® to fully cure, but it will be fine if left undisturbed. Warn people to avoid pushing on for several weeks.
More info can be found on the product info sheet.
Questions on maintaining the legacy of your wood structure? Give us a call- 1-800-359-6614
Pickup in store - or ship to your door -in whichever woods your cabin dwells.
Schroeder Log Home Supply, Inc.
1101 SE 7th Avenue
Grand Rapids MN 55744
1-800-359-6614
 What
is the difference being caulking and chinking? We hear this question
all the time. They are somewhat interchangeable in application- to
some degree- but there are differences. Modern caulking and chinking
are both flexible sealants that are used to seal log homes.
Historically, chinking and daubbing were a myriad of material put
between the courses of logs to fill the gaps and keep out the
weather. It may have been any combination of mud, manure, straw,
horsehair, moss, or whatever the local environment provided.
Gradually that was replaced with a mortar mixture, often applied over
wire mesh or other hardware to keep it in place as the mortar dried
and cracked. Now we have modern, synthetic log home chinking and
caulking. When properly applied, these elastic sealants will stretch
and move with the wood to maintain a bond and keep water, weather,
and pests out of the home and keep the heat inside during winter
months. Following its history, modern chinking is a textured sealant
that simulates mortar but stretches like caulking and is most often
put over a backer rod between the logs. Caulking can also be used to
seal the lateral joints of logs when a subtle, non-chinked style is
needed, and it’s also used with backer rod to keep water out of log
checks and to seal all other gaps around doors, windows, and other
spaces.
What
is the difference being caulking and chinking? We hear this question
all the time. They are somewhat interchangeable in application- to
some degree- but there are differences. Modern caulking and chinking
are both flexible sealants that are used to seal log homes.
Historically, chinking and daubbing were a myriad of material put
between the courses of logs to fill the gaps and keep out the
weather. It may have been any combination of mud, manure, straw,
horsehair, moss, or whatever the local environment provided.
Gradually that was replaced with a mortar mixture, often applied over
wire mesh or other hardware to keep it in place as the mortar dried
and cracked. Now we have modern, synthetic log home chinking and
caulking. When properly applied, these elastic sealants will stretch
and move with the wood to maintain a bond and keep water, weather,
and pests out of the home and keep the heat inside during winter
months. Following its history, modern chinking is a textured sealant
that simulates mortar but stretches like caulking and is most often
put over a backer rod between the logs. Caulking can also be used to
seal the lateral joints of logs when a subtle, non-chinked style is
needed, and it’s also used with backer rod to keep water out of log
checks and to seal all other gaps around doors, windows, and other
spaces.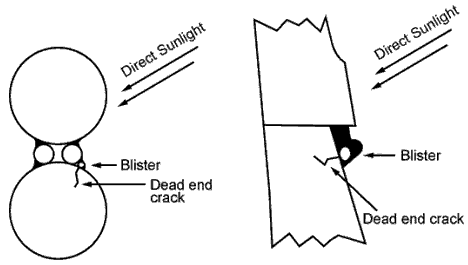
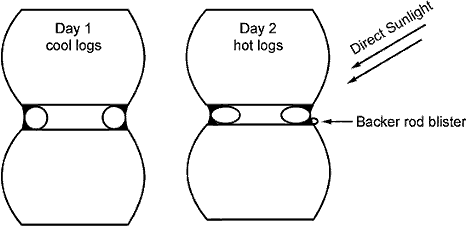
 Pitch Pockets
Logs often have what is termed "pitch pockets." These are areas of
concentrated pitch, or sap, sometimes containing several gallons! (Pitch
pockets of 50 or more gallons are known!) This sap (or its vapor) will
follow cracks in logs, coming out of the log almost anywhere. It
especially exits at the knots Where the sap flow was directed during the
life of the tree. Sap has a volatile component and, when heated, forms a
gas that causes blisters. Some blisters appear to be in the dead center
of the chinking/ caulking. Upon close investigation, however, most or
all of the bubbles are connected to a crack in the log surface. The
blisters are often the result of sap vapor, which can come through the
tiniest of holes in the wood. Pitch pockets are often the cause of
blisters, which line up in a straight row. They are simply aligned with
the crack in the log along which the sap is traveling. In the heat of
direct sunlight some of the liquid sap in the pitch pocket turns into a
gas that is under pressure and can form a blister as it tries to escape
the log.
Pitch Pockets
Logs often have what is termed "pitch pockets." These are areas of
concentrated pitch, or sap, sometimes containing several gallons! (Pitch
pockets of 50 or more gallons are known!) This sap (or its vapor) will
follow cracks in logs, coming out of the log almost anywhere. It
especially exits at the knots Where the sap flow was directed during the
life of the tree. Sap has a volatile component and, when heated, forms a
gas that causes blisters. Some blisters appear to be in the dead center
of the chinking/ caulking. Upon close investigation, however, most or
all of the bubbles are connected to a crack in the log surface. The
blisters are often the result of sap vapor, which can come through the
tiniest of holes in the wood. Pitch pockets are often the cause of
blisters, which line up in a straight row. They are simply aligned with
the crack in the log along which the sap is traveling. In the heat of
direct sunlight some of the liquid sap in the pitch pocket turns into a
gas that is under pressure and can form a blister as it tries to escape
the log.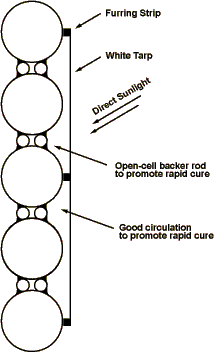
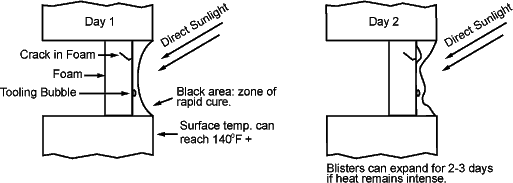
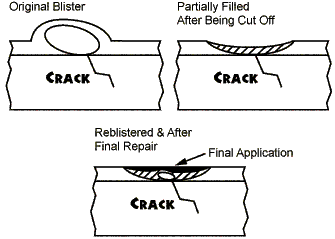 A
fresh blister can sometimes be eliminated by puncturing the surface
skin (to let the moisture vapor escape) and pushing the chinking and
caulking back into place. This step can cause marring of the chinking
finish, but can be smoothed out 2-3 days later (after the chinking has
firmed up) with a small amount of Log Jam applied and smoothed. Often
the blister will not reappear. To be effective, this action must be
taken within the first day after application, while the underlying
chinking and caulking is still wet This method can be the most effective
and efficient since the blisters are caught very early (before they
become very large) and repaired quickly.
A
fresh blister can sometimes be eliminated by puncturing the surface
skin (to let the moisture vapor escape) and pushing the chinking and
caulking back into place. This step can cause marring of the chinking
finish, but can be smoothed out 2-3 days later (after the chinking has
firmed up) with a small amount of Log Jam applied and smoothed. Often
the blister will not reappear. To be effective, this action must be
taken within the first day after application, while the underlying
chinking and caulking is still wet This method can be the most effective
and efficient since the blisters are caught very early (before they
become very large) and repaired quickly.


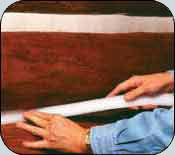
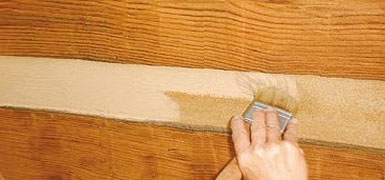
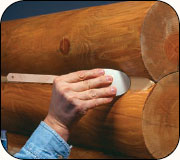 Tooling
There are as many tooling implements out there as there are chinkers! I
prefer the polyethylene foam brushes available in any hardware store or
lumber yard but I have seen folks tool with rubber spatulas, paint
brushes, putty knives, trowels, and even metal spatulas cut down with
wire cutters to the desired width. The secret is finding the tool that
works best for you. You will also need a pail of clean water, a sponge,
and a spray bottle filled with clean water. To speed up the tooling
process, have several foam brushes on hand. As soon as one picks up too
much chinking and starts to drag instead of gliding over the surface,
throw it into the water pail and continue on with a clean brush. A
mixture of 1 part denatured alcohol to 2 parts water can be used for
misting chinking when the temperature is over 70°. If you are working in
the sun and the chinking is skinning over too quickly, straight alcohol
can be used. When the temperature is lower than 70° the alcohol is not
necessary.
Tooling
There are as many tooling implements out there as there are chinkers! I
prefer the polyethylene foam brushes available in any hardware store or
lumber yard but I have seen folks tool with rubber spatulas, paint
brushes, putty knives, trowels, and even metal spatulas cut down with
wire cutters to the desired width. The secret is finding the tool that
works best for you. You will also need a pail of clean water, a sponge,
and a spray bottle filled with clean water. To speed up the tooling
process, have several foam brushes on hand. As soon as one picks up too
much chinking and starts to drag instead of gliding over the surface,
throw it into the water pail and continue on with a clean brush. A
mixture of 1 part denatured alcohol to 2 parts water can be used for
misting chinking when the temperature is over 70°. If you are working in
the sun and the chinking is skinning over too quickly, straight alcohol
can be used. When the temperature is lower than 70° the alcohol is not
necessary.