Can I stain before caulking or chinking?
When applying water-based caulk and chinking like Conceal, Energy Seal, Log Builder caulking, Log Jam chinking, or Perma-Chink, and using a water based stain, it may be applied before of after staining. If using oil-based finishes like NatureColor Base or Recoater, Woodguard, or WR-5:
1. Apply caulk or chinking over one coat, and then apply a second coat of finish the following year.
2.
Wait at least 21 days after staining before caulking or chinking to
allow for cure time. (Paraffinic oils like in X-100 can cause adhesion
failures.)
Do I need backer rod?
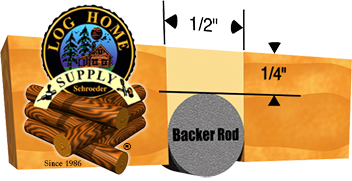
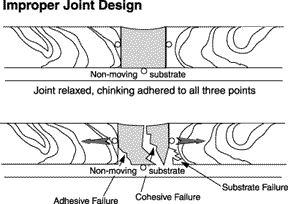
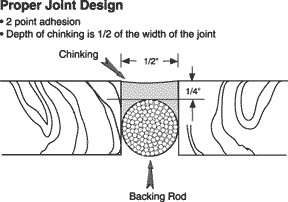
Yes, if chink joints are greater than 1/4". See Backer Rod and Chinking.
What does the temperature need to be to apply caulk or chinking?
See "Surface Preparation".
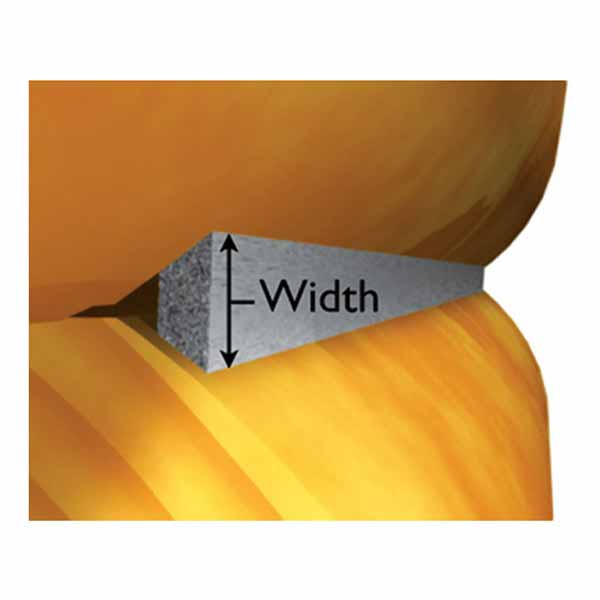
What can I use to smooth out my caulking or chinking?
People
use various kinds of "tooling" devices. The most popular would probably
be a spatula of some sort at the desired width. Some people use a cake
spatula if an industrial one is not available. Butter knives, rubber
spatulas, and foam brushes have also been used.
How do I prevent blisters from forming in log home caulk and chinking?
Click here for details.
I have flat on flat logs, what do I put between them?
There are a couple of alternatives to put in between logs for a flat on flat system:
1. The first is to lay a bead of adhesive caulking on each side of the log; see Conceal or Woodsman Caulking.
2. The other alternative is a product called LogSeal.
Some of the features of LogSeal are sealing against water, cold, heat,
light and noise. LogSeal has adhesive on one side with an easy-release
protective liner, providing fast and easy placement during construction.
LogSeal provides easy application for flat on flat and saddle notch
systems. When using for flat on flat construction, lay one line of
LogSeal on the outer edge and one line on the inner edge.
Do I need to caulk after using LogSeal?
Yes. It
is always important to seal the exterior side with log home caulk or
chinking to keep moisture (in the form of rain or splash-back) out from
the log joints. The log caulking also helps to keep insects from working
their way in.
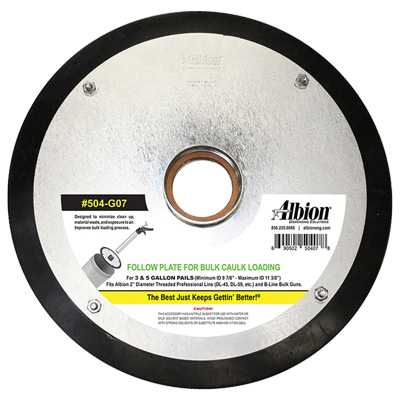
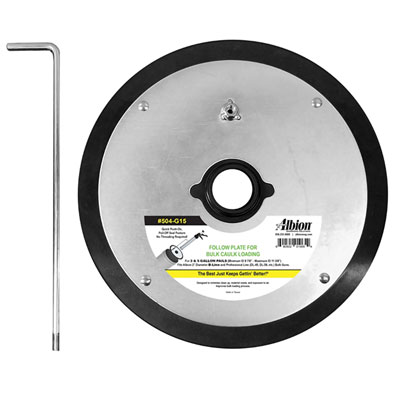
Should I buy a 5-gallon pail or tubes?
Economically,
it is better to buy a 5-gallon pail; however you don't start saving
money until you purchase two 5-gallon pails because of the cost of tools
for pail application. A 5-gallon pail is equivalent to twenty-two 29
oz. tubes. It will also depend on what the you feel comfortable with,
caulking tubes or a bulk loading gun.
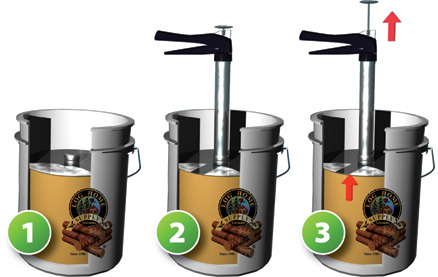
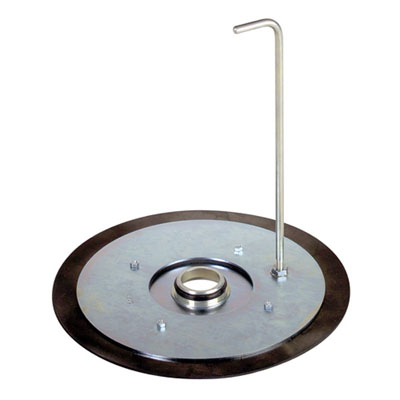
If I buy a 5-gallon pail, how do I get it into my caulk gun?
By using a Follow Plate.
How do I clean and take care of my Albion bulk loading gun?
See "Care of Albion Bulk Loading Guns".
How to Prevent Blisters in Caulk and Chinking
Occasionally,
blistering of a chinked or caulked surface occurs. A chinked area is
more susceptible to blistering due to the larger joint size. After
several years of investigation, Sashco Sealants has uncovered most or
all of the causes* of this problem and can recommend ways to prevent
it.* At first it was thought that the chinking itself was to blame. But
the facts do not support this. For example:
- The same batch of product has blistered on one log and not on another.
- It is common to find blisters on one side of a house and not the other.
- Blisters occur above a certain point on a wall and not below it.
- Some blisters appear to be random on a chinking line and others are in a straight row.
- Blisters often reappear in the same place when repaired with the same batch of chinking or even with a different batch.
The Causes are Site related and not product or batch related.
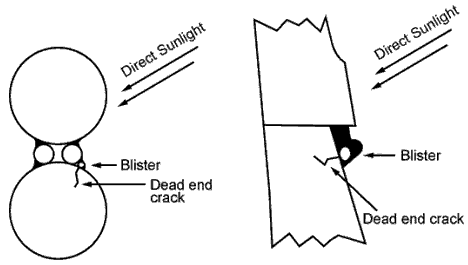
Causes of Blisters: The basic cause of any blister
is a build-up of gas between the log, the backing surface, and the
chinking or caulking. It occurs during The early curing stages when The
chinking is soft but has a skin formed on the surface. Heat usually in
the form of direct sunlight causes the gas to expand. As the gas
expands, it pushes the chinking out, causing a "bubble" or blister. This
gas comes from water, wood sap, or even backing material.
What Circumstances Create the Gas? Trapped Water Vapor.
As chinking and caulking dries, it gives off water vapor. Any physical
condition which traps the resulting water vapor could cause a blister,
especially if the logs and chinking are heated by direct sunlight here
are some things that could trap this vapor.
- Cracks or indentations in foam or polyethylene backer rod which
doesn't go all the way through. Even tiny spaces can trap enough vapor
to create a blister big enough to see.
- Air bubble trapped during the application process against non-porous backer material.
- Dead-end crack in wood where moisture vapor can accumulate and
expand when heated. (This, most likely, is the most wide-spread cause.)
Note Manus-Bond Caulking
is not affected by water vapor in the same as other caulking or
chinking because it is a polyurethane. Moisture makes it set up faster
and will not generally cause blistering.
.
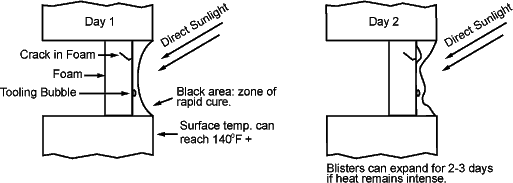
Backing Material Backer rod out-gassing. Closed cell
backer rod has a puncture and is squeezed by expanding logs. The gas
used to make the rod forces a blister in the chinking and caulking.
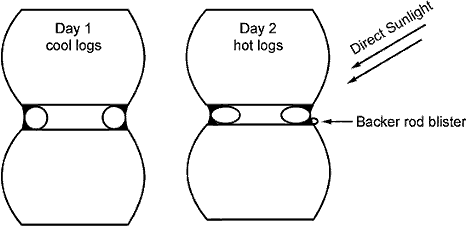
On
Day 1 the backer rod and sealant are applied in the cool part of the
day. On Day 2 the sun comes out and heats the logs. This causes the
backer rod to be squeezed, and forces a small amount of gas in the
backer rod to leave the rod at a rupture or weak spot and make a blister
in the sealant. The phenomenon has been known to occur in the caulk and
sealant industry for many years and occurs randomly and unpredictably.
 Pitch Pockets
Logs often have what is termed "pitch pockets." These are areas of
concentrated pitch, or sap, sometimes containing several gallons! (Pitch
pockets of 50 or more gallons are known!) This sap (or its vapor) will
follow cracks in logs, coming out of the log almost anywhere. It
especially exits at the knots Where the sap flow was directed during the
life of the tree. Sap has a volatile component and, when heated, forms a
gas that causes blisters. Some blisters appear to be in the dead center
of the chinking/ caulking. Upon close investigation, however, most or
all of the bubbles are connected to a crack in the log surface. The
blisters are often the result of sap vapor, which can come through the
tiniest of holes in the wood. Pitch pockets are often the cause of
blisters, which line up in a straight row. They are simply aligned with
the crack in the log along which the sap is traveling. In the heat of
direct sunlight some of the liquid sap in the pitch pocket turns into a
gas that is under pressure and can form a blister as it tries to escape
the log.
Pitch Pockets
Logs often have what is termed "pitch pockets." These are areas of
concentrated pitch, or sap, sometimes containing several gallons! (Pitch
pockets of 50 or more gallons are known!) This sap (or its vapor) will
follow cracks in logs, coming out of the log almost anywhere. It
especially exits at the knots Where the sap flow was directed during the
life of the tree. Sap has a volatile component and, when heated, forms a
gas that causes blisters. Some blisters appear to be in the dead center
of the chinking/ caulking. Upon close investigation, however, most or
all of the bubbles are connected to a crack in the log surface. The
blisters are often the result of sap vapor, which can come through the
tiniest of holes in the wood. Pitch pockets are often the cause of
blisters, which line up in a straight row. They are simply aligned with
the crack in the log along which the sap is traveling. In the heat of
direct sunlight some of the liquid sap in the pitch pocket turns into a
gas that is under pressure and can form a blister as it tries to escape
the log.
Prevention of Blisters Some of these causes cannot
be controlled. Two factors can be partially controlled - heat and backer
rod selection/preparation. Since heat normally is responsible for
turning undetected gas into unsightly blisters, it makes sense to
control this element as much as possible. Once the chinking and caulking
has become firm, it can then resist the low pressure from the water or
sap vapor and the blisters can then be prevented.
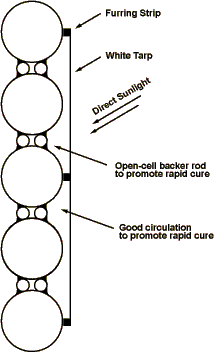
Control the Heat:
- Chink or caulk on the shady, cool side.
- Protect walls from direct sunlight for a few days by covering with a
light colored tarp, cloth or plastic. Leave plenty of room for
ventilation. It is important to cover the logs as well as the chinking
and caulking so the entire surface will stay cool.
- Stain logs first. This can help to close some pitch pocket holes before chinking and caulking.
- Although rare, it is possible for excessive heat to build up inside a
log home during the early curing stage and cause blisters. If this
could occur, make sure windows and doors are left open to allow cool air
to ventilate the interior.
Control the Backing Material:
- Use blunt tools to install closed cell backing materials, being careful to avoid puncturing or denting.
- Open cell backer rod** may be used in place of closed cell backer
rod. These backer rods will not generate gas and they can help dissipate
any gas originating from another source. **The weakness of this type of
backer rod is that it is more susceptible to absorbing moisture if the
chinking or caulking is ruptured and driving rain is forced through to
the backer rod.
- When chinking and caulking over flat insulation (styrofoam, bead
board or foil-faced foam board), surface cracks, holes, or dents should
be covered with a high quality sticky mylar tape, 2" wide preferably.
(The tape will tend to prevent as much as 80% of the blisters that would
otherwise form.) Extruded styrene foam (such as Dow Chemical's blue
"Styrofoam") has a greater tendency to cause blisters than white bead
board or foil-faced urethane foam.
 A
fresh blister can sometimes be eliminated by puncturing the surface
skin (to let the moisture vapor escape) and pushing the chinking and
caulking back into place. This step can cause marring of the chinking
finish, but can be smoothed out 2-3 days later (after the chinking has
firmed up) with a small amount of Log Jam applied and smoothed. Often
the blister will not reappear. To be effective, this action must be
taken within the first day after application, while the underlying
chinking and caulking is still wet This method can be the most effective
and efficient since the blisters are caught very early (before they
become very large) and repaired quickly.
A
fresh blister can sometimes be eliminated by puncturing the surface
skin (to let the moisture vapor escape) and pushing the chinking and
caulking back into place. This step can cause marring of the chinking
finish, but can be smoothed out 2-3 days later (after the chinking has
firmed up) with a small amount of Log Jam applied and smoothed. Often
the blister will not reappear. To be effective, this action must be
taken within the first day after application, while the underlying
chinking and caulking is still wet This method can be the most effective
and efficient since the blisters are caught very early (before they
become very large) and repaired quickly.
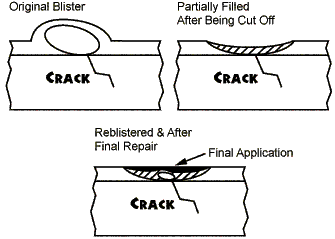
- More thoroughly cured blisters must be cut off flush and the cavity
filled approximately one-fourth to one-half full and allowed to dry. If
the cause of the original blister is still present, then it will push
the fresh chinking and caulking out into a shallow blister below the
surface of the surrounding chinking/ caulking. This may be allowed to
dry and a second application, blending with the surrounding chinking,
will complete the repair. (See the drawings.)
- If you can cover a crack or hole with mylar tape, only one repair
step is needed. Chinking and caulking can be installed flush with the
surrounding material.
Subscribe To Our Log Core Newsletter
Questions on maintaining the legacy of your wood structure? Give us a call- 1-800-359-6614
Pickup in store - or ship to your door -in whichever woods your cabin dwells.
Schroeder Log Home Supply, Inc.
1101 SE 7th Avenue
Grand Rapids MN 55744
1-800-359-6614
 What
is the difference being caulking and chinking? We hear this question
all the time. They are somewhat interchangeable in application- to
some degree- but there are differences. Modern caulking and chinking
are both flexible sealants that are used to seal log homes.
Historically, chinking and daubbing were a myriad of material put
between the courses of logs to fill the gaps and keep out the
weather. It may have been any combination of mud, manure, straw,
horsehair, moss, or whatever the local environment provided.
Gradually that was replaced with a mortar mixture, often applied over
wire mesh or other hardware to keep it in place as the mortar dried
and cracked. Now we have modern, synthetic log home chinking and
caulking. When properly applied, these elastic sealants will stretch
and move with the wood to maintain a bond and keep water, weather,
and pests out of the home and keep the heat inside during winter
months. Following its history, modern chinking is a textured sealant
that simulates mortar but stretches like caulking and is most often
put over a backer rod between the logs. Caulking can also be used to
seal the lateral joints of logs when a subtle, non-chinked style is
needed, and it’s also used with backer rod to keep water out of log
checks and to seal all other gaps around doors, windows, and other
spaces.
What
is the difference being caulking and chinking? We hear this question
all the time. They are somewhat interchangeable in application- to
some degree- but there are differences. Modern caulking and chinking
are both flexible sealants that are used to seal log homes.
Historically, chinking and daubbing were a myriad of material put
between the courses of logs to fill the gaps and keep out the
weather. It may have been any combination of mud, manure, straw,
horsehair, moss, or whatever the local environment provided.
Gradually that was replaced with a mortar mixture, often applied over
wire mesh or other hardware to keep it in place as the mortar dried
and cracked. Now we have modern, synthetic log home chinking and
caulking. When properly applied, these elastic sealants will stretch
and move with the wood to maintain a bond and keep water, weather,
and pests out of the home and keep the heat inside during winter
months. Following its history, modern chinking is a textured sealant
that simulates mortar but stretches like caulking and is most often
put over a backer rod between the logs. Caulking can also be used to
seal the lateral joints of logs when a subtle, non-chinked style is
needed, and it’s also used with backer rod to keep water out of log
checks and to seal all other gaps around doors, windows, and other
spaces.


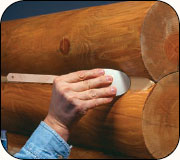 Tooling
There are as many tooling implements out there as there are chinkers! I
prefer the polyethylene foam brushes available in any hardware store or
lumber yard but I have seen folks tool with rubber spatulas, paint
brushes, putty knives, trowels, and even metal spatulas cut down with
wire cutters to the desired width. The secret is finding the tool that
works best for you. You will also need a pail of clean water, a sponge,
and a spray bottle filled with clean water. To speed up the tooling
process, have several foam brushes on hand. As soon as one picks up too
much chinking and starts to drag instead of gliding over the surface,
throw it into the water pail and continue on with a clean brush. A
mixture of 1 part denatured alcohol to 2 parts water can be used for
misting chinking when the temperature is over 70°. If you are working in
the sun and the chinking is skinning over too quickly, straight alcohol
can be used. When the temperature is lower than 70° the alcohol is not
necessary.
Tooling
There are as many tooling implements out there as there are chinkers! I
prefer the polyethylene foam brushes available in any hardware store or
lumber yard but I have seen folks tool with rubber spatulas, paint
brushes, putty knives, trowels, and even metal spatulas cut down with
wire cutters to the desired width. The secret is finding the tool that
works best for you. You will also need a pail of clean water, a sponge,
and a spray bottle filled with clean water. To speed up the tooling
process, have several foam brushes on hand. As soon as one picks up too
much chinking and starts to drag instead of gliding over the surface,
throw it into the water pail and continue on with a clean brush. A
mixture of 1 part denatured alcohol to 2 parts water can be used for
misting chinking when the temperature is over 70°. If you are working in
the sun and the chinking is skinning over too quickly, straight alcohol
can be used. When the temperature is lower than 70° the alcohol is not
necessary.


