Everyone
knows that color is king on a log home stain job, but pleasing the king
can be difficult! Wood porosity differences lead to blotchy, uneven
results when staining. UV damage causes the wood to yellow your stain or
interior clear coat. That once-perfect color is lost. That’s why you
need Sashco’s Colorfast. Colorfast strengthens the glue that binds the
wood cells together, called lignin, preventing yellowing of the
underlying wood cells to help maintain a consistent color year after
year. Before staining, Colorfast evens out wood porosity, creating a
smoother surface for stain application and preventing over-absorption
and a too-dark color. After staining, the lignin stabilizers prevent the
wood underneath from getting sunburned, leaving the stain or clear coat
applied on top looking the same year after year. It’s color confidence
for your log home. Color: Goes on milky white. Dries clear.
Why use Colorfast™?
• Keeps the color the color: Lignin (wood cell glue) stabilizers prevent yellowing and darkening of the wood itself overtime, which in turn prevent color shifts in the stain applied over top. Light colors stay light and darker colors don’t shift too dark.
• Reduces blotchiness: Fills pores for a smoother surface and more even stain application. Great for blasted, rough-sawn, knotty pine, or milled logs.
• Prevents picture-frame effect on interior wood: Apply on bare wood on the interior of the home and under Sashco’s Symphony ® interior clear coat to avoid yellowing around wall décor.
• Use under any Sashco stain: Using oil-based Transformation Log & Timber? Water-based Capture®, Cascade®, or Symphony® ? No problem.
• Easier stain application: Greatly reduces the need to back-
brush the stain applied over top.
• Great as a log keeper coat: Prevents mold and yellowing due to UV damage on new wood as it moves from the mill to the job site and throughout construction. Contains both mildewcide and algaecide to help preserve the wood until it’s time to stain. Or, life happened and you need to wait for a few weeks between prep and staining? No problem.
• Seal those ends: When applied heavily on log ends, prevents over-penetration of stain and log ends that are darker than the rest of the logs.
Application Instructions
Exterior Application Instructions
Proper substrate preparation and product application mean greater longevity, a better color, and better long-term performance. Read this full Colorfast™ Info Sheet before applying any product and call Sashco at 800-767-5656 with any project-specific questions.
1. Make sure it sticks: If you are changing from one stain product to another, contact us first. Colorfast™ will adhere to almost any surface that is properly prepped. Any product already on the wood, and especially those that contains waxes, non-drying oils, or silicones, will interfere with the adhesion and penetration of Colorfast™ and must be removed before the product is applied.
2. Clean the surface: Media blast, power wash, or sand wood surfaces using an Osborn ® brush or 60 to 80 grit sandpaper to remove all previous stains and loose, unsound gray or yellow wood fibers, along with mill glaze, pollen, and other surface contaminants. This creates the best surface for Colorfast™ penetration and stain longevity. If mold or algae is present, apply Sashco’s CPR ® in the brightener strength according to the directions or apply fresh bleach in a 4 parts water to 1 part bleach solution. Allow it to sit no more than 20 minutes, then thoroughly rinse. If necessary, use a chemical remover. (Follow label instructions carefully and ensure wood is back to neutral pH, checking with pH strips.)
3. Remove fuzz: For best appearance, remove felting (wood fuzz) with Osborn® brushes, Sashco’s Buffy Pad system or 60 to 80 grit sandpaper once the wood is dry. Remove all sawdust with a broom, compressed air, or a leaf blower, or rinse with water.
4. Apply preservatives: Apply Tim-bor ® according to directions for protection against wood rot and wood-ingesting insects BEFORE Colorfast™ is applied. Allow wood to dry 1–3 days, until wood is at or below 19% moisture content level. (Use a moisture meter to check!)
5. Timing matters: UV rays from the sun can damage the wood you just worked so hard to prep in as little as 1 week; therefore, Colorfast™ should be applied as soon as possible after wood prep is complete. If cold or rainy weather threaten or delay your staining project, you may apply Colorfast™ and wait up to 8 weeks to apply stain. The mildewcide, algaecide, and lignin stabilizers in Colorfast™ will keep your wood protected during that time. (Score!) Be sure to clean off surface contaminants before staining. If any further sanding prep is needed, remember to reapply Colorfast™ to freshly sanded areas before staining for a consistent finish.
6. Air and surface temperatures matter: Plan to apply Colorfast™ when air and surface temps are between 40°– 90°F (4°– 32°C). Use an infrared thermometer to check surface temps. Temps that are
too hot dry Colorfast™ too quickly, preventing proper penetration. Temps that are too cold will freeze Colorfast™, preventing both proper penetration and proper curing.
7. Don’t get caught out in the rain: While Colorfast™ can be stained over as soon as it’s dry to the touch (usually in 2 hours or less). Full cure takes longer. A heavy rain could wash off both Colorfast™ and any stains applied over top, requiring extensive prep to remove the mess and reapplication of the product. Avoid rain both on the day of application and for a full 24 hours afterwards. You may also plan to cover surfaces if rain is expected.
8. Wood must be dry: Use a moisture meter to make sure wood is at or below 19% moisture content level before applying Colorfast™. Damp wood can prevent Colorfast™ from penetrating properly and also increases the risk of water stains, rot, and peeling stain.
9. Mix it up: Thoroughly mix Colorfast™ with a drill-driven, squirrel-cage type mixer. Scrape any settled material off the bottom of the pail and thoroughly mix it in. Stir Colorfast™ every 15–20 minutes throughout application to ensure all ingredients are always mixed in.
10. Spray it on: Using a large (515+) spray tip on an airless sprayer, apply on one heavy coat of Colorfast™, covering all the wood and inside cracks and checks. If only a brush is used, be sure to drench-apply Colorfast™ to ensure adequate coverage. Don’t skimp. Colorfast™ goes on milky white, but don’t worry: it dries clear.
11. Lightly back-brush: Using a block brush on a pole, lightly brush out Colorfast™ to make sure all the bare wood gets covered, to catch drips, and to coat the insides of every crack and check. Colorfast™ will soak into the wood completely, so don’t worry about foaming. Any areas that remain wet (white) after 10 minutes should be brushed into drier areas.
12. Dry time: Allow Colorfast™ to dry until clear before applying the final stain over it. Often, this is within 2 hours, but check cracks and checks where it may take longer. 13. Apply stain: Once dry, apply two coats of Sashco’s Capture ®, Transformation Log & Timber, or Transformation Siding & Trim. No matter which stain you use, the first coat will go further, will not penetrate as much, will not require vigorous back-brushing, and will be lighter in color than normal. This is OK! It means that Colorfast™ is working as designed.
* Do not apply Colorfast™ to fiber cement, concrete, or other cementitious materials.
Interior Application Instructions:
Interior prep is not as intense: Surfaces must still be clean and free of contaminants and loose wood fibers, but media blasting and power washing aren’t required except in extraordinary circumstances (like the home was flooded or was in a fire). A general rule of thumb on interior wood is to prep the wood the
way you want it to feel when finished. On the interior, smoother wood is best and usually desired.
Spray it: Apply Colorfast™ the same way you would on exterior wood. Be aware that Colorfast™ will go further on smooth, less porous interior wood.
Stain it: Cover Colorfast™ with 1–2 coats of Sashco’s Symphony ® interior clear coat for easier cleaning, to maintain the original bright wood color, and add a beautiful satin or gloss sheen. Colorfast™ is formulated to prevent interior wood from yellowing. Hooray! If a color is desired, apply 1 coat of Sashco’s Capture®, or Transformation Siding & Trim in the color of your choice, followed by 1–2 coats of Symphony ®. Download the Symphony ® application instructions at sashco.com/log-home.
 |
Sashco Colorfast Pre-Stain
|
What’s Really Important
It is well known by painters and stainers everywhere that the single most important factor in the longevity of any staining or painting job is the quality of the prep done beforehand. Clean, sound, warm, dry, and textured wood are the five characteristics of a well-prepped surface. Download Restoring the Dream, Sashco’s complete guide to log home refinishing and maintenance for details on these five factors and other keys to a successful and long-lasting (read: let’s not ever do a restoration like this on our home again) job. Find it at sashco.com/restoration. The second most important factor affecting the longevity of stain is the quantity of stain applied to the wood. Light mist coats will fail quickly, even with the best stains out there. Applying as much Colorfast™ as the wood will accept, while back- brushing and forcing it into the wood, results in dramatically improved performance and longevity of both Colorfast™ and the Sashco stain applied over top. This includes filling any cracks or checks in the wood with stain! The first coat is the only time Colorfast™ can penetrate into the wood. See proper staining in action! Watch the video at http://bit.ly/1BOuB7L
Questions on maintaining the legacy of your wood structure? Give us a call- 1-800-359-6614
Pickup in store - or ship to your door -in whichever woods your cabin dwells.
Schroeder Log Home Supply, Inc.
1101 SE 7th Avenue
Grand Rapids MN 55744
1-800-359-6614

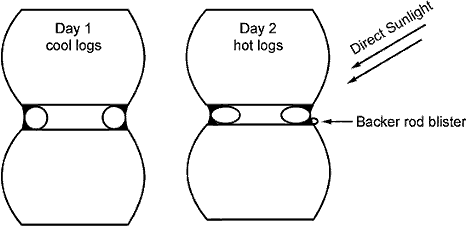
 Pitch Pockets
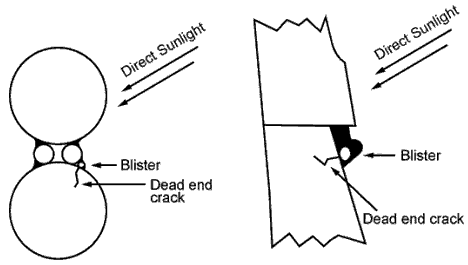
Logs often have what is termed "pitch pockets." These are areas of
concentrated pitch, or sap, sometimes containing several gallons! (Pitch
pockets of 50 or more gallons are known!) This sap (or its vapor) will
follow cracks in logs, coming out of the log almost anywhere. It
especially exits at the knots Where the sap flow was directed during the
life of the tree. Sap has a volatile component and, when heated, forms a
gas that causes blisters. Some blisters appear to be in the dead center
of the chinking/ caulking. Upon close investigation, however, most or
all of the bubbles are connected to a crack in the log surface. The
blisters are often the result of sap vapor, which can come through the
tiniest of holes in the wood. Pitch pockets are often the cause of
blisters, which line up in a straight row. They are simply aligned with
the crack in the log along which the sap is traveling. In the heat of
direct sunlight some of the liquid sap in the pitch pocket turns into a
gas that is under pressure and can form a blister as it tries to escape
the log.
Pitch Pockets
Logs often have what is termed "pitch pockets." These are areas of
concentrated pitch, or sap, sometimes containing several gallons! (Pitch
pockets of 50 or more gallons are known!) This sap (or its vapor) will
follow cracks in logs, coming out of the log almost anywhere. It
especially exits at the knots Where the sap flow was directed during the
life of the tree. Sap has a volatile component and, when heated, forms a
gas that causes blisters. Some blisters appear to be in the dead center
of the chinking/ caulking. Upon close investigation, however, most or
all of the bubbles are connected to a crack in the log surface. The
blisters are often the result of sap vapor, which can come through the
tiniest of holes in the wood. Pitch pockets are often the cause of
blisters, which line up in a straight row. They are simply aligned with
the crack in the log along which the sap is traveling. In the heat of
direct sunlight some of the liquid sap in the pitch pocket turns into a
gas that is under pressure and can form a blister as it tries to escape
the log.
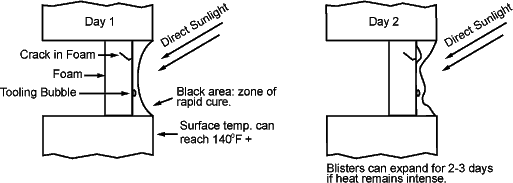
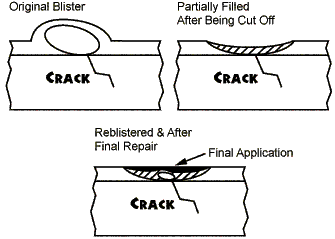 A
fresh blister can sometimes be eliminated by puncturing the surface
skin (to let the moisture vapor escape) and pushing the chinking and
caulking back into place. This step can cause marring of the chinking
finish, but can be smoothed out 2-3 days later (after the chinking has
firmed up) with a small amount of Log Jam applied and smoothed. Often
the blister will not reappear. To be effective, this action must be
taken within the first day after application, while the underlying
chinking and caulking is still wet This method can be the most effective
and efficient since the blisters are caught very early (before they
become very large) and repaired quickly.
A
fresh blister can sometimes be eliminated by puncturing the surface
skin (to let the moisture vapor escape) and pushing the chinking and
caulking back into place. This step can cause marring of the chinking
finish, but can be smoothed out 2-3 days later (after the chinking has
firmed up) with a small amount of Log Jam applied and smoothed. Often
the blister will not reappear. To be effective, this action must be
taken within the first day after application, while the underlying
chinking and caulking is still wet This method can be the most effective
and efficient since the blisters are caught very early (before they
become very large) and repaired quickly.