Thursday, June 27, 2024

Perma-Chink Directions for Use

STEP #1: INSPECTION

If applying to an older home, check for signs of rot and decay. Remove and replace or repair deteriorated wood. Contact any Perma-Chink Systems office for information about wood repairs.
 

STEP #2: SURFACE PREPARATION

All surfaces should be clean, dry and free from oil, dirt or other foreign matter. Use appropriate materials to clean and prepare surfaces. Perma-Chink Log Home Sealant is best applied after the home has been stained. We strongly recommend the use of any LIFELINE™ brand exterior stain and topcoat. If an oil-based stain has been applied, allow it to dry at least two weeks before applying Perma-Chink Log Home Sealant.


STEP #3: BACKING MATERIALS

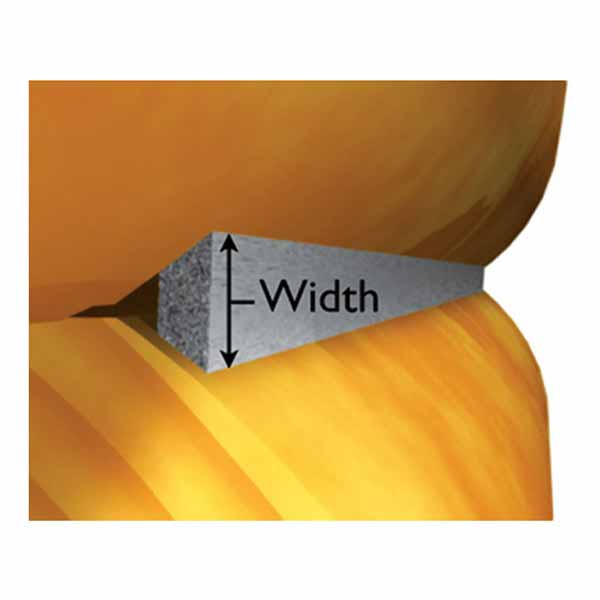
Perma-Chink Log Home Sealant should only be applied over approved substrates. When selecting the width of Grip Strip to use on round logs, the joint width should be approximately 1/6 the diameter of the logs (10” diameter logs; 10” ÷ 6 = 1.67”). Obtain a copy of our “Log Home Sealant Application Guide” from any Perma-Chink Systems location for information about suitable backing materials and substrates.
 

STEP #4: APPLICATION

Do not apply in direct sunlight or when the temperature is less than 40° F. Perma-Chink Log Home Sealant may be applied with a bulk loading caulk gun, grout bag or high volume chink pump. Hold the applicator tip firmly against the back surface and apply. If several beads of chinking are required to fill a gap, place them close together to avoid entrapped air. Apply enough sealant to maintain a wet thickness of
at least 5/16” and no more than ½” across the entire joint after tooling. Only apply as much sealant as you can tool in about 15 minutes. Once the joint is filled, spray with a light mist of water and tool smooth with a trowel or spatula. If the width of the trowel is close to the width of the joint, the smoothing process will be easier. Make sure there is good contact between the Perma-Chink and the exposed edges of the top and bottom logs. If you are a first time applicator, start work on a less visible area until you become familiar with the process.


STEP #5: DRYING AND CURING TIME

Protect freshly applied Perma-Chink from direct rainfall for a minimum of 24 hours. When draping a wall with plastic film, allow some airspace between the wall and the plastic to facilitate drying. Sheets of cardboard may also be use to cover newly applied Perma-Chink to prevent “chinking inspectors” from leaving finger dents in the uncured chinking. Drying time and curing time are two entirely different terms. In warm or hot weather, Perma-Chink will begin to skin over in as little as ten minutes while a complete cure may take three to four weeks. Cooler weather will slow both the drying time and curing process.
 

STEP #6: CLEANUP

Clean area and equipment immediately with warm, soapy water before the Perma-Chink dries. For removing Perma-Chink that has dried, soften with alcohol and then clean with warm water. Please do not pollute our environment. Dispose of containers and unused material in accordance with local, state, and federal regulations.
 

STEP #7: MAINTENANCE

Periodic cleaning with an appropriate cleaner such as Log Wash™ will clean off dust and dirt and accentuate the beauty of your home. We recommend that log walls be washed down at least twice a year. Small rips and tears may be repaired using a bead of Perma-Chink and a damp short bristled brush to blend it in with the surrounding area. Tears greater than one foot long should be cut out and the chinking replaced.
 

STEP #8: STORAGE

Store Perma-Chink out of direct sunlight and protect from freezing. Although Perma-Chink is freeze-thaw stable, if the product is accidentally frozen, allow to thaw, mix well and check for suitability of use before applying. Request a copy of our “Log Home Sealant Application Guide” from any Perma-Chink Systems office for additional information about applying and maintaining Perma-Chink Log Home Sealant.

Questions on maintaining the legacy of your wood structure? Give us a call- 1-800-359-6614
Schroeder Log Home Supply, Inc.
1101 SE 7th Avenue
Grand Rapids MN 55744

www.loghelp.com 

Tuesday, June 25, 2024

Sansin Purity Nature's Oil

Sansin Purity Nature’s Oil: Penetrating oil for timbers, furniture, floors and other interiors. A clear, concentrated, low VOC traditional oil finish. For a natural finish, use Nature’s Oil inside your home. After all, there’s nothing warmer or more inviting than the feeling of hand-rubbed wood. Simply apply and polish this penetrating oil into wood – just one coat delivers a rich, uniform lustre that allows the grain and character of your wood to shine through. Purity Nature’s Oil is environmentally friendly, low in VOC’s, high in solids and non-flammable. A long open time means you can work the finish to create exactly the look you want. A second coat of Nature’s Oil may be applied at any time to maintain a beautiful low luster finish. Sansin Purity Nature’s Oil is a concentrate allowing you to mix it 3:1 with mineral spirits (three parts mineral spirits to one part Nature’s Oil). Mixed this way, a quart of Nature’s Oil will cover 1,000 to 2,000 sq. ft.

Questions on maintaining the legacy of your wood structure? Give us a call- 1-800-359-6614

Schroeder Log Home Supply, Inc.
1101 SE 7th Avenue
Grand Rapids MN 55744

www.loghelp.com 


Monday, June 24, 2024

Sashco Log Jam Chinking

You chose rugged, rustic logs and timbers to create your perfect home- stead. Now, use Log Jam® to protect it for years to come. Log Jam® is the industry standard in synthetic chinking. Unlike old-time mortar or other synthetic chinking, it holds tough year after year. Its superior elasticity means it moves with your logs with- out cracking to seal your log cabin from vermin, pollen, dust, rain and wind alike. You get the rustic look of old-time mortar without compromising modern-day comfort and energy efficiency. Keep the cozy feel and rustic look of big timbers without compromise. Seal your logs with Log Jam®. 

• Rustic look without the rustic application: The textured formula is easy to apply, even for a novice, for a Daniel Boone-approved mortar look. 

• Keeps the weather where it belongs - outside: Moves with your logs to create a permanently waterproof and weatherproof seal. 

• Helps you avoid repeated repairs: Just say no to crumbly mortar or cracked chinking. Stays soft and elastic over time for a long-lasting seal. 

• Easy to clean up: Easy to smooth and clean-up with water. 

• No special chemicals required 

• OK to leave in your unheated garage overnight: Stable through 5 freeze-thaw cycles.


Fundamental Chinking Application Guidelines

Proper substrate preparation and application are imperative for product longevity. Read this instruction sheet before applying any product.

1. Best results are obtained when Log Jam® is applied to clean, dry, stained wood. Make certain there is compatibility between your stain and Log Jam®. Log Jam® has a lifetime warranty when applied with Sashco’s stains: Capture Log Stain® / Cascade® staining system, Transformation Stain® Log & Timber and Symphony®Interior Clear Coat. If using a different stain or finish, contact Sashco for guidance. Call 800-767-5656, or visit and chat live at www.sashco.com.

2. Check the weather forecast. Finishing products are best applied in moderate weather conditions, i.e., out of direct sunlight, in dry, warm conditions.

3. Check the log surface temperature. The surface temperature should be between 40˚-90˚F (4˚-32˚C).

4. Install a bond breaker before Log Jam® is applied. Backer rod, Grip Strip, and clear packing tape all perform this function well. If Log Jam® is applied over white styrene bead-board or Tyvek™ house wrap, it is best to cover the bead-board or wrinkle-free house wrap with clear packing tape (to prevent adhesion to those materials). We do not recommend the use of blue or pink extruded polystyrene board as a bond breaker.

5. Gun the chinking over the backing material. Ideal seal- ant depth is half of the joint width, but no less than 1/4”, nor more than 1/2”.

6. Tool Log Jam® to ensure good contact with the log surfaces, especially to the upper log; this will greatly aid adhesion.

7. All chinking products may occasionally “blister”.

To avoid blistering:

• Do not apply in direct sunlight.

• Protect fresh chinking from direct sunlight for 1-2 days after application with white plastic sheeting tacked over it.

• For detailed information, read Sashco’s Savvy Bulletin, “Preventing Blisters”.

Application Surface Preparation

Best results are obtained when Log Jam® is applied to wood that has been previously coated with a compatible and thoroughly cured stain.

Clean the log surfaces thoroughly to remove dirt, pollen, bird droppings and other surface contaminants.

The USDA Forest Products Laboratory and other researchers around the world have reported that surface wood exposed to sunlight for as little as 1-2 weeks can become significantly damaged and unsound, which may lead to premature adhesive failure of the stains or other coatings applied to it. It can also hurt Log Jam®’s (or any chinking’s) adhesion to the surface. Once bare wood has been properly cleaned and prepped to remove unsound wood, stain should be applied as soon as possible. Follow with Log Jam® chinking.

If a stain is applied over Log Jam®, it will be tinted the stain color, but will be affected differently than the surrounding wood; therefore, test appearance before wide- spread use.

A few coatings, especially those high in wax content or non-drying oils, may interfere with adhesion, whether they are applied before or after Log Jam®. We advise against using Log Jam ® with such products. Contact Sashco if you have questions about your particular product.

Cold Weather Chinking

Log Jam® can be applied in cold weather by following these instructions:

1. Make sure the log surfaces are above 40˚F (4˚C). Use a surface thermometer to double-check.

2. Keep the chinking at room temperature until ready to use.

3. Make sure the logs are free of frost.

4. Tent out the walls with clear plastic sheeting and keep them warm with heaters, then apply chinking.

5. Make sure there is air circulation so moisture doesn’t form on the logs, causing a washout. Some venting up high will help with this problem.

6. Leave the tent intact day and night while chinking, and for 2 to 4 days after chinking is complete.

7. Finally, remove the plastic sheeting. This should be sufficient to let the Log Jam® skin over and slowly cure. Due to cold temperatures, it will take much longer than normal for the Log Jam® to fully cure, but it will be fine if left undisturbed. Warn people to avoid pushing on for several weeks.

More info can be found on the product info sheet


Questions on maintaining the legacy of your wood structure? Give us a call- 1-800-359-6614

Pickup in store - or ship to your door -in whichever woods your cabin dwells.

 Schroeder Log Home Supply, Inc. 

1101 SE 7th Avenue

Grand Rapids MN 55744

1-800-359-6614

Friday, June 21, 2024

Sansin ENS


Sansin ENS on Vancouver Island Home

Sansin ENS is an environmentally-friendly highly durable glossy two-coat wood finish, designed for exterior vertical surfaces, siding, timber, furniture, windows and doors. It is exceptionally UV resistant, washable, low in VOC's, and non-flammable. Sansin ENS provides a rich and attractive coating with exceptional durability and weather protection. ENS is compatible to surfaces pre-treated using SDF or Classic. Sansin ENS offers excellent adhesion characteristics and can be applied over many waterbased or alkyd products to enhance protection and beauty. For increased protection use Sansin SDF or Sansin Classic for the first coat to ensure penetrating protection. Use ENS Naturals Top Coat or ENS Optimum for maintenance coats. 

Made in Canada.

Application Methods 

• For previously coated surfaces apply a small test area to ensure proper drying, adhesion and durability. 

• Brush using a good quality dual purpose brush. 

• Spray using hand or airless equipment with a .011-.013 tip. Set pressure to ensure desirable spray pattern. 

• Avoid high sheer pumps. 

• For a gloss finish, apply ENS Optimum Clear mixed 90:10 with the base color for the final coat. 

• If a low lustre sheen is required, use as final coat only. Use gloss for intermediate coats. 

Working Procedure 

• Apply ENS to all six sides of the wood, or for deep penetrating moisture protection, use Classic, SDF, Dec, KP-12 or Foundation as the first coat to surfaces like millwork and decks. 

• Stir well before and during application. 

• Spray application is preferred using air assist or airless spray equipment. 

• Apply a manageable film thickness. 

• Allow to dry. 

• Consider finish sanding for a smooth finish and remove dust. 

• Apply a second and third coat if necessary. Follow the above procedures. Ensure an adequate dry film thickness of 3 mils for optimum protection. 

• Do not overwork ENS as it is fast drying. 

• Do not apply in heat of day or direct sun. 

• Do not apply on wood that is warm to touch. 

• Do not apply if rain is expected or in near freezing temperatures. 

Maintenance 

Horizontal and vertical services require maintenance every 4-5 years. Maintenance is necessary when the surface shows signs of wear, such as fading or erosion. Low lustre finishes require more frequent maintenance than satin or high lustre finishes. Maintaining your wood on a regular basis will ensure long-lasting color retention, exceptional dimensional stabilization and effective water repellency. Periodically, clean the wood surface with a power washer or Sansin Multi-Wash to remove dirt and residue. How frequently maintenance coats are required will depend on the quality of prior preparation, quality of application and exposure levels. If fading or erosion is evident, prepare wood by using a power washer to lightly clean the wood surface; or use Sansin Multi-Wash. Then re-apply one maintenance coat of Sansin ENS according to instructions. Exposure, workmanship and color will affect the performance of the coating.


Questions on maintaining the legacy of your wood structure? Give us a call- 1-800-359-6614
Schroeder Log Home Supply, Inc.
1101 SE 7th Avenue
Grand Rapids MN 55744

www.loghelp.com 


Thursday, June 20, 2024

Cobra Rods


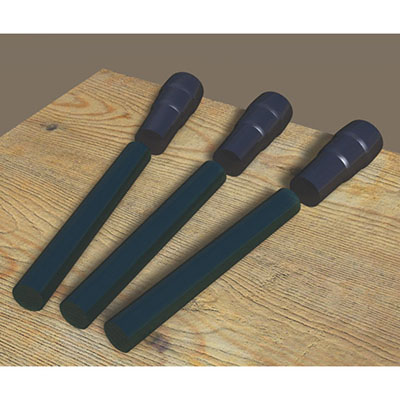
Photo shows Cobra Rods and Cobra Rod Plugs.

Cobra Rods are a safe, Environmental Protection Agency (EPA) approved wood decay protection and prevention system for log homes. Cobra Rods are a wood preservative, fungicide, and insecticide that's safe to handle and made entirely of a unique Boron and Copper Hydroxide complex. Cobra Rods include the addition of Copper Hydroxide which provides extended protection from fungus species not affected by borates, effectively providing more protection then Impel Rods.

Cobra Rods take the form of a solid cylindrical rod that is approximately 7/16" in diameter (use a 1/2" drill bit for installation) and comes in 2" and 4" lengths. Cobra Rods are a deep green color and has a glass-like look and feel. When used for logs, the Cobra Rods can be "plugged" with caulking or chinking to aesthetically hide them. CobraRod Plugs are also available (included with the 2" 10 pack and 3" 12 pack of Cobra Rods). Cobra Rods can be used in logs, landscape timbers, deck joists, posts, and other places where moisture is present. The treatment cycle is 8 to 10 years if wood moisture is 20% or higher. Cobra Rods are placed into holes drilled in wood at specific high risk locations (such as at the groundline or near joints and exposed endgrain) and are dependent upon moisture in the wood to work.

Made in Canada.


Wood ends and joints are particularly susceptible to fungal attack and an appropriate size rod should be inserted within 3 inches of any end or joint in high-risk areas. Linear spacing along the grain should never exceed 15 inches on center and spacing across the grain should not exceed 6 inches on center. After the rods are in place, the holes should be plugged using a plastic plug, wooden dowel, caulk, chinking or wood putty. The treated area can be painted, stained, or coated with any appropriate finish.

Application Steps

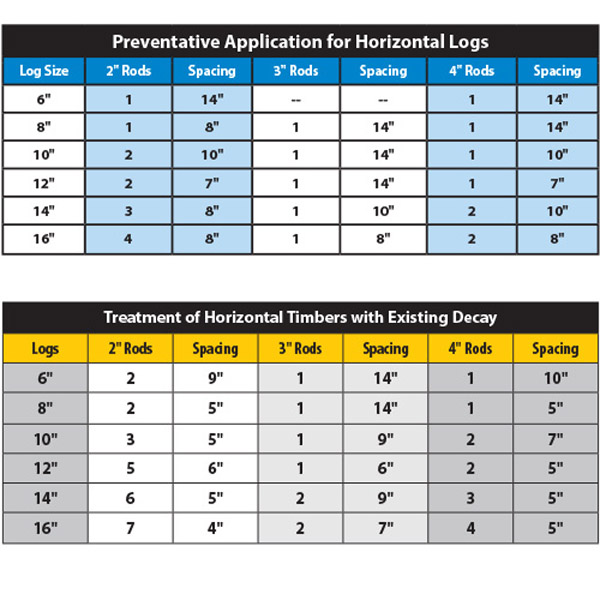
  1. Drill appropriate size holes to accommodate the number and size of CobraRods required. Drill hole size should be approximately 1/16” larger than rod size. Plug size should be approximately 1/16” larger than hole size. (Consult the recommended Application Rate Table for this information).
  2. Insert the CobraRods into the hole or holes.
  3. Plug the hole with a plastic plug, wooden dowel, caulk or wood putty.


Questions on maintaining the legacy of your wood structure? Give us a call- 1-800-359-6614

Schroeder Log Home Supply, Inc.
1101 SE 7th Avenue
Grand Rapids MN 55744

www.loghelp.com 


Wednesday, June 19, 2024

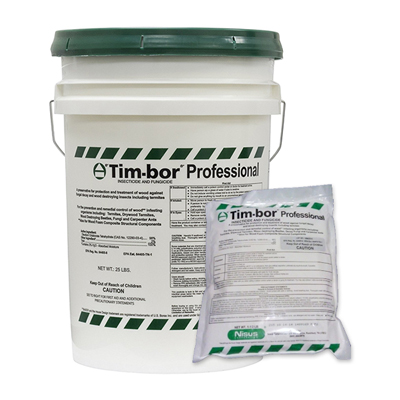
Tim-bor Professional Borate Preservative

Why You Need A Wood Preservative

Rot, weather, insects, fungi all pose a serious threat to your logs. Protect your investment—treat your logs first to make them last. All wood faces the possibility of rot and insect infestation—even in dry climates. Fungi and insects actually consume the cells of dead wood, often causing severe structural damage, damage that often requires log replacement—a costly repair. Tim-bor® helps protect your home from the costly damage caused by rot and insect infestation.

What is Tim-bor® ?

Tim-bor® is a borate-based wood preservative. Borates are well-known across the world for their protective qualities. And like other borates, Tim-bor® is highly effective in the prevention of most rot and wood-boring insects. When using Tim-bor®, a protective “shell” coating helps defend your home against dry, wet, and brown rot as well as termites, house borers, powderpost beetles and carpenter ants (to name a few).

Tim-bor Professional Borate in 6 gallon and 1.5 pound

The Tim-bor® Difference

Tim-bor® is registered with the Environmental Protection Agency (EPA) for spray and brush application, which makes it perfect for remedial treatment when you follow all application and use guidelines. Do not mix Tim-bor® into stains. For borates to be effective and to provide long-term protection, they must soak into the wood itself, not remain in the coating. Although some stains contain borates, the low percent- age of borate in the stain (generally 2-3%) provides lit- tle to no appreciable benefit. Follow the Tim-bor® mix- ing and application guidelines to achieve recommended BAE (borate acid equivalent) levels that truly provide long-term, effective protection. Tim-bor® can be applied by brushing, spraying, dipping, kerf-flooding or hole flooding. It comes in powder form and just needs to be mixed with water for application. Tim-bor® is packaged in two convenient sizes: 6-gallon pails that are easy to carry and double as a handy source for mixing the solution and the 1.5 lb. packet—perfect for smaller jobs. The active ingredient in Tim-bor® (disodium octaborate tetrahydrate, a refined form of the natural mineral borax) is less toxic to people and animals than many other chemicals used for wood preservation. However, since no pesticide is completely safe, Tim-bor® must be handled and used as directed. Borates do not affect the natural color or strength of wood they are completely odorless they’re not corrosive to metal fasteners, nails or screws. And when a “Tim-bor® home” is properly sealed against moisture, the borates can provide many years of effective protection.

More Protection for Your Money

The best part about Tim-bor® is the money it saves you. Not only is Tim-bor® affordable, it reduces the risk of potential log replacement. According to the most comprehensive study avail- able, the depth of penetration of Tim-bor® is as deep or deeper than other borate products that use slow-drying and toxic solvents (like ethylene glycol) in their formulations. Contact Sashco at 1-800-767-5656 if you’d like a copy of this study.

The Basics in Applying Tim-bor®

1. Read this entire Data Tec and the container label before applying Tim-bor®. It is a violation of Federal law to use this product in a manner inconsistent with its labeling.

2. Mix Tim-bor® at a rate of 1-pound (1 loosely packed quart) to 1-gallon of water.

3. Wood must be clean and bare; free of dirt, wax, mill glaze and surface finishes, and wood surface temperature above 40̊F.

4. Apply Tim-bor® at the rate of 1 mixed gallon per 150 ft2 of wood surface. Apply a second coat 4 to 24 hours later. Thoroughly soak cut ends, checks and cracks.

5. Coat the logs with a water-repellent finish after the Tim-bor® solution has thoroughly dried. Use a moisture meter to verify that the log’s moisture content doesn’t exceed 19%.

Where to Use Tim-bor®

Use Tim-bor® on above-ground wood surfaces, including logs, timbers, dimensional lumber, siding, etc. Wood subject to direct moisture contact must be coated with a good water-repellent finish after treating with Tim-bor®.

Surface Preparation

Wood surface must be bare: free of dirt, wax, mill glaze and surface finishes. Remove all previous coat- ings by media blasting, sanding, chemical stripping and/ or power washing. Surface discoloration from mold or mildew should be treated with Sashco’s CPR® Log Cleaner & Brightener before applying Timbor®. Read “Keeping the Dream Alive,” Sashco’s complete staining guide, for more detailed instructions on this and the finishing process. Do not apply to frozen wood. Log (not air) temperature must be between 40̊F and 90̊F. It is best to apply Tim-bor® to dry wood.

Mixing Tim-bor®

Mix at the rate of one pound, or loosely packed quart, to one gallon of water. The Tim-bor® mixture requires only mild stirring before application. The mixture will be clear and water thin. With this mixture, all application methods described herein will yield a minimum retention level of 0.24 pounds per cubic foot boric acid equivalent to 1/2”.

Methods of Application

Tim-bor® may be applied by brushing, spraying (with a garden sprayer), dipping, kerf-flooding or hole flooding. Full immersion dipping yields the deepest and most complete protection, especially with large logs. Kerf-flooding accompanied with brushing or spraying, yields nearly the same level of protection as dipping. Brushing and spraying can completely penetrate dimensional lumber and can provide excellent “shell” protection for timbers and logs to a depth of 1/8” to 1/2” — which is adequate for most applications. NOTE: Diffusion of Tim-bor® into the wood begins immediately and requires several days for completion. With “shell” protection in large logs or timber, pre-existing insect larva may not be killed. Upon maturing, they may emerge from the wood. Insects must ingest the substance to be killed. Tim-bor® is not a contact killer. Further insect infestations, however, will be prevented.

Brushing or Spraying

Apply Tim-bor® at a rate of 1 mixed gallon per 150 ft2 of wood surface. Apply a second coat 4 to 24 hours later. Thoroughly soak cut ends and apply to checks and cracks.

Kerf-Flooding, Hole Flooding, and Spraying/ Brushing

Logs 9” in diameter and larger are often kerfed to control unwanted checking. When kerfing a log in the shape of a trough (with 3/8” wide chain saw to a depth of 3”), simply pour the Tim-bor® solution into the kerf. Fill the kerf at a rate of 15 to 20 lineal feet per mixed gallon. Let soak. It will take 1 to 2 days for the logs to absorb all the liquid. Protection may also be gained by pouring powdered Tim-bor® into the kerf (0.2 to 0.3 pounds per lineal foot). Pour water into the kerf to dissolve and carry the Tim-bor® into the wood. Brush or spray the exterior of the logs with more Tim-bor® after either of these methods as described above. NOTE: Be sure the kerf or holes do not affect the structural strength of the log. HINT: Runoff from vertical walls may be contained by using plastic sheeting to form an accumulation basin. The trapped liquid may then be recycled and will be prevented from injuring nearby foliage.

Dipping

Dip logs or lumber in Tim-bor® for 6 to 10 minutes, depending on log diameter. Let excess liquid drain back into the tank, dip again 24 hours later. Cover wood with a tarp or place in a shed for at least 48 hours prior to coating with a good exterior finish.

After Applying Tim-bor®

Treated wood must be protected from direct contact with moisture or the active ingredient may leach out. It’s best to wait at least 48 hours (in warm, dry weather; longer in cool, humid weather) after applying Tim-bor® to coat wood with a water-repellent finish. Let the surface thoroughly dry and brush away any crystals that appear before staining. Use a moisture meter to verify that the logs’ moisture content doesn’t exceed 19%. Clean Up Use soap and water to clean equipment, skin and clothing.

Please download the Tim-bor® full info sheet for details on: • Storage and Disposal • First Aid • Enviromental Hazards • Warranty www.sashco.com/timbor-sds-info


Questions on maintaining the legacy of your wood structure? Give us a call- 1-800-359-6614
Schroeder Log Home Supply, Inc.
1101 SE 7th Avenue
Grand Rapids MN 55744

www.loghelp.com 


Tuesday, June 18, 2024

Albion Bulk Loading Caulk Gun Care

 Loading The Gun
If you are not using a follow plate, place the end of the gun down into the material about 2-3" and pull up on push rod. Using your pointer finger, scrape material off gun until it is clean, then wipe your finger. This helps reduce mess. It is advisable to have a small 5-quart pail with water and a cloth for clean-up after each filling.

Clean-Up At End Of Day
Put remaining caulk or chink back into pail and seal it. Place gun into a pail of water with cap removed and pull up on the push rod. Keep doing this until gun is clean of material. Unscrew the back trigger mechanism and spray a light lubricant like WD-40 into the back and into the gun chamber. Leave gun open until it is dry. This will help keep the interior from rusting. Wipe exterior of the gun with a light oil.

Other Maintenance
If gun is not maintained and a buildup of material develops on or in the gun, remove it by first soaking with brush and roller cleaner. After softening of material occurs, the interior can be cleaned with a 2" or 3" wire wheel attached to a 1/4 inch drill extension.

Other Trouble Shooting: Gun Will Not Fill
The leathers are probably either worn or dried out. With leathers in the gun, place the end of the gun in warm water and keep pulling up on push rod until water is pulled into the gun chamber. If you are working in the fall, the material may be cold and leak fluid. Either keep the material in a heated space or place the pail of material in a tub of heated water.

Leathers Are Buckled
The leathers will lose shape if stored or soaked in water too long. A well-maintained gun will give you a much better chinking or caulking experience, so do clean it daily; if you are unable to clean daily, place the gun in a plastic bag and seal it up until you can take the time to clean it. (if need be, the packing cups can be replaced)

Questions on maintaining the legacy of your wood structure? Give us a call- 1-800-359-6614

Schroeder Log Home Supply, Inc.
1101 SE 7th Avenue
Grand Rapids MN 55744

www.loghelp.com 


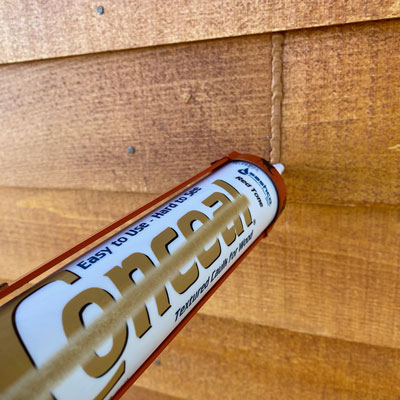
Conceal Textured Caulking for Log and Wood Homes

Conceal Textured Caulk in Redtone on Capture Red Cedar

Conceal Textured Caulking for log homes delivers performance that's hard to see. Conceal Textured Caulking colors blend in with the most popular stains used on log homes, and Conceal´s light texture simulates the natural roughness of wood. The combination of color and texture makes it hard to see where the caulking ends and the logs begin. Instead, they just blend together. Although the caulking is hard to see, Conceal delivers performance. Additionally, Conceal Textured Caulking is excellent for filling and concealing log checks. Is resistant to rainfall in 1-4 hours. Has a limited lifetime warranty. Conceal has superior elongation, memory, and adhesion. Application Temperature: 40°-90°F. Clean-up: Soap and water. Made in the USA.


Fundamental Caulking Application Guidelines

 • Proper substrate preparation and application are imperative for product longevity. Read this entire Info Sheet (CNL 002) before applying any product. 

• Conceal is not a chinking and should be used in joints under 2” wide. If the joints are wider, we recommend Log Jam. 

• Make certain there is compatibility between your stain and Conceal. We recommend Sashco’s Capture®/Cascade®, or Transformation® stains for exterior applications and Symphony® interior clear coat for beautiful long-term protection. Best results are obtained when Conceal is applied to clean, stained wood. 

• Check the weather forecast. Finishing products are best applied in moderate weather conditions, i.e., out of direct sunlight, in dry, warm conditions. 

• Check the surface temperature. It should be between 40˚-90˚F (4˚-32˚C). 

• It is always best to use a bond breaker (usually backer rod) before caulking. Sashco strongly recommends the use of backer rod, especially if the home is new and/or the wood is subject to significant movement. If a bond breaker is not used, expect more caulking repairs. 

• Tool Conceal to help ensure good contact with the wood surfaces. This will greatly aid adhesion. 

• Ideal caulk depth is half of the joint width, but no less than 1/4” and no more than 1/2”. 

• Assemble tools and equipment: - Backer rod - Caulking guns - Trowels, spatulas, or foam brushes for tooling - Clean water and rags - Plastic sheets to cover the caulking if wet weather moves in - Staple gun & staples (if necessary to help with backer rod installation)


Questions on maintaining the legacy of your wood structure? Give us a call- 1-800-359-6614

Schroeder Log Home Supply, Inc.
1101 SE 7th Avenue
Grand Rapids MN 55744


Monday, June 17, 2024

Transformation Siding & Trim

Transformation Siding & Trim in Honey Timber on log cabin

Transformation Siding & Trim is a unique water and oil emulsion provides a very easy finish to apply, but the cured coating is both stunningly beautiful and durable. Transformation Siding & Trim penetrates properly prepared wood and is extremely resistant to UV degradation, moisture, and oxidation. The high quality transoxide pigments enhance the natural beauty of wood grain while imparting a mellow sheen to the logs. Transformation Siding & Trim is compatible with PeneTreat (see Tim-bor), Log Builder Caulking, and Log Jam Chinking. Matte finish.


Transformation Siding & Trim will adhere to almost any surface that is properly prepped. Be aware that any product already on the wood that contains waxes, non-drying oils, silicones, or anything that forms thick layers on the wood, can interfere with the adhesion and penetration of Transformation Log & Timber (or any stain) and must first be removed.

It’s about Transformation: old and weathered wood siding brought to life again, or trim stained with color to create the perfect accent. These are the results stain was made for, yet rarely do we observe this in the real world. We see our neighbor’s stain peeling or are reluctant to repair our own siding due to its “big project” nature and the hefty price tag. Contrary to common wisdom, having a great quality stain is only half the battle. The other half is what is neglected the most: routine maintenance. Over time, routine main- tenance is truly the key to easy and inexpensive staining. When applied correctly and maintained every 3-4 years, you can be assured that Transformation Stain® Siding & Trim won’t peel. This eliminates the time and expense of sanding the surface before applying a maintenance coat. Simply do a light power wash, allow the wood to dry and apply another coat. It’s that easy, and you’ll find that your “big project” wasn’t so big after all. Use a quality stain like Transformation Siding & Trim and you’ll transform the look of your wood. Practice routine maintenance and you’ll discover a better way to stain. For Sashco’s complete guide on “a better way to stain,” keep reading.

You’ll find step-by-step instructions on the following key topics:

Sampling

To get the look you want, sample the stain on your wood.

Prep

Proper prep starts you down the right path.

Application

Proper application of a quality stain ensures long-term performance.

Routine Maintenance

Reduce long-term costs, time and effort.


Questions on maintaining the legacy of your wood structure? Give us a call- 1-800-359-6614
Schroeder Log Home Supply, Inc.
1101 SE 7th Avenue
Grand Rapids MN 55744

www.loghelp.com


Friday, June 14, 2024

Transformation Log & Timber

Before/After Transformation L&T GTL. Credit: Liberty Log & Stain LLC


It‘s about Transformation: old and weathered logs brought to life again, or timbers refreshed with color when they were once only gray. These are the results we want for our dream home, but sometimes those results seem like a distant fantasy. We’ve seen other log and timber homes scorched by the sun and are afraid of the “big project” nature and the hefty price tag of maintaining our own. Contrary to common wisdom, having a great quality stain is only half the battle. The other half is what is neglected the most: routine maintenance. Over time, routine maintenance is truly the key to easier and less expensive staining. When done every 3-5 years, we find that routine maintenance saves a lot of time and money by eliminat-ing much of the prep work before staining. Simply do a light power wash, allow the wood to dry, and apply a maintenance coat. No sanding or stain removal necessary. Your contractor will be happy you called him sooner rather than later, and your pocketbook will be, too. It’s that simple. Use a quality stain like Transformation Stain® Log & Timber and you’ll transform the look of your wood. Practice routine maintenance, and you’ll discover a better way to stain.


 Transformation Log & Timber is the low VOC formula of the original Transformation Log Stain by Sashco. It will transform your logs and vertical woodwork from dull and lifeless to rich and brilliant - especially for restoring older logs. Transformation is excellent for restoration log work. Transformation Log & Timber is the log home stain that's easy to remember because its name describes what you want and what it provides, Transformation! Perfect for new construction and restoration projects. Gloss sheen. 


Questions on maintaining the legacy of your wood structure? Give us a call- 1-800-359-6614
Schroeder Log Home Supply, Inc.
1101 SE 7th Avenue
Grand Rapids MN 55744

www.loghelp.com


Thursday, June 13, 2024

Air vs Surface Temperature for staining log and wood

When applying exterior wood finishes, finding the perfect weather conditions can be a challenge. 72 degrees Fahrenheit with 50% relative humidity on a partly cloudy day with no rain in the forecast... we might get one or two of those in a Minnesota summer and chances are some other event will already be on the calendar.

 Finding label-ideal conditions may be a challenge, but temperatures and other weather conditions are important considerations for best coating performance. Besides avoiding precipitation, temperature is one of the most critical considerations. Beyond only checking the air temperature, almost more important is the surface temperature; after all, that’s where the stain will be applied and it needs ideal conditions to get the best performance. Air temperature only tells part of the story, but in the shade or in the sun the wood surface can vary greatly.

On one project staining rough-sawn cedar in early May, the air temperature at 9am was 48F and climbing. On the northeast corner of the house, where one side was in the shade and the other was in the morning sun, there were immediate differences. The north shaded side matched the air temperature of 48F and the east has already climbed to 70F. An hour later at 10am, air temperature has risen 4 degrees, but the sunny surface has risen 20. Most exterior finishes are ideally applied around 50-90F, so there was a situation where the air temperature and shaded side were at the minimum of 50F, but the surface on the sunny side was already at its maximum of 90F. The consideration of temperatures in the sun can be even more pronounced in the heat of peak summer. Later that afternoon, the air temperature was in the low 60’s, but the south sunny side was over 100F and unsuitable for staining. In that situation, staining on the south side was ceased until cloud cover returned and the surface had cooled to avoid flash-drying of the stain.

 The air thermometer may look ideal at 72F, but when measuring the surface of a sunny side, it may read well over 100F. Applying stains and sealers on surfaces that are too hot or too cold will result in poor penetration or adhesion, and ultimately the coating may fail. Handheld surface thermometers are as easy to use as a laser pointer. Approximately $30-$100 to purchase, they are undeniably cheaper and easier than stripping off failed stain and reapplying it all over again.

Without a surface thermometer, the layman technique would be to only stain in the shade or under cloud cover, with air temperatures at 50-90F (or whatever range is given on the product label).


Questions on maintaining the legacy of your wood structure? Give us a call- 1-800-359-6614
Schroeder Log Home Supply, Inc.
1101 SE 7th Avenue
Grand Rapids MN 55744

www.loghelp.com

Structures NatureColor Base Coat and Recoater

NatureColor® Base Coat is a durable translucent satin exterior wood finish for log homes and wood structures. Its advanced oil alkyd resin formulation is combined with micronized ultraviolet reflecting iron oxide pigments and ultraviolet absorbers allowing beautiful grain definition, UV protection, and microporosity. Applied by brush or sprayed and back brushed in a three coat system, it penetrates and bonds itself to wood surfaces in a translucent weathering shield that when properly maintained will keep your natural wood home new looking year after year. NatureColor® Base Coat is used on exterior vertical surfaces as the first and second coat of a recommended three coat system. It can also be used alone as a one or two coat application on decks, docks, railings and other weather-exposed horizontal surfaces. Apply two coats on outdoor wood furniture and fences.

NatureColor® Recoater is used on vertical wood surfaces as a system-completing topcoat over NatureColor® Base Coat. For optimum performance all three coats should be applied within one month. If weather, budget, or time becomes an issue, NatureColor® Recoater can be applied within one year of the NatureColor® Base Coat applications. (Note: surface preparation must be followed if four weeks time has lapsed between coats). NatureColor® Recoater is also used as a subsequent single application maintenance coat to sustain your structure's new wood appearance. Made in the USA. 

For optimum long-term visual appeal of your natural wood, correct wood surface preparation is of great importance. Options are; Sanding, TSP-Bleach-Water Power washing or Chemically or Abrasive stripping the wood surface. For method to use see spec sheets for your particular application. Coat vertical surfaces within two weeks of cleaning procedures. Apply second coat within two weeks of the first application. Coat horizontal surfaces within one week of surface preparation.


Questions on maintaining the legacy of your wood structure? Give us a call- 1-800-359-6614
Schroeder Log Home Supply, Inc.
1101 SE 7th Avenue
Grand Rapids MN 55744

www.loghelp.com


Tuesday, June 11, 2024

Structures NatureOne Acrylic

NatureOne® is a durable translucent exterior wood coating that combines 100% acrylic resin technology and transparent iron oxides. The result is a premium coating with advanced UV protection along with a beautiful luster and clarity of the wood grain. The acrylic formulation is naturally breathable, fungi resistant, color stable and has excellent adhesion. No harsh odors and low VOC make this coating applicator and environmentally friendly. A three coat application of NatureOne® builds a finish protection system for your wood sided or log home which is easily maintained with a single recoat every 2 to 5 years. Made in the USA.  

Application Method 

1. Do a color confirmation test. Allow 2-4 hours dry time between coats. Apply the number of coats recommended for your application. 

2. Check moisture content of the wood. Apply coating when the surface moisture is no more than 18% 

3. Need to scuff sand with 60-80 grit sandpaper 

4. Stir material thoroughly before and during use. 

5. Best results are with a quality nylon polyester brush. Airless sprayer application is acceptable, but must be immediately back brushed. Tip: 5-15 to 5-17 Pressure: 1000 to 1500 PSI 

6. Generously coat the surface and all exposed end grains. Apply as liberally as possible without runs – do not “stretch out” the product. Apply in the direction of the grain. On textured/rough sawn surfaces, thoroughly cross brush to soak the finish into the surface and finish brushing in the direction of the grain. If spraying, spray until the coating runs slightly and then immediately back brush. 

7. Avoid lap marks by starting at one end of a given surface area and while maintaining a wet edge, follow through to the opposite end of the surface area. 

8. Siding may be pre-coated with two coats of NatureOne® 100% acrylic exterior before installation. Back priming is recommended for siding. 

Available online shipped to your door, or local pickup come to our store:

 Schroeder Log Home Supply, Inc. 

1101 SE 7th Avenue

Grand Rapids MN 55744

www.loghelp.com

Wednesday, June 5, 2024

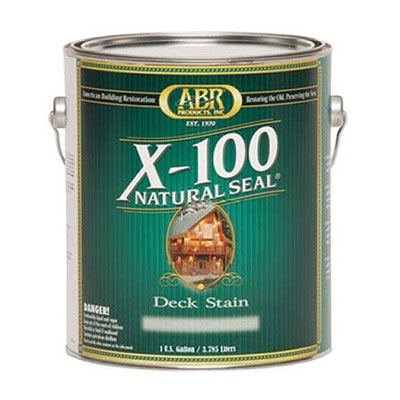
X-100 Deck Stain

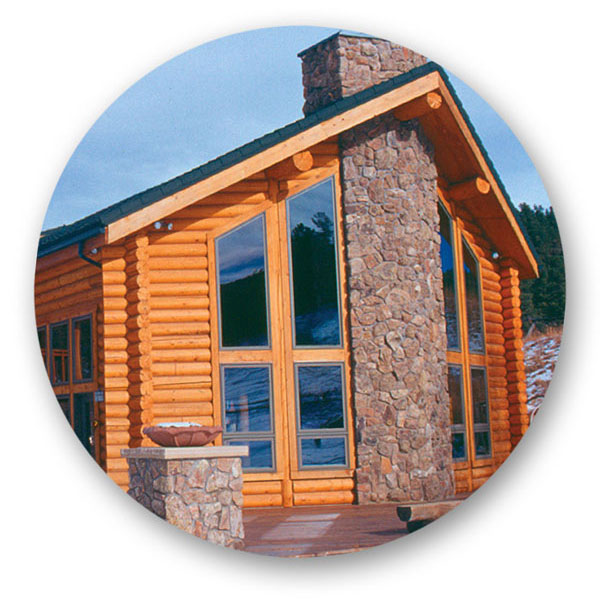
X-100 Deck Stain provides protection against the intrusion of moisture and water on new, faded, dense and seasoned pressure treated, cedar, redwood, and other hardwood decking lumber. X-100 Deck Stain enables the natural wood grain to show through allowing for a natural wood finish. In the case of an old deck (greater than three years old), the grain of the wood has had an opportunity to be exposed to the general weathering conditions that naturally open its pores. Accordingly, X-100 Deck Stain has been recommended for use on such surfaces, as the first and only step (resealing with X-100 Deck Stain every two to four years). Made in the USA.


 Popular colors of X-100 like Cedartone Gold and Cedartone Brown are kept in stock in Grand Rapids, MN. 


Available online or local pickup in our store:

 www.loghelp.com

Schroeder Log Home Supply, Inc.
1101 SE 7th Avenue
Grand Rapids MN 55744

1-800-359-6614


Tuesday, June 4, 2024

Outlast Q8 Log Oil

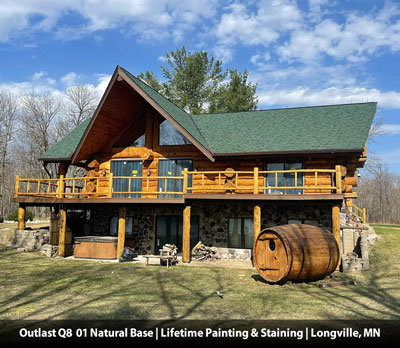
Outlast™ Q8 Log Oil is an EPA registered exterior wood preservative specifically designed to control decay causing organisms (and mold, termites, powder post beetles) in log homes and on wood siding. Outlast Q8 Log Oil provides unsurpassed water repellency and sheer trans-oxide color with one coat coverage. Outlast Q8 Log Oil is a totally non-film forming exterior treatment that will never crack or peel. The trans-oxide pigment system provides excellent UV control that operates like a sunscreen to slow down graying of the wood and provide fade resistant color. The solution soaks into the wood to provide protection, not just on the surface, but also deep into the wood cell structure. Outlast Q8 Log Oil offers unique flexibility in terms of application temperature ranges, log moisture content, and delivery method. Outlast Q8 Log Oil meets all nationwide VOC requirements.

Made in the USA.

Stops decay fungi and mold - Rot control, Toxic to termites and powder post beetles Superior water repellency - Controls cracking and splitting Easy to apply - One coat coverage - low pressure spray, brush, or roll - low-pressure spray application to refusal No lap marks or brush marks - Simple re-coat: no stripping required No cob blasting, sanding, or sandblasting needed for re-coats. 

Stocked and available online or local pickup in our store:

 www.loghelp.com

Schroeder Log Home Supply, Inc.
1101 SE 7th Avenue
Grand Rapids MN 55744

1-800-359-6614


Monday, June 3, 2024

Cascade Clear Coat

A heavy coat of Cascade Clear Top Coat must be applied over Capture Log Stain on the exterior of your log home. This clear, protective log home finish top coat is heavily loaded with biocides and UV inhibitors to help prevent mildew and block damaging ultraviolet light. Cascade adds "depth" and a long-lasting satin sheen to Capture log stain. Should not be used alone on bare wood. Lab and field tests have proven the Capture System (Capture log stain plus Cascade clear top coat) to have superb resistance to chalking, fading, cracking, peeling, and loss of overall appearance. Once Capture has dried, apply Cascade. After applying Cascade, inspect the finish twice a year and touch up areas that have become dull with a pump sprayer as needed. For Use Over Capture Log Stain Only.

Made in the USA. 


Application Steps

1. Compatibility counts: Cascade® is formulated for use only with Capture® Log Stain. Contact Sashco if you are attempting to use Cascade® with any other stain. Cascade® will not adhere to any product containing waxes, silicone, or other non-drying oils.

2. Timing matters: Cascade® gives Capture® Log Stain excellent water and UV resistance. It’s best to apply it within 1-2 days after Capture® Log Stain has dried in order to ensure proper protection.

3. Clean the surface: Dust, pollen, or other contaminants can interfere with Cascade® adhesion to the stained surface (and look ugly underneath it if they get trapped there). To remove these contaminants, lightly rinse down surfaces with plain water to remove them and allow surfaces to thoroughly dry.

4. Air & surface temperatures matter: To allow Cascade® to dry and adhere properly to the Capture® log stain, apply the product when the forecast is predicting clear, rain-free and snow-free weather, with air and wood surface temps of 40° to 90°F (4°-32°C) both during application and for the rest of the day after it has been applied. (This includes overnight temperatures!) If rain can’t be avoided, protect stained surfaces from direct rainfall for 1-2 days after application. Like any wet stain or paint, direct, heavy rain can wash the product off the surface before it has completely dried. (Once dry, Cascade® is absolutely water resistant.) Use a surface thermometer to check surface temps.

5. Control surface mildew: To further enhance protection from mildew growth on the surface of the stain, add in StayClean I/E® Mildewcide to each pail of Cascade®. Cascade® is already boosted with algaecides to resist algae growth. For more information on algae vs. mildew growth on log surfaces, visit http://www.sashco.com/blog/mildew-vs- algae/.

6. Mix it up properly: Using a squirrel cage type mixer, thoroughly mix Cascade®, being sure to scrape all material off the bottom of the pail.

7. Spray it on: Using an airless paint sprayer or pump sprayer, apply one heavy coat of Cascade®, following behind immediately to brush out any runs. Cascade® will appear milky when applied but will dry clear.

8. Enjoy: Step back and admire your hard work. 


Complete application guide can be found here.


Available online or local pickup in our store:

 www.loghelp.com

Schroeder Log Home Supply, Inc.
1101 SE 7th Avenue
Grand Rapids MN 55744

1-800-359-6614

Sansin Announces Color of the Year 2025 - Ivory 21

Sansin has announced the 2025 color of the year: Ivory 21. Ivory 21 enhances the natural beauty of wood and brightens up any space. This v...