Some friends of mine, a young couple, are looking at purchasing a log home in the area. It's a nice home with a very appealing design. Unfortunately, it has a few issues to take care of before closing. Some of the log ends have deteriorated and will need repair. Many of the ends are sticking out far, even past the eaves. It's a perfect example of how gutters, log eaves, well-stained log ends, and caulking on upward-facing checks could have gone a long way to prevent headaches down the road. The existing problems are repairable, but protecting the log ends better would have prevented them altogether.
For the areas where there is enough sound wood that replacement isn't necessary, repair will include flooding the rotted wood with borates like Penetreat to kill rot, filling the void with WoodEpox, and finding ways to keep water out of the log in the future. Preventing future rot includes keeping the logs underneath the overhang (even if that includes trimming them back), caulking upward-facing cracks, and soaking the ends with a log home stain that will keep water out while maintaining the log's ability to breathe. Go here for more tips on log repair.
Helping People Live in Nature.
We furnish the legacy of log, timber, and structures.
Quality products, complemented with contractor referrals and DIY advice.
www.loghelp.com
1-800-359-6614
Saturday, April 16, 2011
Friday, April 15, 2011
Tips for Cleaning
A Suggestion For Applying Cleaners
Mix the materials thoroughly in a pail or sprayer. Wet down the logs with cleaner from the bottom working upward. This is done so that any material running down will be onto a wet surface so that streaking is prevented or minimized. Wet down only the area that you will work in the following hour. If heavily weathered areas exist, scrub in and then rinse. Residues could cause adhesion problems with some cleaners. Many prefer to use a pressure washer to rinse and scrub. If you choose to use one, a 500-1500 psi washer is sufficient in most cases.
Oxalic acids like New Log Prep leave more color in the wood while chlorine bleach can blond the wood. If this happens, you may need to apply a pigmented finish to re-color the wood.
Oxalic acid mixtures will also help remove iron stains. (See New Log Prep) This material leaves more of a golden color to the wood. Use an oxalic acid based cleaner if you will be finishing your logs with a solvent-based or water based finish, make sure the cleaner is thoroughly rinsed off.
Neutralize the bleach with clear water, or the salts in the bleach could remain to feed future fungi.
Use a more diluted mixture on softer, more porous woods like cedar. Example Use a mixture of 1 part bleach to 5 parts water. On heavily weathered wood, you may need to use a 1:3 mixture.
If you choose to use TSP as a cleaner and use it in heavy amounts, it can pull out the reddish undertones in Red Pine (Norway Pine). This red undertone can react with yellow finishes to give stains more of an orange appearance.
How to Power Wash Logs
Power Wash Only The Exterior
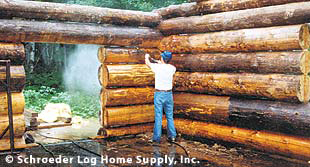
The interior surfaces are not critical, since they see no exposure to extreme weather. To avoid damage to interior areas, power wash the logs in the yard before they are shipped to the job site. If it is not possible to clean the logs in the yard, it should be done early in the construction cycle at the job site.
Use A 1500 PSI Power Washer
Extremely high pressure is not necessary since you run the risk of tearing up the surface and leaving it with a "fuzzy" or "hairy" condition. This will not hurt the performance of the stain, but the appearance can be objectionable and can be buffed off with an Osborn Buffing Brush.
Use A Low-foaming Detergent
The detergent will assist the high pressure water in loosening and lifting all surface residues. Use hot water. Then rinse with cold water to flush any detergent from the surface. A garden hose works well for this.
Use A Fan Spray Nozzle
Apply the water at an angle so it does not spray back into your face (be sure to wear safety goggles). Hold the nozzle at a distance, just far enough away from the surface to avoid "fuzzing" up the outer layer of wood. At this distance, the water and detergent will impact the wood with tremendous force and will remove virtually all residues, as well as creating considerable micro-roughening of the surface for enhanced stain penetration.
Apply The Finishing Touches
If you will be applying PeneTreat, apply it once the logs have become slightly damp after cleaning. Caulking the checks and cracks may be done at any time after the cleaning operation is complete and the logs are dry.
Note: The most effective method for removing mill glaze and roughening the surface is cob or sand blasting. But for many, this approach is too expensive or impractical. If this is the case, power washing or sanding the logs will remove the mill glaze.
Cleaning Logs
How do I clean my logs?
1. Exterior Cleaning Lightly cob blast, sandblast, sand, or pressure wash (the most often used method) new logs.
Why should you power wash new logs? As is true for most any job, proper preparation is as important as doing the actual job. This is certainly true for properly preparing the exterior surface of logs before applying stain to them. The leftover mill glaze* must be removed, and the surface should be slightly roughened to allow the stain to penetrate as deeply as possible. *Mill glaze is the stain-repelling film leftover from shaping the logs in the processing mill. One way to understand the importance of this step is to realize that it is very rare to ever have any failure of a coating applied to the cut end of a log. The log end is extremely rough in texture, and the coating has ample opportunity to penetrate and establish optimum adhesion. The goal of power washing is to stimulate the texture without dramatically affecting the log’s appearance.
When pressure washing, we suggest you used one of these cleaning agents if you will be applying either a water-based or oil-based finish: CPR, New Log Prep, X-180 Weathered Wood Restorer, or Bleach & Water: A mixture of one part household bleach and five parts water, plus one tablespoon TSP (Tri-sodium phosphate) per gallon (optional). Note: Log Maintenance Wash is best for cleaning logs that already have a finish.
Bleach is a corrosive chemical irritant that can damage surfaces like skin and fabric. Never mix bleach and ammonia for any reason, the results can be fatal. Also, it is not recommended to mix bleach with other household cleaners that may contain ammonia or to mix bleach with vinegar. Vinegar and bleach will create a chlorine gas that is a toxic health risk.
Do not use household bleach as a cleaning agent for deck lumber that was treated with CCA (chromated copper arsenate) or more commonly known as "pressure treated lumber". This type of treated lumber was removed from the market by 2003. If your deck or landscaping timbers were made from this lumber, use an oxygen bleach like KleenStart Wood Cleaner instead of household chlorine bleach. Chlorine bleach when combined with CCA forms highly toxic chromium and arsenic compounds.
Apply cleaning agents from the bottom and work up. This will avoid streaking of the logs. Allow agent to stand 10-15 minutes before power washing. Rinse thoroughly. Allow to dry 3-7 days depending on drying conditions before applying stain.
Be sure to thoroughly rinse the cleaning agent and allow the log surfaces to completely dry before applying a finish.
After cleaning, you will notice a woody pulp on the surface. This can be removed by hand with a 3-M stripping pad or a quicker method is using an Osborn Buffing Brush on an angle grinder or car buffer. Usually two brushes are required for a house. If you did not use a sap-stain control, you may notice sap-stain, a blue, red, or brown coloration deep in the wood. These are permanent stains and unfortunately can not be removed.
2. Interior Cleaning on the inside may be more messy than on the outside, if the house is already furnished. A general dusting may work, but to actually clean the logs, a sponge saturated with a bleach and water combination may be used. The logs will need to be rinsed, hence the messiness. A trough could be built to catch any of the dripping water when rinsing, or use another sponge with plain water. Otherwise, just a light sanding is necessary.
Subscribe to:
Posts (Atom)
Sansin Announces Color of the Year 2025 - Ivory 21
Sansin has announced the 2025 color of the year: Ivory 21. Ivory 21 enhances the natural beauty of wood and brightens up any space. This v...
-
Hults Bruk Replacement Hickory Handles (a.k.a. haft or helve) for Hults Bruk Axes. As the saying goes with several variations, "T...
-
Rustic log furniture is increasing in popularity, and many people are opting to build DIY log furniture and railings at their own cabi...
-
Sansin Dec Finish is a two-coat, specially designed formulation for decks, docks, and balconies. The modified natural oils in Sansin D...