Showing posts with label Caulking. Show all posts

Wednesday, May 21, 2025

Log Home Chinking vs Caulking

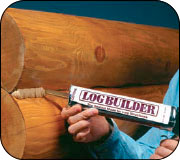
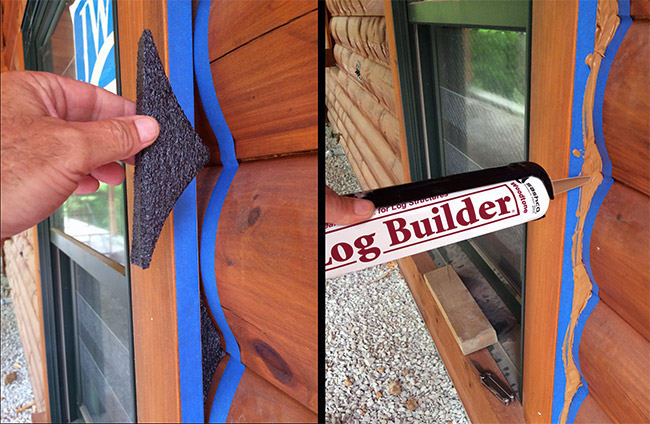
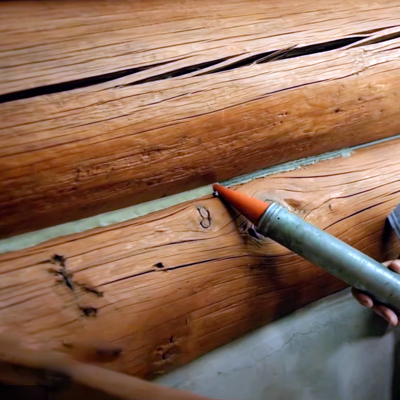
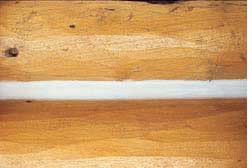
Chinking Joint Design for Log HomesWhat is the difference being caulking and chinking? We hear this question all the time. They are somewhat interchangeable in application- to some degree- but there are differences. Modern caulking and chinking are both flexible sealants that are used to seal log homes. Historically, chinking and daubbing were a myriad of material put between the courses of logs to fill the gaps and keep out the weather. It may have been any combination of mud, manure, straw, horsehair, moss, or whatever the local environment provided. Gradually that was replaced with a mortar mixture, often applied over wire mesh or other hardware to keep it in place as the mortar dried and cracked. Now we have modern, synthetic log home chinking and caulking. When properly applied, these elastic sealants will stretch and move with the wood to maintain a bond and keep water, weather, and pests out of the home and keep the heat inside during winter months. Following its history, modern chinking is a textured sealant that simulates mortar but stretches like caulking and is most often put over a backer rod between the logs. Caulking can also be used to seal the lateral joints of logs when a subtle, non-chinked style is needed, and it’s also used with backer rod to keep water out of log checks and to seal all other gaps around doors, windows, and other spaces.

At Schroeder Log Home Supply Inc., we believe in the importance of using the right product for the job, and that means using quality sealants that are designed to bond and be elastic for the best performance with log and wood. Brands we carry are Big StretchCaulking, CheckMate2, Conceal Textured Caulking, Energy SealCaulking, Log Builder Caulking, Manus-Bond Caulking, WoodsmanCaulking, Log Jam Chinking, Perma-Chink, and Sansin Timber-TecChinking. Contact us to help decide which may be best for your situation, or to get a color card to determine the best match to your wood finish.

Questions on maintaining the legacy of your wood structure? Give us a call- 1-800-359-6614

Pickup in store - or ship to your door -in whichever woods your cabin dwells.

 Schroeder Log Home Supply, Inc. 

1101 SE 7th Avenue

Grand Rapids MN 55744

1-800-359-6614


Monday, May 5, 2025

Log Builder Caulking - NEW Now Available in Clear!

In addition to the popular colors Tan, Woodtone and Dark Brown, Log Builder Caulking is now available in Clear. It’s the same excellent elasticity and ease of application you’ve grown to love, now in CLEAR. Great for sealing tongue and groove pine while staying undetectable. Also stainable to help blend in with…well, whatever color is there. Available in 10.5 oz. and 30 oz. cartridges, as well as 5 gallon pails.
 

 Log Builder Caulking by Sashco is a log home caulking sealant with a limited lifetime warranty. Sashco Log Builder Caulking is designed to meet the demanding sealant needs log homes and is compatible with most construction materials. Sashco Log Builder Caulking is water resistant in 1-4 hours. Sashco Log Builder caulking has superior water resistance. Plus excellent resistance to UV rays. Sashco Log Builder Caulking develops powerful adhesion, remains a rubbery sealant for many years. Not only does Log Builder caulking have powerful adhesion to sound wood - it sticks to a lot more. Granted, you want your sealant to have superior adhesion to all species of wood, but Sashco Log Builder caulking adheres to a variety of surfaces. After all, your log home doesn't just consist of wood. What about windows, doors, and baseboards made of a different material? Sashco Log Builder caulking sticks to most building materials including glass, plastics, and metals. So you can seal around those windows, doors and baseboards effectively. And you can fill checks and cracks since Log Builder caulking adheres to most log home stains and finishes too. Sashco Log Builder caulking has water-based chemistry that is environmentally friendly. All Sashco caulking including Log Builder Caulking is recommended for use with Backer Rod when used with logs. Made in the USA. Log Builder Caulking - How Well Does it Stick? Application Temperature: 40-90° F (log surface temp.) Cleanup: Soap and water. Log Builder Caulking Data | SDS

Questions on maintaining the legacy of your wood structure? Give us a call- 1-800-359-6614

Pickup in store - or ship to your door -in whichever woods your cabin dwells.

 Schroeder Log Home Supply, Inc. 

1101 SE 7th Avenue

Grand Rapids MN 55744

1-800-359-6614


Thursday, August 22, 2024

Log Home Caulking, Chinking, & Sealing FAQs

 Can I stain before caulking or chinking?

When applying water-based caulk and chinking like Conceal, Energy Seal, Log Builder caulking, Log Jam chinking, or Perma-Chink, and using a water based stain, it may be applied before of after staining. If using oil-based finishes like NatureColor Base or Recoater, Woodguard, or WR-5:
1. Apply caulk or chinking over one coat, and then apply a second coat of finish the following year.
2. Wait at least 21 days after staining before caulking or chinking to allow for cure time. (Paraffinic oils like in X-100 can cause adhesion failures.)

Do I need backer rod?

Yes, if chink joints are greater than 1/4". See Backer Rod and Chinking.

What does the temperature need to be to apply caulk or chinking?

See "Surface Preparation".

What can I use to smooth out my caulking or chinking?

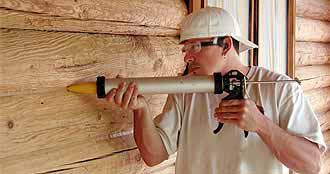
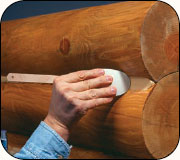
People use various kinds of "tooling" devices. The most popular would probably be a spatula of some sort at the desired width. Some people use a cake spatula if an industrial one is not available. Butter knives, rubber spatulas, and foam brushes have also been used.

How do I prevent blisters from forming in log home caulk and chinking?

Click here for details.

I have flat on flat logs, what do I put between them?

There are a couple of alternatives to put in between logs for a flat on flat system:

1. The first is to lay a bead of adhesive caulking on each side of the log; see Conceal or Woodsman Caulking.
2. The other alternative is a product called LogSeal. Some of the features of LogSeal are sealing against water, cold, heat, light and noise. LogSeal has adhesive on one side with an easy-release protective liner, providing fast and easy placement during construction. LogSeal provides easy application for flat on flat and saddle notch systems. When using for flat on flat construction, lay one line of LogSeal on the outer edge and one line on the inner edge.

Do I need to caulk after using LogSeal?

Yes. It is always important to seal the exterior side with log home caulk or chinking to keep moisture (in the form of rain or splash-back) out from the log joints. The log caulking also helps to keep insects from working their way in.

Should I buy a 5-gallon pail or tubes?

Economically, it is better to buy a 5-gallon pail; however you don't start saving money until you purchase two 5-gallon pails because of the cost of tools for pail application. A 5-gallon pail is equivalent to twenty-two 29 oz. tubes. It will also depend on what the you feel comfortable with, caulking tubes or a bulk loading gun.

If I buy a 5-gallon pail, how do I get it into my caulk gun?

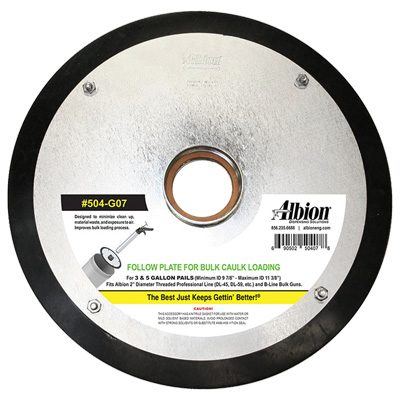
By using a Follow Plate.

How do I clean and take care of my Albion bulk loading gun?

See "Care of Albion Bulk Loading Guns".

How to Prevent Blisters in Caulk and Chinking

Occasionally, blistering of a chinked or caulked surface occurs. A chinked area is more susceptible to blistering due to the larger joint size. After several years of investigation, Sashco Sealants has uncovered most or all of the causes* of this problem and can recommend ways to prevent it.* At first it was thought that the chinking itself was to blame. But the facts do not support this. For example:

  •  The same batch of product has blistered on one log and not on another.
  •  It is common to find blisters on one side of a house and not the other.
  •  Blisters occur above a certain point on a wall and not below it.
  •  Some blisters appear to be random on a chinking line and others are in a straight row.
  •  Blisters often reappear in the same place when repaired with the same batch of chinking or even with a different batch.

The Causes are Site related and not product or batch related.

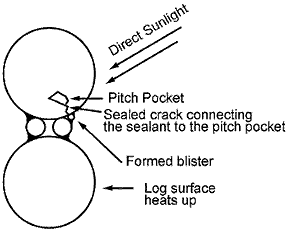
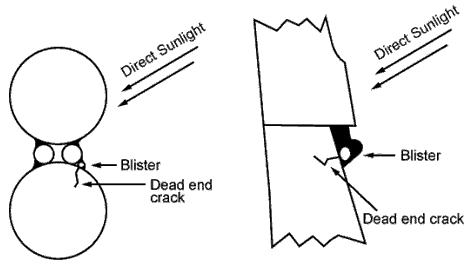
Causes of Blisters: The basic cause of any blister is a build-up of gas between the log, the backing surface, and the chinking or caulking. It occurs during The early curing stages when The chinking is soft but has a skin formed on the surface. Heat usually in the form of direct sunlight causes the gas to expand. As the gas expands, it pushes the chinking out, causing a "bubble" or blister. This gas comes from water, wood sap, or even backing material.

What Circumstances Create the Gas? Trapped Water Vapor. As chinking and caulking dries, it gives off water vapor. Any physical condition which traps the resulting water vapor could cause a blister, especially if the logs and chinking are heated by direct sunlight here are some things that could trap this vapor.

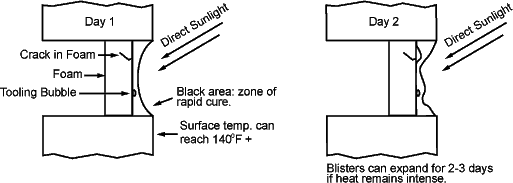
  • Cracks or indentations in foam or polyethylene backer rod which doesn't go all the way through. Even tiny spaces can trap enough vapor to create a blister big enough to see.
  • Air bubble trapped during the application process against non-porous backer material.
  • Dead-end crack in wood where moisture vapor can accumulate and expand when heated. (This, most likely, is the most wide-spread cause.)

Note Manus-Bond Caulking is not affected by water vapor in the same as other caulking or chinking because it is a polyurethane. Moisture makes it set up faster and will not generally cause blistering.

.

blisters forming

blisters on day 1 and day 2

Backing Material Backer rod out-gassing. Closed cell backer rod has a puncture and is squeezed by expanding logs. The gas used to make the rod forces a blister in the chinking and caulking.

On Day 1 the backer rod and sealant are applied in the cool part of the day. On Day 2 the sun comes out and heats the logs. This causes the backer rod to be squeezed, and forces a small amount of gas in the backer rod to leave the rod at a rupture or weak spot and make a blister in the sealant. The phenomenon has been known to occur in the caulk and sealant industry for many years and occurs randomly and unpredictably.
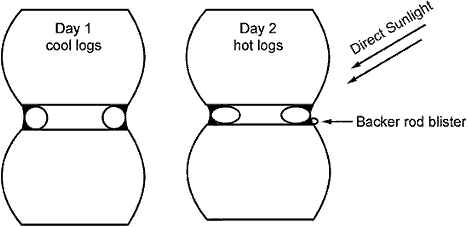
Backer Rod Blister

Blister from Pitch PocketPitch Pockets Logs often have what is termed "pitch pockets." These are areas of concentrated pitch, or sap, sometimes containing several gallons! (Pitch pockets of 50 or more gallons are known!) This sap (or its vapor) will follow cracks in logs, coming out of the log almost anywhere. It especially exits at the knots Where the sap flow was directed during the life of the tree. Sap has a volatile component and, when heated, forms a gas that causes blisters. Some blisters appear to be in the dead center of the chinking/ caulking. Upon close investigation, however, most or all of the bubbles are connected to a crack in the log surface. The blisters are often the result of sap vapor, which can come through the tiniest of holes in the wood. Pitch pockets are often the cause of blisters, which line up in a straight row. They are simply aligned with the crack in the log along which the sap is traveling. In the heat of direct sunlight some of the liquid sap in the pitch pocket turns into a gas that is under pressure and can form a blister as it tries to escape the log.

Prevention of Blisters Some of these causes cannot be controlled. Two factors can be partially controlled - heat and backer rod selection/preparation. Since heat normally is responsible for turning undetected gas into unsightly blisters, it makes sense to control this element as much as possible. Once the chinking and caulking has become firm, it can then resist the low pressure from the water or sap vapor and the blisters can then be prevented.
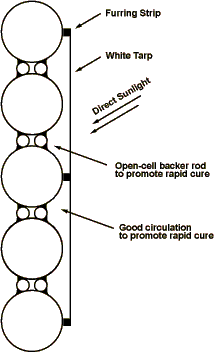
Control the Heat to Prevent Blisters

Control the Heat:

  • Chink or caulk on the shady, cool side.
  • Protect walls from direct sunlight for a few days by covering with a light colored tarp, cloth or plastic. Leave plenty of room for ventilation. It is important to cover the logs as well as the chinking and caulking so the entire surface will stay cool.
  • Stain logs first. This can help to close some pitch pocket holes before chinking and caulking.
  • Although rare, it is possible for excessive heat to build up inside a log home during the early curing stage and cause blisters. If this could occur, make sure windows and doors are left open to allow cool air to ventilate the interior.

Control the Backing Material:

  • Use blunt tools to install closed cell backing materials, being careful to avoid puncturing or denting.
  • Open cell backer rod** may be used in place of closed cell backer rod. These backer rods will not generate gas and they can help dissipate any gas originating from another source. **The weakness of this type of backer rod is that it is more susceptible to absorbing moisture if the chinking or caulking is ruptured and driving rain is forced through to the backer rod.
  • When chinking and caulking over flat insulation (styrofoam, bead board or foil-faced foam board), surface cracks, holes, or dents should be covered with a high quality sticky mylar tape, 2" wide preferably. (The tape will tend to prevent as much as 80% of the blisters that would otherwise form.) Extruded styrene foam (such as Dow Chemical's blue "Styrofoam") has a greater tendency to cause blisters than white bead board or foil-faced urethane foam.
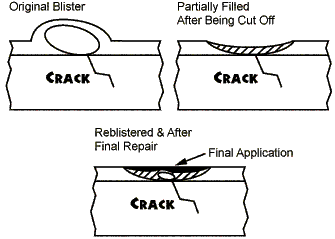
  • Fixing a BlisterA fresh blister can sometimes be eliminated by puncturing the surface skin (to let the moisture vapor escape) and pushing the chinking and caulking back into place. This step can cause marring of the chinking finish, but can be smoothed out 2-3 days later (after the chinking has firmed up) with a small amount of Log Jam applied and smoothed. Often the blister will not reappear. To be effective, this action must be taken within the first day after application, while the underlying chinking and caulking is still wet This method can be the most effective and efficient since the blisters are caught very early (before they become very large) and repaired quickly.
  • More thoroughly cured blisters must be cut off flush and the cavity filled approximately one-fourth to one-half full and allowed to dry. If the cause of the original blister is still present, then it will push the fresh chinking and caulking out into a shallow blister below the surface of the surrounding chinking/ caulking. This may be allowed to dry and a second application, blending with the surrounding chinking, will complete the repair. (See the drawings.)
  • If you can cover a crack or hole with mylar tape, only one repair step is needed. Chinking and caulking can be installed flush with the surrounding material.

Subscribe To Our Log Core Newsletter


Questions on maintaining the legacy of your wood structure? Give us a call- 1-800-359-6614

Pickup in store - or ship to your door -in whichever woods your cabin dwells.

 Schroeder Log Home Supply, Inc. 

1101 SE 7th Avenue

Grand Rapids MN 55744

1-800-359-6614


Thursday, August 8, 2024

Perma-Chink Energy Seal Textured Caulking

 Caulking a log home with Energy Seal by Perma-ChinkPerma-Chink Energy Seal Textured Caulking is a Log Home Sealant designed for Milled and Scribed Log Homes. Energy Seal, was created specifically to seal milled or scribed log homes. One application makes any log wall completely weather-tight. Energy Seal has excellent adhesion and stretch. Its long-lasting, UV-stable and chemical-resistant formula has become a popular log home sealant. Unlike many commonly used sealants, which look shiny and artificial, Energy Seal is textured to match the visual characteristics of wood. It tools easily to a smooth, professional finish, virtually disappearing into the walls after it's applied. It softens the lines on log walls and accepts the color of wood finishes. In fact, Energy Seal so closely matches your walls, most people can't tell the seams are sealed. Made in the USA.

 Directions for Use 

STEP #1: INSPECTION

Check for deterioration and decay. Remove and replace or repair deteriorated wood. Unsound wood should be repaired prior to applying ENERGYSEAL. Contact any Perma- Chink Systems office for information about wood repairs.

STEP #2: SURFACE PREPARATION 

All surfaces should be clean and free of contaminates including dirt, dust, mold, mildew, oil and wax. Use appropriate materials to clean and prepare surfaces. Do not apply ENERGYSEAL over old caulk. If a wood preservative has been previously applied, make sure it is completely dry before applying ENERGYSEAL. If the surface is tacky or there are visible deposits on the wood, wipe the surface with a wet rag and allow to dry. If an oil-based stain has been applied, allow it to dry at least two weeks before applying ENERGYSEAL. Request a copy of “Log Home Sealant Application Guide” from any Perma-Chink Systems office for information about surface preparation and sealant application. 

STEP #3: BACKING MATERIALS

Depending on the log structure, Grip Strip (trapezoid) or Backer Rod (round) should be placed into the gap before the ENERGYSEAL is applied. This provides a more effective two-way (top and bottom) adhesion. When sealing small seams between logs, the Backer Rod may be held in place by running a small bead of ENERGYSEAL along the seam and sticking the Backer Rod to it. After about 30 minutes ENERGYSEAL may then be applied over the Backer Rod without displacing it. 

STEP #4: APPLICATION 

ENERGYSEAL is compatible with most stains. For maximum adhesion and least visibility use ENERGYSEAL on bare wood prior to staining. If ENERGYSEAL is to be used over newly applied stains or topcoats, apply the product in an obscure area, wait 24 hours and test for adhesion. Do not apply ENERGYSEAL in direct sunlight or when the temperature is less than 40° F. ENERGYSEAL may be applied with a bulk loading caulk gun or applicator bag. Hold the applicator tip firmly against the back surface and apply. Apply enough sealant to maintain a wet thickness of 3/8” across the entire joint after tooling. Only apply as much sealant as you can tool in about 15 minutes. Once the joint is filled, spray with a light mist of water and tool smooth with a trowel or spatula. If the width of the trowel is close to the width of the joint, the smoothing process will be easier. Make sure there is good contact between the ENERGYSEAL and the exposed edges of the top and bottom logs. If you are a first time applicator, start work on a less visible area until you become familiar with the process. 

STEP #5: DRYING AND CURING TIME STEP 

Protect freshly applied ENERGYSEAL from direct rainfall for a minimum of 24 hours. When draping a wall with plastic film, allow some airspace between the wall and the plastic to facilitate drying. Drying time and curing time are two entirely different terms. In warm or hot weather, ENERGYSEAL will begin to skin over in as little as ten minutes while a complete cure may take three to four weeks. Cooler weather will slow both the drying time and curing process. 

STEP #6: CLEANUP 

Clean area and equipment immediately with warm, soapy water before the ENERGYSEAL dries. For removing Perma-Chink that has dried, soften with alcohol and then clean with warm water. Please do not pollute our environment. Dispose of containers and unused material in accordance with local, state, and federal regulations.

STEP #7: MAINTENANCE

Periodic cleaning with an appropriate cleaner such as Log Wash™ will clean off dust and dirt and accentuate the beauty of your home. We recommend that log walls be washed down at least twice a year. Small rips and tears may be repaired using a bead of ENERGYSEAL and a damp short bristled brush to blend it in with the surrounding area. 

STEP #8: STORAGE

Store ENERGYSEAL out of direct sunlight and protect from freezing. Although ENERGYSEAL is freeze-thaw stable, if the product is accidentally frozen, allow to thaw, mix well and check for suitability of use before applying. 

Full data sheet can be found here.


Questions on maintaining the legacy of your wood structure? Give us a call- 1-800-359-6614

Pickup in store - or ship to your door -in whichever woods your cabin dwells.

 Schroeder Log Home Supply, Inc. 

1101 SE 7th Avenue

Grand Rapids MN 55744

1-800-359-6614

Friday, July 26, 2024

Sashco Log Builder Caulking

Log Builder Caulking being applied on a Swedish Cope style log home Log Builder Caulking by Sashco is a log home caulking sealant with a limited lifetime warranty. Sashco Log Builder Caulking is designed to meet the demanding sealant needs log homes and is compatible with most construction materials. Sashco Log Builder Caulking is water resistant in 1-4 hours. Sashco Log Builder caulking has superior water resistance. Plus excellent resistance to UV rays. Sashco Log Builder Caulking develops powerful adhesion, remains a rubbery sealant for many years. Not only does Log Builder caulking have powerful adhesion to sound wood - it sticks to a lot more. Granted, you want your sealant to have superior adhesion to all species of wood, but Sashco Log Builder caulking adheres to a variety of surfaces. After all, your log home doesn't just consist of wood. What about windows, doors, and baseboards made of a different material? Sashco Log Builder caulking sticks to most building materials including glass, plastics, and metals. So you can seal around those windows, doors and baseboards effectively. And you can fill checks and cracks since Log Builder caulking adheres to most log home stains and finishes too. Sashco Log Builder caulking has water-based chemistry that is environmentally friendly. All Sashco caulking including Log Builder Caulking is recommended for use with Backer Rod when used with logs. Made in the USA. 


Fundamental Caulking Application Guidelines

• Proper substrate preparation and application are imperative for product longevity. Read this entire info sheet (LBR 002) before applying any product. 

• Make certain there is compatibility between your stain and Log Builder. We recommend Sashco’s Capture®/Cascade® or Transformation Stains® for exterior applications and Symphony® interior clear coat for beautiful long-term protection. Best results are obtained when Log Builder is applied to clean, stained wood. Call Sashco at 800-767-5656 for guidance if in doubt. 

• Check the weather forecast. Finishing products are best-applied in moderate weather conditions, i.e., out of direct sunlight, and in dry, warm conditions.. 

• Check the log surface temperature. The surface temperature should be between 40˚F (4˚C) – 90˚F (32˚C). 

• It is always best to use a bond breaker (usually backer rod) before caulking. Sashco strongly recommends the use of backer rod, especially if the home is new and/or the logs are subject to significant movement. If a bond breaker is not used, expect more caulking repairs. 

• Tool Log Builder to help ensure good contact with the log surfaces, especially to the upper log; this will greatly aid adhesion. 

• Ideal sealant depth is 1/2 of the joint width, but no less than 1/4” and no more than 1/2”.

• Assemble tools and equipment: - Backer rod - Caulking guns - Trowels, spatulas, or foam brushes for tooling - Clean water and rags - Plastic sheets to cover the caulking if wet weather moves in - Staple gun & staples

Surface Preparation

Best results are obtained when Log Builder is applied to wood that has been previously coated with a compatible and thoroughly cured stain. In fact, Log Builder has a Limited Lifetime Warranty when applied over any of Sashco’s stains: Capture Log Stain or Transformation Stain. 

If not using a Sashco stain, be sure to confirm its compatibility with Log Builder. If the stain is older but still intact, clean the log surfaces thoroughly to remove dirt, pollen, bird droppings, and other surface contaminants.

The USDA Forest Products Laboratory and other researchers around the world have recently reported that surface wood exposed to sunlight for as little as 1-2 weeks can become significantly damaged and unsound which may lead to premature adhesive failure of coatings. Such surface wood damage has the potential to also hurt Log Builder’s (or any caulk’s) adhesion. Once bare wood has been properly cleaned and prepped to remove unsound wood, stain should be applied as soon as possible. Follow with Log Building caulking.

A few sealers, especially those high in wax content or non-drying oils, may interfere with adhesion. Some of these coatings can hurt any caulk’s adhesion—whether applied before or after the caulk—so we advise against their use. Check with Sashco if you have questions about your particular product.


Questions on maintaining the legacy of your wood structure? Give us a call- 1-800-359-6614

Pickup in store - or ship to your door -in whichever woods your cabin dwells.

 Schroeder Log Home Supply, Inc. 

1101 SE 7th Avenue

Grand Rapids MN 55744

1-800-359-6614

Tuesday, July 9, 2024

Log Gap Cap Installation

The Log Gap Cap™ reduces air infiltration where round logs meet window and door trim. The small are designed to work with 6" to 8" diameter logs, the large fits 9" to 11" logs. The Log Gap Cap's uniform shape fits most log profiles. With an easy scissor cut along the flat side, they work in log siding applications. Engineered from 3/4" closed cell flexible foam, it compresses and remains in place with little or no caulking required. Its smooth surface on one side allows easy caulking if desired. The material is resistant to mold, rot, bacteria, and will not absorb moisture. Made in the USA. Available in 10 packs and 50 count boxes.


Questions on maintaining the legacy of your wood structure? Give us a call- 1-800-359-6614

Pickup in store - or ship to your door -in whichever woods your cabin dwells.

 Schroeder Log Home Supply, Inc. 

1101 SE 7th Avenue

Grand Rapids MN 55744

1-800-359-6614

Friday, July 5, 2024

Sansin Timber-Tec Chinking


 Sansin Timber-Tec Chinking - A revolution in chinking technology. Log homes move and settle like no other buildings. That’s why Timber-Tec Chinking is engineered for zero shrinkage while accommodating up to 400% elongation so that as your house moves it will continue to be tightly sealed against the weather. Timber-Tec Chinking is odorless, cures to exposure in just one hour, and is easy to apply even in cold temperatures. Timber-Tec Chinking is designed for application in very dynamic joints. It is solvent free, non-shrinking, and its unique cure chemistry allows application down to 30° F. Made in Canada.


Application Temp: 30°F +.
Method: For these sausage packs, use the Cox Bulk Gun with the factory installed blue cup or a Newborn Bulk Gun. You can spray 99% isopropyl alcohol as you apply and spread chinking in the joint. Don't use water as this promotes faster curing.
Surface Preparation Inspect bonding surfaces for defects or deterioration or insect damage. Clean all dirt, debris, oil or previous chinking with ammonia water or alcohol. Do not clean with petroleum distillates or detergents, which leave a residue that would interfere with adhesion. See Technical Data for details.
Drying Time Cure begins when it comes in contact with air, resealing the package will not stop the curring process so it is necessary to plan accordingly. Skin over in about 40 minutes at room temperature. Hot and humid conditions can accelerate skin over time to as little as 20 minutes. See Technical Data for details.
Shelf Life: 1 year. Store at room temperature. Freeze-thaw stable (not damaged by freezing).
Cleanup: Soapy water/Alcohol mixture.


Questions on maintaining the legacy of your wood structure? Give us a call- 1-800-359-6614

Schroeder Log Home Supply, Inc.
1101 SE 7th Avenue
Grand Rapids MN 55744

www.loghelp.com 

Wednesday, July 3, 2024

Backer Rod and Chinking Log Homes

Backer Rod and Chinking Part 2

Chinking a log home is not a difficult process. Once you get over the awkwardness of learning how to "gun the product" onto the logs and then get the "feel" of tooling the product you will pick up speed and find satisfaction in having a part in finishing your home. This article covers the basics of how to chink a log home, but before starting your project in earnest, request and read a Data Tech that goes into greater detail.

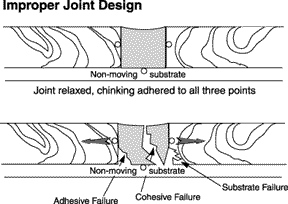
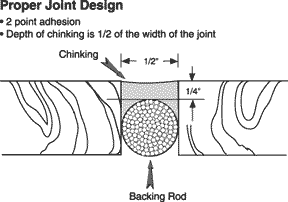
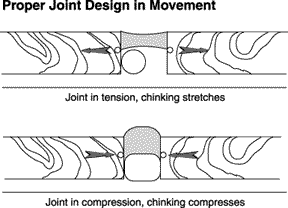
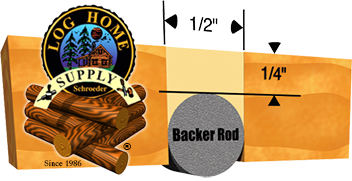
Proper Joint Design Last month’s article briefly touched on the reason why backer rod is needed—to serve as a bond breaker. The following illustrations graphically depict why 2-point adhesion is so important for the performance of any chinking or caulking product. Synthetic chinking is formulated to be flexible, but as the drawings demonstrate it can fully flex to absorb log movement only if a bond breaker is installed down the center of the joint.

 improper joint design     proper joint design
 
proper joint design in movement
 

Surface Preparation For chinking to establish good adhesion to the logs, they must be clean—free of dirt, pollen, uncured oils, sawdust, and other loose materials. The surface temperature of the logs should be between 40°-90° Fahrenheit. The liquids in the chinking "wet out the surface" of the logs so that the chinking can establish good adhesion. If the log surface is colder than 40° the wood pores tighten up not allowing for proper wetting out of the surface. Conversely, when the wood temperature is higher than 90°, the liquids evaporate off too quickly, adversely affecting adhesion.

Most people like contrast in color between their chinking and their stain; therefore, staining prior to chinking is necessary to achieve this look. It is also easier to tool chinking if it is applied to a stained surface, but you must be certain that the stain and chinking are compatible, and that the stain has had sufficient cure time.

Many stains on the market contain waxes and stearates that can interfere with adhesion of chinking and caulking. Usually, companies that manufacture both chinking and stains make certain that their products are compatible, and attempt to enhance their stains for even better adhesion of their chinking and caulking products. If your chinking and stain are manufactured by 2 different companies, call and ask if testing has been done for compatibility and request a copy of their test results.

Application Chinking is packaged in 5-gallon pails and quart tubes, although for larger jobs, 5-gallon pails are more economical. When using 5-gallon pails there are a number of application methods that can be used. You can use a trowel, grout bag, bulk loading gun, or a commercial pumping system that pumps out the chinking material in a continuous flow, making it easier to apply.

There are a variety of different sized nozzles available in both round and slot styles. For smaller beads, a round style nozzle works well but for wider joints the slot style nozzles are the only way to go. In selecting your nozzle size be aware that the depth of the bead of caulk should be half the size of the width of the joint, but never thinner than a 1/4" or thicker than 1/2"; i.e., for a joint 1" wide the bead depth should be 3/8" to 1/2".

Apply the chinking material down the center of the joint, over the backer rod and overlapping slightly onto the surface of both logs. Only apply enough product down the length of the log that you can reasonably tool before it starts to skin over. As you become accustomed to tooling you will be able to run longer beads.

Tooling ChinkingTooling There are as many tooling implements out there as there are chinkers! I prefer the polyethylene foam brushes available in any hardware store or lumber yard but I have seen folks tool with rubber spatulas, paint brushes, putty knives, trowels, and even metal spatulas cut down with wire cutters to the desired width. The secret is finding the tool that works best for you. You will also need a pail of clean water, a sponge, and a spray bottle filled with clean water. To speed up the tooling process, have several foam brushes on hand. As soon as one picks up too much chinking and starts to drag instead of gliding over the surface, throw it into the water pail and continue on with a clean brush. A mixture of 1 part denatured alcohol to 2 parts water can be used for misting chinking when the temperature is over 70°. If you are working in the sun and the chinking is skinning over too quickly, straight alcohol can be used. When the temperature is lower than 70° the alcohol is not necessary.
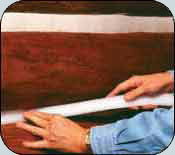
Using a damp polyethylene foam brush, holding the foam portion parallel to the bead, gently press the bead into place. You don't want to drag the foam brush down the bead but instead, section by section press the foam brush against the bead. The next step is the actual tooling. Using the spray bottle, lightly mist the chinking with water to allow the brush to glide over the surface. Do not apply too much water, or the latex in the chinking will run down the logs. If this happens, just wipe off with a damp sponge or rag. The idea is to smooth out the ripples caused by gunning, but most importantly, to feather the bead out onto the top and bottom logs at least 1/4" so that the chinking is tooled tightly to the log surfaces.

Clean-up and Disposal To properly dispose of unused chinking material, it is good practice to understand and follow all of your state and local regulations on clean-up and disposal. Do not dispose of chinking material in drinking water supplies. However, for easy clean-up water may be used for cleaning hands, surfaces and equipment. Toxic solvents are not required for chinking material clean-up.

Warning! As you finish your chinking and stand back to admire your work . . . ugh! Blisters! Blisters are a phenomenon commonly found after applying chinking. They form when moisture from the chinking accumulates in voids beneath the bead and the heat from the sun causes the blister to appear as "bubble" in the chinking. To avoid these blisters, use a white tarp to shield freshly chinked walls from the sun. If this is not possible, keep a close eye on the chinked wall for the first 24-48 hours. If a blister pops up, just puncture a hole in the middle of it and gently push the chinking back into place. Then after 3-5 days you can repair the blister by applying a small portion of chinking material into the hole.

Cure Time After the chinking process is completed, allow it to cure for one week if you will be painting over it with oil or latex paints, total cure-through is 28 days. Just one last suggestion that I picked up from a professional chinker: Hang a small board with several beads of the chinking in a conspicuous area with a sign inviting people to satisfy their need to touch. Hopefully, this will keep them from satisfying their curiosity on the chinking courses of your home!


Questions on maintaining the legacy of your wood structure? Give us a call- 1-800-359-6614

Schroeder Log Home Supply, Inc.
1101 SE 7th Avenue
Grand Rapids MN 55744

www.loghelp.com 


Backer Rod for Log Home Chinking


Backer Rod and Chinking Part 1 & 2


Part 1


As the warm weather begins, its the time of year when we start thinking about chinking our log homes. The first step of caulking or chinking is applying Backer Rod. The *Log Core will take you through a two part series of Backer Rod and Chinking. We will begin this series with backer rod of all types.

Backer Rod is a synthetic foam that comes in a variety of shapes and sizes from 1/4" up to 5". The reason why Backer Rod needs to be placed in joints is that it acts as a bond breaker, which provides a surface that chinking won't adhere to. Eventually, the chinking will free itself from the backer and will move with the logs as they expand or shrink. Backer Rod also serves by adding an insulation value and reduces the amount of material needed.

Grip Strip backer rod provides an excellent fit with a flat working surface and is a closed cell product that repels water. As a chinking applicator for a restoration company for 7 years in Northern Minnesota, I have found this material is the easiest and quickest to use. No tools are necessary and it follows with the curvature of the logs. This product really grips to the logs and stays in place.

SOF Rod can be described as an open cell, extruded polyethylene foam. SOF Rod is extruded to leave an impermeable shell to prevent moisture from entering the side. Advantages of this backer are that it is very flexible and is easy to install. Smaller sizes are offered to fit those really tight joints. When choosing a size, the diameter should be approximately 25% larger than the joint because of the compressibility. Precautions to take are not to puncture or stretch during application. This may cause out gassing. In smaller joints a blunt tool may be needed to push backer further into the joint to allow the required amount of chinking. This material is easier to work with for smaller size joints.

Closed Cell backer rod is a closed cell polyethylene round foam that also runs in a continuous length. Compared to the SOF Rod this backer is firm, but just as easy to install. Again a blunt tool may be needed to push backer deeper into the joint to allow the required amount of chinking.

Open Cell Backer Rod is easy to work with also. It is soft and compresses to fit most size joints. This product is breathable which allows for a faster cure, but recommended in the interior. This is because it will absorb water. If used on the exterior, only put in the amount of open cell that you think will get done in one day so the exposed backer will not draw in moisture. Note: the use of a blunt tool when installing backer rod to the exterior logs will prevent punctures to the surface of the rod and minimize chink blistering caused by trapped water vaporizing under direct heat from exposure to the sun.

For smaller joints where backer rod can not fit, but yet there may be a gap, a mylar tape or strapping tape may be used. This too will serve as a bond-breaker to allow the material to release itself from the tape and move with logs as they settle and shrink. If applying chinking over old mortar, a bond-breaker tape should be applied as well. Packing tape or duct tape are two examples that will work for this situation.

If the backer seems to keep popping out, a smaller backer or a different style of backer is needed. You should never have to nail Backer Rod to keep in place. The most common mistake about choosing Backer Rod is selecting a backer that is too big for the joint. When this happens, the backer keeps coming out or you are left with a chinked joint that is larger than it needs to be. I recommend to take advantage of the samples we have to try different styles and sizes. Keep in mind that you may require a number of different styles and sizes for your particular project.

*Backer Rod and Chinking Part 1 (courtesy of Denise Carlson, Schroeder Log Home Supply, Inc.)


Questions on maintaining the legacy of your wood structure? Give us a call- 1-800-359-6614

Schroeder Log Home Supply, Inc.
1101 SE 7th Avenue
Grand Rapids MN 55744

www.loghelp.com 


Tuesday, July 2, 2024

How to Use a Follow Plate

How to Use a Follow Plate

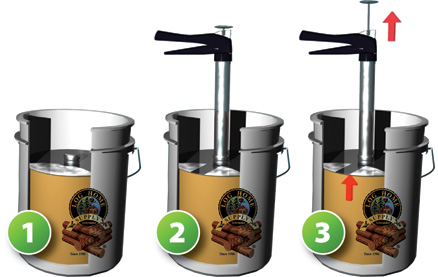
Remove front cap of caulk gun and wet the end of gun with water or release agent (50% water and 50% denatured alcohol). Spray or pull water into the gun chamber to lubricate the interior.


  1. Seat the follow plate firmly on the surface of caulk or chinking.
  2. Attach the caulk gun to the follow plate and lock the push rod.
  3. Pull up slowly to draw the caulk or chinking up inside the barrel until filled.

 Albion & Cox Follow Plates are available.


Albion Follow Plate


With your gun screwed on, the Follow Plate allows for easy pressure-feed filling and refilling of caulk or chinking from 5-gallon pails. For straight or tapered  pails. (Conceal, Log Builder, and Log Jam are tapered as of March 1st, 2015). Works with Albion and Newborn bulk loading guns. Made of sheet metal.


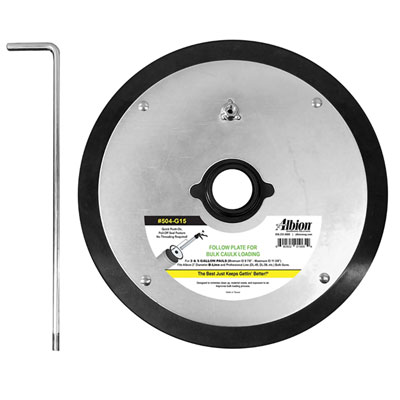
Albion Slip On Follow Plate


Quick Push-On, Pull-Off Seal Feature. No Threading Required!

• For 3 & 5 Gallon Pails (Minimum ID 9-7/8” - Maximum ID 11-3/8”).
• Fits all 2” diameter B-Line Bulk and Sausage Guns (models B12Bxx, B26Bxx, B12Sxx, B18Sxx, etc.) and Pro Professional Line (DL-45, DL-59, etc) Bulk Guns. (Sold Separately.)
• Includes a pull rod for easy removal of Follow Plate from pail.
• Steel plates sandwich a nitrile gasket that scrapes the inside of 3 or 5-gallon pail clean.
• Designed to minimize clean up, material waste, and exposure to air.
• Keeps gun barrel clean and prevents air from entering gun barrel during loading.

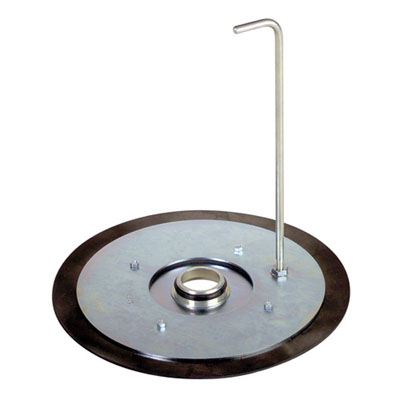
Cox Follow Plate


The Cox Follow Plate
works with Albion, Cox, and Newborn bulk loading caulk guns. It is designed to work with both straight and tapered 5 gallon pails. The rubber gasket edge seal makes for exceptional ease of use. Pull rod included. See How to Use a Follow Plate.  


Questions on maintaining the legacy of your wood structure? Give us a call- 1-800-359-6614

Schroeder Log Home Supply, Inc.
1101 SE 7th Avenue
Grand Rapids MN 55744

www.loghelp.com 


Tuesday, June 18, 2024

Albion Bulk Loading Caulk Gun Care

 Loading The Gun
If you are not using a follow plate, place the end of the gun down into the material about 2-3" and pull up on push rod. Using your pointer finger, scrape material off gun until it is clean, then wipe your finger. This helps reduce mess. It is advisable to have a small 5-quart pail with water and a cloth for clean-up after each filling.

Clean-Up At End Of Day
Put remaining caulk or chink back into pail and seal it. Place gun into a pail of water with cap removed and pull up on the push rod. Keep doing this until gun is clean of material. Unscrew the back trigger mechanism and spray a light lubricant like WD-40 into the back and into the gun chamber. Leave gun open until it is dry. This will help keep the interior from rusting. Wipe exterior of the gun with a light oil.

Other Maintenance
If gun is not maintained and a buildup of material develops on or in the gun, remove it by first soaking with brush and roller cleaner. After softening of material occurs, the interior can be cleaned with a 2" or 3" wire wheel attached to a 1/4 inch drill extension.

Other Trouble Shooting: Gun Will Not Fill
The leathers are probably either worn or dried out. With leathers in the gun, place the end of the gun in warm water and keep pulling up on push rod until water is pulled into the gun chamber. If you are working in the fall, the material may be cold and leak fluid. Either keep the material in a heated space or place the pail of material in a tub of heated water.

Leathers Are Buckled
The leathers will lose shape if stored or soaked in water too long. A well-maintained gun will give you a much better chinking or caulking experience, so do clean it daily; if you are unable to clean daily, place the gun in a plastic bag and seal it up until you can take the time to clean it. (if need be, the packing cups can be replaced)

Questions on maintaining the legacy of your wood structure? Give us a call- 1-800-359-6614

Schroeder Log Home Supply, Inc.
1101 SE 7th Avenue
Grand Rapids MN 55744

www.loghelp.com 


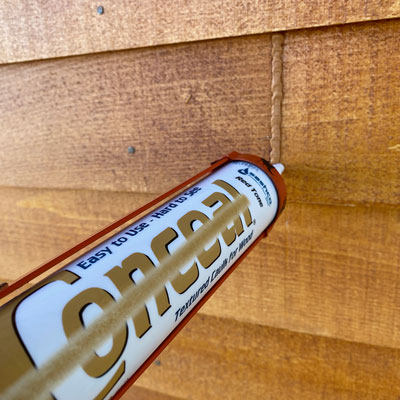
Conceal Textured Caulking for Log and Wood Homes

Conceal Textured Caulk in Redtone on Capture Red Cedar

Conceal Textured Caulking for log homes delivers performance that's hard to see. Conceal Textured Caulking colors blend in with the most popular stains used on log homes, and Conceal´s light texture simulates the natural roughness of wood. The combination of color and texture makes it hard to see where the caulking ends and the logs begin. Instead, they just blend together. Although the caulking is hard to see, Conceal delivers performance. Additionally, Conceal Textured Caulking is excellent for filling and concealing log checks. Is resistant to rainfall in 1-4 hours. Has a limited lifetime warranty. Conceal has superior elongation, memory, and adhesion. Application Temperature: 40°-90°F. Clean-up: Soap and water. Made in the USA.


Fundamental Caulking Application Guidelines

 • Proper substrate preparation and application are imperative for product longevity. Read this entire Info Sheet (CNL 002) before applying any product. 

• Conceal is not a chinking and should be used in joints under 2” wide. If the joints are wider, we recommend Log Jam. 

• Make certain there is compatibility between your stain and Conceal. We recommend Sashco’s Capture®/Cascade®, or Transformation® stains for exterior applications and Symphony® interior clear coat for beautiful long-term protection. Best results are obtained when Conceal is applied to clean, stained wood. 

• Check the weather forecast. Finishing products are best applied in moderate weather conditions, i.e., out of direct sunlight, in dry, warm conditions. 

• Check the surface temperature. It should be between 40˚-90˚F (4˚-32˚C). 

• It is always best to use a bond breaker (usually backer rod) before caulking. Sashco strongly recommends the use of backer rod, especially if the home is new and/or the wood is subject to significant movement. If a bond breaker is not used, expect more caulking repairs. 

• Tool Conceal to help ensure good contact with the wood surfaces. This will greatly aid adhesion. 

• Ideal caulk depth is half of the joint width, but no less than 1/4” and no more than 1/2”. 

• Assemble tools and equipment: - Backer rod - Caulking guns - Trowels, spatulas, or foam brushes for tooling - Clean water and rags - Plastic sheets to cover the caulking if wet weather moves in - Staple gun & staples (if necessary to help with backer rod installation)


Questions on maintaining the legacy of your wood structure? Give us a call- 1-800-359-6614

Schroeder Log Home Supply, Inc.
1101 SE 7th Avenue
Grand Rapids MN 55744


Monday, February 19, 2024

Contractor Training with Sashco


On February 15 we hosted our third annual Demo Day with Sashco’s Grizzly Bob. This has been a recurring opportunity for contractors to spend a day continuing their education on log care. In addition to giving product demos and instruction on how to use Sashco’s log finishing products, Bob also shared his wealth of knowledge on proper log home finishing and restoration practices. We are fully stocked with Sashco’s log products line and appreciate the partnership of education and experience Bob brings to share with our area contractors. For more extensive training, Sashco offers the Zero Failures training at their headquarters in Colorado. Interested contractors can contact us for more information on dates and sponsorship opportunity.

Questions on continuing your contractor education? Give us a call- 1-800-359-6614

Schroeder Log Home Supply, Inc.
1101 SE 7th Avenue
Grand Rapids MN 55744

www.loghelp.com


Tuesday, January 14, 2020

Camo Your Cracks

By Robert G. Kenel, Sashco, Inc

Checking is a natural occurrence that occurs in wood as it dries and acclimates to the surrounding atmospheric conditions. There are some things that can help reduce the effect of checking. Radial checking is the most common. That’s when the log shrinks as moisture is removed. To give you a better idea of how that looks. Picture the growth rings of the tree as a length of rope. It breaks as the wood dries. Know think the length of rope, it will shrink in length and get shorter. The longer the rope the more it more it will shrink. As these checks occur some will be bigger and others smaller as the logs reach specific gravity (G). You can see more in the ICC 400 Log Standards section 302.
Those checks can be seen exterior and interior, horizontal and vertical. While some see them as part of the log, others find them very displeasing. Besides the appearance there are some things that need to be addressed when checks are on the exterior of a structure. Foremost, upward facing checks are like gutters, collecting water in all its forms. This water becomes trapped and is absorbed in the wood fibers. It then starts to decay the wood internally where it can not be seen. Even if the logs look fine on the exterior, stain and sealers are doing their job. The hidden damages can cause expensive log replacement

Bigger checks of 1" or more I like to cut out a taper in the check. Using a small saw, I use a small electric chain saw. In which I cut tapers within the check making sure to go all the way to the very ends of the check. This is important as you can not caulk or seal those small ends properly. I do this for two reasons. One, to make a space for the wooden wedge I cut to fit the check. Two to cut out all the splinters to create a good fit for the backer strips required before caulking. On the job site I will use a 2X and circular saw set at angle to cut the wooden wedge. These I like to make a bit bigger so they extend beyond the log. That way I can grind off to fit. I fill the checks with either powder or liquid borates using a squeeze bottle. Like from a dish soap of ketchup bottle. I use glue to adhere the wedges. A good all weather adhesive I use is UltraTech 0770 ADA by Loctite. After the wedge dries is fully dried, grinded down and sanded. I can then match the stain and finish as needed.

Conceal Grizzly Brown
For checks that do not need wood, proceed with the same method but use backer strips that fit the check. They come in many sizes. The use of backer is very important as it creates that all important two point adhesion that bonds much better and allows the product to stretch properly. If backer is not used product could pull from the wood and there is no mid point of expansion to stretch. Follow the curves of the check with the saw and backer. Again, don’t forget the borates. A proper backer in inserted in the check is 1/4'” – 3/8” below the surface of the face of the log. This gives a depth that will hold a good amount of caulk, but not wasting by using to much. Tool using water mixed with a little dish soap. You can use a small brush with hair or foam. Wipe any excess off with a rag wiping in the same direction each time. I like using caulk designed for applications I am doing. Textured products like Conceal have grits that make it much less noticeable when dry. Other caulks are very smooth, and wood is not so much. Colors change as they dry so always do a test area first. Stain can also be applied over these areas after proper curing.

Reprinted from 2019 GLLCA newsletter.


Wednesday, January 10, 2018

Cut Your Energy Costs


Sashco Log Builder Caulking Application
January 10th is National Cut Your Energy Costs Day! One of the best ways to cut energy costs on an existing log home is to seal the joints with backer rod and caulking.

Logs and large timbers have thermal mass, which allow them to retain and radiate heat well in the winter. No doubt, log cabins are cozy! They can become uncomfortable, however, when daylight is seen between the logs or through the corner notches. If daylight is visible, then air can undoubtedly pass through, and that's when uncomfortable drafts will be coming into the home. If cold drafts are coming in, then warm energy is escaping out. That means it's time to caulk!


Insert a foam backer rod into the gap between the logs and seal the joint with a caulking designed for logs, such as Log Builder or Conceal Textured Caulking. Mist with some water to lubricate, then smooth out with a putty knife or spatula.

Cutting Your Energy Costs in a log home is as easy as squeezing a caulk gun trigger!

Questions on maintaining the legacy of your wood structure? Give us a call- 1-800-359-6614

Schroeder Log Home Supply, Inc.
1101 SE 7th Avenue
Grand Rapids MN 55744

www.loghelp.com


Monday, March 20, 2017

Chinking Damaged by Birds

Reprinted from our LogCore Newsletter Spring 2008 edition and The Log Home Maintenance Guide


You can see where birds have pecked irregular shaped holes into the latex chinking looking for insects and even where they chewed into the backer rod.

Birds can hear the insects moving within the log work and they are trying to reach them. The insects have either found within the logs soft, moist wood to nest in and hatch their young or are feeding on the wood itself.

Treatment:
The insect infestation of the logs needs to be treated first. Look for other small holes (accompanied by fine sawdust) in the log work. Using a syringe, inject the holes with an approved insecticide. Plug the holes with caulking or a mixture of wood glue and sawdust. For more information on the prevention and treatment of insects see Chapter 4: Insects starting on page 30.

Once the insect problem has been dealt with, fill holes with similar caulk or chinking to seal them from future infestation and moisture infiltration.

Unlike mortar chinking, synthetic caulk and chinking will adhere perfectly to old caulk or chinking as long as the surface is dry and free of dust and debris. Apply a small amount of new chinking over the holes and spread out with a foam brush to form a seamless patch.

Monitor the chinking and logs over the next few months to see if any more holes materialize. If so, repeat the treatment until they stop appearing. Typically, once the insect problem has been effectively dealt with, the birds should leave the chinking alone.

Reprinted from the Log Home Maintenance Guide.

Questions? Give us a call at 1-800-359-6614 or contact us on our website here.

Log Help Posts are Moving

 This site will no longer be updated, but please visit www.loghelp.com and especially the FAQs tab for regularly updated content and relevan...