by Paul VanKeuren
Customer Service
www.loghelp.com
Wooden handles are excellent. On hammers and axes they absorb shock, protecting the user. They are durable when used as a lever, as you would discover while using a peavey, cant hook, or shovel. And they decompose gracefully when accidentally abandoned in the woods, unlike fiberglass or plastic. However, wood handles are susceptible to the same forces that lead to the decay of any other wooden object, log homes included. Water is the enemy. Not only does it lead to the decay of the handle, it can also rust the metal parts of your tools. To prevent this you need to apply something to your handles, and while most handles already come varnished, I argue that a drying oil is the best treatment.
Why treat your handles with oil rather than varnish?
An oiled finish is easier on your hands than a varnished surface, and is less slick when wet. This makes it safer for you and those around you. Oiled finishes also breathe better than varnished surfaces, helping you get moisture out of the handle if any ends up getting in. Another benefit of an oiled handle, is the fact that it swells when treated with oil. This helps the wood form a tighter bond with other parts of the tool like an axe head.
Aren’t handles replaceable, why not just buy new ones when needed? Wood handles are replaceable and renewable which are some of their many virtues. However, quality handles are hard to find at your local hardware store, and the prices keep going up. If you carve your own you can avoid this, but then you still have a month of waiting for your freshly carved handle to dry. It is best to care for your tools AND replace/repair as needed. High quality replacement handles are available to order here.
What oil should I use?
When it comes to treating wood, there are essentially two types of oils, the drying oils and the non-drying oils. Drying oils are oils that cure to a plastic-like state, they include oils like linseed, tung, or walnut. A non-drying oil does not cure, but can evaporate or wash away with time. For tool handles, I recommend drying oils as they cure inside the wood making it a more durable material, while also protecting much longer than a non drying oil. Traditionally linseed oil has been used.
Be warned, drying oils heat up as they cure and can burst into flame. Any rags you use to apply drying oils should be burned, or soaked in water and spread out on a hot surface. I’ve heard several stories of folks throwing oil soaked rags in the trash only to have them start on fire and burn down their homes.
Boiled or Raw?
There are two kinds of linseed oil on the market, boiled and raw. The boiled linseed oil is not actually boiled, but has heavy metal driers added at the factory to make it dry faster. Raw linseed oil is the same thing as flax oil without any additives. Raw linseed oil will dry much slower, but is also a more natural product. To further complicate things, some folks thin their linseed oil with turpentine to aid in penetration. The turpentine then evaporates out of the handle depositing the oil further into the wood.
Application?
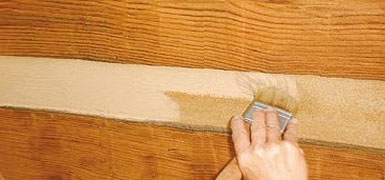
Apply liberally to the handle paying extra attention to the end grain until refusal. Then let the handle sit out in the sun for a minute or two, and wipe away any excess. There is an old adage that says you should oil your fresh handles once a day for a week, then once a week for a month, once a month for a year, and then yearly. I think this is over prescribed, but you do want to build up a good layer of oil within the wood.
Thursday, November 21, 2019
Monday, June 3, 2019
Replacement Axe Handle Measurements
Hults Bruk Replacement Hickory Handles (a.k.a. haft or helve) for Hults Bruk Axes.

As the saying goes with several variations, "This axe has been in my family for generations. The handle has only been replaced twice and the head replaced once." If the handle is replaced, is it the same axe? How about the head? Well, either way, there comes a time in an axe's life when it needs a new handle (also called a half, or helve).
There are also times when a haftless axe head is found at a flea market, in an old barn, or somewhere else treasures are discovered. In that case, restoring an old axe is a rewarding project that leaves one with a quality tool. For finding an appropriately sized handle for an axe head, the measurements for eye length and eye width are needed.

Hults Bruk handles designed to fit Hults Bruk Axes can also be used to replace old or missing handles on old axe heads. After measuring the eye width and eye length, the chart below can help find an appropriately sized haft to fit the axe head.
Hults Bruk handles are available at www.loghelp.com

As the saying goes with several variations, "This axe has been in my family for generations. The handle has only been replaced twice and the head replaced once." If the handle is replaced, is it the same axe? How about the head? Well, either way, there comes a time in an axe's life when it needs a new handle (also called a half, or helve).
There are also times when a haftless axe head is found at a flea market, in an old barn, or somewhere else treasures are discovered. In that case, restoring an old axe is a rewarding project that leaves one with a quality tool. For finding an appropriately sized handle for an axe head, the measurements for eye length and eye width are needed.

Hults Bruk handles designed to fit Hults Bruk Axes can also be used to replace old or missing handles on old axe heads. After measuring the eye width and eye length, the chart below can help find an appropriately sized haft to fit the axe head.
| Name & Length | Eye Width | Eye Length |
| Akka - 24" | 15 mm | 42 mm |
| Almike - 16" | 15 mm | 42 mm |
| Arvika - 32" | 23 mm | 63 mm |
| Atran - 32" | 23 mm | 63 mm |
| Jonaker - 9.4" | 15 mm | 42 mm |
| Kalix - 28" | 20 mm | 50 mm |
| Kisa - 26" | 20 mm | 50 mm |
| Motala - 30" | 23 mm | 63 mm |
| Tibro - 20" | 20 mm | 50 mm |
Hults Bruk handles are available at www.loghelp.com
Saturday, June 1, 2019
2019 GLLCA Conference
We had a great time with the Great Log Crafters
Association
this spring. An April snowstorm pushed the scheduled GLLCA
Conference into May,
which altered a few plans, but ultimately it was an educational
and enjoyable
conference. One of the outdoor sessions was Mark Weber’s log chain
demonstration. He showed how to chainsaw-carve a large-linked
chain out of a
solid. The unfinished chain went up onto the Association’s
fundraiser auction,
and now it’s sitting in the SLHS lobby as a point of interest.
There were two experiences highlighting the
history of logs
in the region—a presentation by Lilah Crowe of the Itasca County
Historical
Society gave an overview of the history of logging and notable log
structures. Later,
a visit to the Forest History Center of the Minnesota Historical
Society gave a
living history experience of life in a 1900 logging camp. Many of
the historic
tools used in the camps a century ago are still very familiar and
used by log
builders today—cant hooks, peaveys, axes, and the like.
Some great, educational presentations included
engineering
for log structures by Asche Engineering, and dustless wet blasting
by ABS Blast.
Association members presented on some crafting
techniques, including
live-edge paneling cut from a curved tree, and an S-Curve log
stairway that
merged a glue-laminated stringer with half-log stair treads.
Another great
demonstration was John Beltman’s spring-pole lathe, in which he
turned a Windsor
chair leg on his lathe powered by a foot petal and a green wood
pole.
Preliminary plans are in progress for next
year’s moving,
annual conference, and those interested in log craft are welcomed
to join and
watch for updates at www.gllca.org
Saturday, April 6, 2019
The Old Forestry Mixture
The old forestry mixture, as some have called it, is a formula for a penetrating oil stain developed by the Forest Products Laboratory in the 1950's. Other than the old forestry mixture, it's more formerly know as the Forest Products Laboratory Natural Finish. The FPL Natural Finish was introduced as follows:
"Many homeowners want a finish that retains a part of the natural color and the grain of new wood or one that enhances the rustic appearance of lumber or plywood. The commercially available natural finishes that form a clear film, such as varnish, have been so short-lived, however, that they are not recommended for exterior use. One durable natural finish is the penetrating stain, developed at the Forest Products Laboratory in the 1950's. The FPL natural finish was formulated to overcome the more serious shortcomings inherent in such finishes of t the film-forming type that are so susceptible to failure by cracking ind peeling. Because the stain penetrates the wood surface and does not form a coating, there is no failure by blistering and peeling even in excessive moisture conditions. There is no coating to scrape before refinishing. Thus, the penetrating stain is easily maintained at a low cost on a variety of wood surfaces. Test results indicate that the first application of the FPL natural finish to smoothly planed surfaces fully exposed to the weather should last I about 3 years. When refinished after weathering, the finish will last much longer. Two coats of stain applied to rough-sawn or weathered surfaces may last 10 years or more."
The exact recipe and full document are listed here. It contains a blend of linseed oil, paraffin wax, solvent, and some other ingredients, including Penta, which is no longer available to the public and restricted to things like the manufacturing of telephone poles and railroad ties. While some of the ingredients are difficult to obtain and Penta is nye impossible, there is at least one alternative on the market. As a ready-made option, a formula similar to that old mixture is available under the brand Organiclear WR-5.
 WR-5 Log Home Stain is a superior exterior wood treatment that
restores, preserves and enhances the natural beauty of your new or
existing log home, deck, fences, railings, shakes and shingles, and
outdoor wood furniture. WR-5 offers a unique blend of deep-penetrating
premium oils, resins and waxes to create a long-lasting MOISTURE-GUARD™
barrier against harsh weather. To enhance wood life further, WR-5
provides maximum protection against ultraviolet (UV) radiation damage by
combining sun blockers to absorb and control UV degradation, thus
minimizing wood deterioration. WR-5 penetrating coating will also help
prevent wood from cracking or peeling. WR-5 also works very well in high
humidity areas. WR-5 allows wood to "breathe" naturally through a micro
porous film and prevents moisture penetration. Water beads up and rolls
off the exterior wood surface. WR-5 brings out the natural grain beauty
of the wood while preventing the wood from cracking and peeling. WR-5
is the perfect choice for the full realm of wood protection your home
needs to stand the test of time. For new, unfinished decks, apply two
coats of WR-5 this year and then either a third in the Fall or one more
next year. WR-5 Clear can be used as a second (if only putting on two
coats), third coat, or as future maintenance coats though it won't last
as long as a pigmented coat. Some people like to use the clear in this
way to "lock" in a particular light color. Made in the USA.
WR-5 Log Home Stain is a superior exterior wood treatment that
restores, preserves and enhances the natural beauty of your new or
existing log home, deck, fences, railings, shakes and shingles, and
outdoor wood furniture. WR-5 offers a unique blend of deep-penetrating
premium oils, resins and waxes to create a long-lasting MOISTURE-GUARD™
barrier against harsh weather. To enhance wood life further, WR-5
provides maximum protection against ultraviolet (UV) radiation damage by
combining sun blockers to absorb and control UV degradation, thus
minimizing wood deterioration. WR-5 penetrating coating will also help
prevent wood from cracking or peeling. WR-5 also works very well in high
humidity areas. WR-5 allows wood to "breathe" naturally through a micro
porous film and prevents moisture penetration. Water beads up and rolls
off the exterior wood surface. WR-5 brings out the natural grain beauty
of the wood while preventing the wood from cracking and peeling. WR-5
is the perfect choice for the full realm of wood protection your home
needs to stand the test of time. For new, unfinished decks, apply two
coats of WR-5 this year and then either a third in the Fall or one more
next year. WR-5 Clear can be used as a second (if only putting on two
coats), third coat, or as future maintenance coats though it won't last
as long as a pigmented coat. Some people like to use the clear in this
way to "lock" in a particular light color. Made in the USA.
"Many homeowners want a finish that retains a part of the natural color and the grain of new wood or one that enhances the rustic appearance of lumber or plywood. The commercially available natural finishes that form a clear film, such as varnish, have been so short-lived, however, that they are not recommended for exterior use. One durable natural finish is the penetrating stain, developed at the Forest Products Laboratory in the 1950's. The FPL natural finish was formulated to overcome the more serious shortcomings inherent in such finishes of t the film-forming type that are so susceptible to failure by cracking ind peeling. Because the stain penetrates the wood surface and does not form a coating, there is no failure by blistering and peeling even in excessive moisture conditions. There is no coating to scrape before refinishing. Thus, the penetrating stain is easily maintained at a low cost on a variety of wood surfaces. Test results indicate that the first application of the FPL natural finish to smoothly planed surfaces fully exposed to the weather should last I about 3 years. When refinished after weathering, the finish will last much longer. Two coats of stain applied to rough-sawn or weathered surfaces may last 10 years or more."
The exact recipe and full document are listed here. It contains a blend of linseed oil, paraffin wax, solvent, and some other ingredients, including Penta, which is no longer available to the public and restricted to things like the manufacturing of telephone poles and railroad ties. While some of the ingredients are difficult to obtain and Penta is nye impossible, there is at least one alternative on the market. As a ready-made option, a formula similar to that old mixture is available under the brand Organiclear WR-5.

Thursday, April 4, 2019
Log Rot: The Problem With Painted Logs
Log Rot: The Problem
With Painted Logs
With Painted Logs
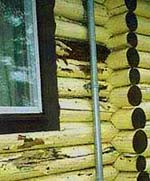 This log house was originally coated with house paint instead of a Log Home Finish.
You can see where the house logs have cracked or "checked" leaving open
cracks in the paint for rain water to penetrate into the wood causing
further log rot. The density of the paint coating acts like a plastic
sheeting that traps in moisture causing blisters and flaking paint. In
winter when the logs freeze, the trapped moisture expands by becoming
ice particles. This causes more subsurface damage making tiny cracks
larger and allowing more space for water to penetrate farther into the
log causing more damage. In the photograph, the dark area behind the
pipe is totally rotted.
This log house was originally coated with house paint instead of a Log Home Finish.
You can see where the house logs have cracked or "checked" leaving open
cracks in the paint for rain water to penetrate into the wood causing
further log rot. The density of the paint coating acts like a plastic
sheeting that traps in moisture causing blisters and flaking paint. In
winter when the logs freeze, the trapped moisture expands by becoming
ice particles. This causes more subsurface damage making tiny cracks
larger and allowing more space for water to penetrate farther into the
log causing more damage. In the photograph, the dark area behind the
pipe is totally rotted.
In a situation like this all of the paint needs to be
removed with either a chemical stripper or blasted with media (glass is most common now). The
next step would be to cut out the rotted areas of wood and use Tim-bor or Boracol to saturate the logs and keep them from rotting any further. If the rotted areas are relatively shallow, LiquidWood can be used to seal cracks and create an undercoating for the WoodEpox
to adhere to. Next, apply the WoodEpox and form it so that it conforms
to the rest of the log. Dry pigment can be added to WoodEpox to color it
(especially if you will be coating with a stain). Allow to dry
thoroughly, then apply a new finish.
If large portions of the logs are rotted away, you will
either have to replace portions of the log with half-log inserts or
replace the entire log. You may need the services of a professional log
home restoration contractor.
Questions on maintaining the legacy of your wood structure? Give us a call- 1-800-359-6614
A Few Notes to Consider on Deck Stains

Walking traffic, direct sun, and standing water make decks higher maintenance than log walls.
Most log home finishes are too soft for use as a deck stain. Use a finish rated for decks.
Clear finishes are more prone to UV damage and have shorter
lifespans than pigmented finishes on decks and log walls.
For matching the house stain to the deck consider LifeTime,
Sansin, Sikkens (ProLuxe), Transformation, WeatherSeal, WR-5, or X-100 Deck.
Inspect areas where the deck meets the log walls. This area can
be a problem area for wood rot. Water runs down the deck to the log
wall. Flashing will solve this problem where the deck meets the wall.
Contrasting colors of deck stain to the house can be attractive - e.g. light honey colored house, dark honey
colored deck.
Pressure treated or green treated decks can be stained,
but wait 3 months to 1 year. This allows the wood to dry and the green
color to fade. This will give a more true color to the stain that you
purchased.
Cedar decks stand up better to the weather but they
still need a water repellent, pigmented finish. All wood rots when
conditions are right.
Railings are high maintenance; watch the tops of log railings for sunburned and water catching depressions.
Be careful of cedar railings that were strip peeled. Strip peeling (removing the bark without using a drawknife)
can leave a thin layer of cambium that will peel off prematurely,
making it appear that the stain is peeling. Also, the closed wood pores
can repel the log or deck stain's ability to adhere.
Questions on maintaining the legacy of your wood structure? Give us a call- 1-800-359-6614
Thursday, March 28, 2019
Cleaning Up Chinking Lines
As time and weather pass, chink lines on your log cabin or log home that were once strikingly bright may become dirty and dingy. Sometimes a simple wash and scrub will clean it up and get the chinking looking new. If that isn't enough, if some log stain got onto your chinking, or you just want to change its color, you can apply a liquified, paintable chinking product. There is a pre-mixed Chink-Paint available to save you time and hassle, or there is a recipe to make it yourself and save money.
Apply Pre-Mixed Chink Paint:
Chink-Paint is an elastomeric, textured coating for renewing or changing the color of chinking. Ideal for giving your log home a face-lift by brightening the appearance of old, dirty chinking, or altering the color of existing chinking. Chink-Paint’s elasticity enables it to expand and contract with Perma-Chink chinking or Energy Seal without cracking or peeling. When restoring an older home, it saves time and money by eliminating the need to mask off the chinking before staining. Simply wait for the stain to dry and then apply a coat of Chink-Paint in the color you desire.
Make Your Own Paint-On Chinking:
As explained by Sashco, "It’s easy to make your own Log Jam® chink paint on site. And since mixing your own costs 1/3 less than buying pre-mixed chink paint, it’s the smart money-saving choice.
Simply follow the instructions below, then apply over any water-based chinking*.
PREPARATION:
Be sure that all chink lines are clean and dry, and free of waxes, mold, mildew, dust, pollen, and other contaminants.
MIXING INSTRUCTIONS:
Large Volume (Yield: approx. 5 gal. mixed)
1) Remove and set aside 1 gallon of chinking from a 5 gallon pail.
2) Add one gallon of distilled water back into the pail.
3) Using a high viscosity mixing blade, thoroughly mix the water and chinking.
4) Add additional water or chinking (in small increments) to “dial in” your preferred viscosity.
Small Volume (Yield: approx. 1 quart mixed)
1) Gun out entire contents of one 29 oz. cartridge of chinking into any large plastic container (such as a clean 1 gal. ice cream bucket).
2) Add in ½ pint (8 oz.) of distilled water
3) Using a mixing blade or a typical kitchen hand-held mixer, thoroughly mix the water and chinking.
4) Add additional water or chinking (in small increments) to “dial in” your preferred viscosity.
Floetrol®, a common additive used in the paint industry, can be used in place of water, if desired. Resulting mixture will not be noticeably different. (Floetrol® is a registered trademark of the Akzo Nobel group of companies.)
APPLICATION INSTRUCTIONS:
1) Using a foam paint brush, paint pad or trowel (whichever you prefer), apply the chink paint and smooth onto the chink line.
2) Clean off any drips or runs immediately so they don’t dry on the wood and stain it.
3) Allow to thoroughly dry. Cover exterior walls with plastic if rainfall is expected within 24 hours after installation.
COVERAGE RATES:
Joint Width: 3/4” 1” 1-1/2” 2” 3”
Lineal Feet per 1 gal.: 1760 1320 880 660 440
*Tested for compatibility with Sashco’s Log Jam chinking. Always test first if using a different product.
Thursday, March 21, 2019
Carpenter Bee Control in Log Homes

For Log Homes, the large carpenter bees or Xylocopa do
the most damage, boring approximately 1/2" diameter tunnels into logs
and other wood surfaces including decks, overhangs, fence rails, etc.
Carpenter Bee tunnels become a threat for infestation of wood-decaying
fungi or other insects, such as carpenter ants.
Treatments: Insecticidal sprays and dusts such as those
included in the Carpenter Bee Kit are available. These types of
products may need to be applied every couple of weeks for awhile to
ensure effectiveness. Apply them at night while the hive is asleep for
maximum impact. Beware that some insecticides have been banned but not
yet removed from store shelves. Consider the potential health risks of
using such poisons in your home (young children are the most
susceptible). If you have an exterminator do the job professionally,
find out what they are using and if those insecticides have been banned
in your area. If you are having or have had problems with Carpenter
bees, consider adding NBS 30 to your finish when you recoat your house
again. If chemicals aren't your bag, you can give the kids a project
with a couple of fly swatters. The males don't sting and the females are
known to be more reluctant to stinging, unlike other bees, wasps, and
hornets.
However you choose to rid your logs of carpenter bees, consider spraying Tim-bor
or Shell Guard RTU in the tunnels afterwards to help guard against
wood-decaying fungi. Just mix up some Tim-bor in a spray bottle, pump
sprayer, or squeeze bottle and administer it into the holes. Also, be
sure to seal off the tunnel entrances by pounding in wooden dowels or by
using Caulking, wood putty, or by mixing WoodEpox and sawdust.
Questions on maintaining the legacy of your wood structure? Give us a call- 1-800-359-6614
Saturday, March 9, 2019
Event: The Lost Forty
We are excited to be sponsoring an evening of north woods music heralding back to the age of the lumberjack. The Lost Forty will be playing April 11 at the Myles Reif Performing Arts Center in Grand Rapids.
A native of the northern Minnesota town of Bemidji, Brian Miller teams up with Wisconsinite Randy Gosa as The Lost Forty. The Lost Forty revives and performs the Irish-influenced songs of men who roamed the Great Lakes region in the days when pine was king. Miller (Bua) and Gosa (Myserk) have toured the US with their Irish traditional music groups. Together they mix a passion for northwoods history and folklore with their love of arranging forgotten songs to bring to life this rich but under-explored music.

A native of the northern Minnesota town of Bemidji, Brian Miller teams up with Wisconsinite Randy Gosa as The Lost Forty. The Lost Forty revives and performs the Irish-influenced songs of men who roamed the Great Lakes region in the days when pine was king. Miller (Bua) and Gosa (Myserk) have toured the US with their Irish traditional music groups. Together they mix a passion for northwoods history and folklore with their love of arranging forgotten songs to bring to life this rich but under-explored music.

Thursday, March 7, 2019
Great Lakes Log Crafters Conference
Once a year, a group of handcrafted log builders meets in Minnesota, Wisconsin, or Michigan to share ideas on the craft of log building. The Great Lakes Log Crafters Association has been meeting for over 30 years, and describes itself as ‘an organization of professional log builders and others interested in the art of handcrafting log structures.’ This year the moving conference will be meeting April 12 & 13 in SLHS’s own town of Grand Rapids, MN.
The two-day gathering packs in a combination of lecture-presentations and craftsmanship demonstrations. Recent gatherings in the past, members have demonstrated cutting dovetails, scribing and cutting lock notches, media-blasting logs for surface restoration, and chainsaw carving feathers out of scraps from scarf cuts. This year’s conference includes presentations on curved paneling, building an s-curved stairway, historic log structures, and engineering for log, log blasting, and other topics.
Another exciting component to the 2019 Annual GLLCA Conference is the location and venue. The Log Crafters Association will be meeting at The Forest History Center, a site of the Minnesota Historical Society, which features a recreation 1900 logging camp, forest walking trails, and the main interpretive center where most conference of the conference activities will take place. The event is open to public attendance, and registration as a guest can be found here and inquiries can be directed to Kay at info at gllca.org.
Subscribe to:
Posts (Atom)
-
STEP #1: INSPECTION If applying to an older home, check for signs of rot and decay. Remove and replace or repair deteriorated wood. Contact ...
-
 Capture Log Stain by Sashco is a log finish that is extremely effective and attractive semi-transparent stain that is followed by a wea...
 -
Tips For Rotted Logs For restoring log ends like the ones pictured and maintaining the natural gray patina of the logs. 1. First, use a...

