Backer Rod and Chinking Part 2
Chinking a log home is not a difficult process. Once you get over the awkwardness of learning how to "gun the product" onto the logs and then get the "feel" of tooling the product you will pick up speed and find satisfaction in having a part in finishing your home. This article covers the basics of how to chink a log home, but before starting your project in earnest, request and read a Data Tech that goes into greater detail.
Proper Joint Design Last month’s article briefly touched on the reason why backer rod is needed—to serve as a bond breaker. The following illustrations graphically depict why 2-point adhesion is so important for the performance of any chinking or caulking product. Synthetic chinking is formulated to be flexible, but as the drawings demonstrate it can fully flex to absorb log movement only if a bond breaker is installed down the center of the joint.

Surface Preparation For chinking to establish good adhesion to the logs, they must be clean—free of dirt, pollen, uncured oils, sawdust, and other loose materials. The surface temperature of the logs should be between 40°-90° Fahrenheit. The liquids in the chinking "wet out the surface" of the logs so that the chinking can establish good adhesion. If the log surface is colder than 40° the wood pores tighten up not allowing for proper wetting out of the surface. Conversely, when the wood temperature is higher than 90°, the liquids evaporate off too quickly, adversely affecting adhesion.
Most people like contrast in color between their chinking and their stain; therefore, staining prior to chinking is necessary to achieve this look. It is also easier to tool chinking if it is applied to a stained surface, but you must be certain that the stain and chinking are compatible, and that the stain has had sufficient cure time.
Many stains on the market contain waxes and stearates that can interfere with adhesion of chinking and caulking. Usually, companies that manufacture both chinking and stains make certain that their products are compatible, and attempt to enhance their stains for even better adhesion of their chinking and caulking products. If your chinking and stain are manufactured by 2 different companies, call and ask if testing has been done for compatibility and request a copy of their test results.
Application Chinking is packaged in 5-gallon pails and quart tubes, although for larger jobs, 5-gallon pails are more economical. When using 5-gallon pails there are a number of application methods that can be used. You can use a trowel, grout bag, bulk loading gun, or a commercial pumping system that pumps out the chinking material in a continuous flow, making it easier to apply.
There are a variety of different sized nozzles available in both round and slot styles. For smaller beads, a round style nozzle works well but for wider joints the slot style nozzles are the only way to go. In selecting your nozzle size be aware that the depth of the bead of caulk should be half the size of the width of the joint, but never thinner than a 1/4" or thicker than 1/2"; i.e., for a joint 1" wide the bead depth should be 3/8" to 1/2".
Apply the chinking material down the center of the joint, over the backer rod and overlapping slightly onto the surface of both logs. Only apply enough product down the length of the log that you can reasonably tool before it starts to skin over. As you become accustomed to tooling you will be able to run longer beads.
 Tooling
There are as many tooling implements out there as there are chinkers! I
prefer the polyethylene foam brushes available in any hardware store or
lumber yard but I have seen folks tool with rubber spatulas, paint
brushes, putty knives, trowels, and even metal spatulas cut down with
wire cutters to the desired width. The secret is finding the tool that
works best for you. You will also need a pail of clean water, a sponge,
and a spray bottle filled with clean water. To speed up the tooling
process, have several foam brushes on hand. As soon as one picks up too
much chinking and starts to drag instead of gliding over the surface,
throw it into the water pail and continue on with a clean brush. A
mixture of 1 part denatured alcohol to 2 parts water can be used for
misting chinking when the temperature is over 70°. If you are working in
the sun and the chinking is skinning over too quickly, straight alcohol
can be used. When the temperature is lower than 70° the alcohol is not
necessary.
Tooling
There are as many tooling implements out there as there are chinkers! I
prefer the polyethylene foam brushes available in any hardware store or
lumber yard but I have seen folks tool with rubber spatulas, paint
brushes, putty knives, trowels, and even metal spatulas cut down with
wire cutters to the desired width. The secret is finding the tool that
works best for you. You will also need a pail of clean water, a sponge,
and a spray bottle filled with clean water. To speed up the tooling
process, have several foam brushes on hand. As soon as one picks up too
much chinking and starts to drag instead of gliding over the surface,
throw it into the water pail and continue on with a clean brush. A
mixture of 1 part denatured alcohol to 2 parts water can be used for
misting chinking when the temperature is over 70°. If you are working in
the sun and the chinking is skinning over too quickly, straight alcohol
can be used. When the temperature is lower than 70° the alcohol is not
necessary.
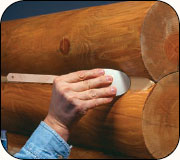
Using a damp polyethylene foam brush, holding the foam portion parallel to the bead, gently press the bead into place. You don't want to drag the foam brush down the bead but instead, section by section press the foam brush against the bead. The next step is the actual tooling. Using the spray bottle, lightly mist the chinking with water to allow the brush to glide over the surface. Do not apply too much water, or the latex in the chinking will run down the logs. If this happens, just wipe off with a damp sponge or rag. The idea is to smooth out the ripples caused by gunning, but most importantly, to feather the bead out onto the top and bottom logs at least 1/4" so that the chinking is tooled tightly to the log surfaces.
Clean-up and Disposal To properly dispose of unused chinking material, it is good practice to understand and follow all of your state and local regulations on clean-up and disposal. Do not dispose of chinking material in drinking water supplies. However, for easy clean-up water may be used for cleaning hands, surfaces and equipment. Toxic solvents are not required for chinking material clean-up.
Warning! As you finish your chinking and stand back to admire your work . . . ugh! Blisters! Blisters are a phenomenon commonly found after applying chinking. They form when moisture from the chinking accumulates in voids beneath the bead and the heat from the sun causes the blister to appear as "bubble" in the chinking. To avoid these blisters, use a white tarp to shield freshly chinked walls from the sun. If this is not possible, keep a close eye on the chinked wall for the first 24-48 hours. If a blister pops up, just puncture a hole in the middle of it and gently push the chinking back into place. Then after 3-5 days you can repair the blister by applying a small portion of chinking material into the hole.
Cure Time After the chinking process is completed, allow it to cure for one week if you will be painting over it with oil or latex paints, total cure-through is 28 days. Just one last suggestion that I picked up from a professional chinker: Hang a small board with several beads of the chinking in a conspicuous area with a sign inviting people to satisfy their need to touch. Hopefully, this will keep them from satisfying their curiosity on the chinking courses of your home!
Questions on maintaining the legacy of your wood structure? Give us a call- 1-800-359-6614


No comments:
Post a Comment