Transformation Log & Timber is
the low VOC formula of the original Transformation Log Stain by Sashco.
It will transform your logs and vertical woodwork from dull and
lifeless to rich and brilliant - especially for restoring older logs.
Transformation is excellent for restoration log work. Transformation Log
& Timber is the log home stain that's easy to remember because its
name describes what you want and what it provides, Transformation!
Perfect for new construction and restoration projects. Gloss sheen.
View the full data sheet here.
“A Better Way to Stain”
It‘s about Transformation: old and weathered logs
brought to life again, or timbers refreshed with color
when they were once only gray.
These are the results we want for our dream home,
but sometimes those results seem like a distant fantasy.
We’ve seen other log and timber homes scorched by
the sun and are afraid of the “big project” nature and
the hefty price tag of maintaining our own. Contrary to
common wisdom, having a great quality stain is only half
the battle. The other half is what is neglected the most:
routine maintenance. Over time, routine maintenance is
truly the key to easier and less expensive staining.
When done every 3-5 years, we find that routine
maintenance saves a lot of time and money by eliminating much of the prep work before staining. Simply do
a light power wash, allow the wood to dry, and apply a
maintenance coat. No sanding or stain removal necessary.
Your contractor will be happy you called him sooner
rather than later, and your pocketbook will be, too. It’s
that simple.
Use a quality stain like Transformation Stain® Log
& Timber and you’ll transform the look of your wood.
Practice routine maintenance, and you’ll discover a better
way to stain.
For Sashco’s complete guide on a better way to stain,
keep reading. You’ll find step-by-step instructions on the
following key topics:
Sampling
To get the look you want, sample the stain on your wood.
Prep
Proper prep starts you down the right path.
Application
Proper application of a quality stain ensures long-term
performance.
Routine Maintenance
Reduce long-term costs, time and effort.
View the full data sheet here.
Sampling
Proper sampling is where it starts. It is critical because the same stain can look very different
on various species of wood. Different prep and
application methods will also affect the final result.
Therefore, sampling on your wood is the only way to
make sure you get the color you want the first time.
It’s easy: on a small, inconspicuous test area (we
recommend a minimum 2 sq. ft. space), simply do
each step the exact same way you will on all of your
logs and timbers.
• Prep the wood.
• Apply the stain.
• Let the stain dry (both between coats and after
all coats are applied).
• If working with a contractor, don’t allow the
contractor to stain until you have thoroughly
discussed and demonstrated the look you want.
Show him/her the sample.
• Don’t stain all of your logs and timbers before
you verify that you’re achieving the look you
want. It is best if you can be on-site when staining starts.
Prep
Proper substrate preparation and application mean greater longevity,
better color, and better long-term performance.
• Make sure it sticks: If you are changing from one stain product to
another, contact us first. Transformation Log & Timber will adhere
to almost any surface that is properly prepped. Be aware that any
product already on the wood that contains waxes, non-drying oils,
silicones, or anything that forms thick layers on the wood, can interfere with the adhesion and penetration of Transformation Log &
Timber, or any stain, and must first be removed.
Cleanliness is a virtue: Starting with an absolutely clean surface
means better penetration and adhesion of the stain, which means
better longevity and a more beautiful finish.
• Media blast, vigorously power wash or sand wood surfaces using
an Osborn® brush or 60—80 grit sand paper to remove failing
stains and loose, unsound wood fibers, along with surface
contaminants.
• If mildew is present, apply Sashco’s CPR® in the brightener
strength according to the directions, or apply fresh bleach in a 4
parts water to 1 part bleach solution. Allow it to sit no more than
20 minutes, and then thoroughly rinse.
Fuzz be gone: For the best appearance, remove felting (wood fuzz)
with Osborn brushes, Sashco’s Buffy Pad system or 60—80 grit
sand paper once the wood is dry. Remove all sawdust with a broom,
compressed air or a leaf blower.
• Don’t delay: UV rays from the sun can damage cleaned wood surfaces in as little as 1 week; therefore, stain should be applied no
more than 2 weeks after wood prep is completed.
• Sunny with a chance of more sun: Plan to stain when the fore-
cast is predicting clear, rain-free weather that will extend 1-2 days
after the stain has been applied. If rain can’t be avoided, be sure to
protect the stain from direct rainfall for 1-2 days after the stain is
applied to prevent it from being washed off the surface.
Preserve, please: Apply Sashco’s PeneTreat® for protection
against wood rot and insects. Allow wood to dry at least 2-4 days.
(Use a moisture meter to check it!)
Osborn® is a trademark of Osborn International.
Application
Proper application of the stain, combined with the prep
you’ve already done, will complete the transformation of your
logs and timbers.
1. Stay dry:
Use a moisture meter to make sure wood is at or
below 19% moisture content level before applying stain.
Damp wood can prevent the stain from penetrating properly
and can eventually lead to peeling.
2. Say no to mildew:
Help keep surface mold and mildew at
bay by adding more mildewcides to the stain. We recommend Stay Clean I/E™. (now replaced with M-1)
3. Mix it up:
Thoroughly mix the stain. The preferred method
is to use a drill-driven, squirrel-cage type mixer. No matter
what method is used to mix the stain, you can ensure the
most consistent color by:
• Scraping all pigment off the bottom of the pail and
thoroughly mixing it in.
• Interblending pails with different lot numbers.
• Stirring the stain every 10-15 minutes throughout application to keep the pigments evenly distributed through
the stain.
4. Warm feelings:
Apply Transformation Log & Timber to
wood surfaces that are no colder than 40°F (4°C) and no
hotter than 90°F (32°C). Extreme temperatures will prevent
proper penetration and drying of the stain. Plan your work
so that surface temperatures fall within this range. Do not
apply to surfaces in direct intense sunlight and work in sections to avoid lap marks.
5. Spray it again, please:
a. Spray on one heavy coat of Transformation Log & Timber
stain. If only a brush is used, be sure to drench-apply the
stain. Don’t skimp.
b. Vigorously brush the stain, pushing it into the wood and all
cracks and checks, catching any drips. This promotes the
best adhesion and penetration, and leaves an even, consistent
coat of stain.
• Wait until the first coat is dry (24 hrs.), then apply a light
second coat of stain, spraying and back brushing as with
the first coat.
6. Bask in it:
Enjoy your beautiful log or timber home.
Routine Maintenance
Everyone knows that a $30 oil change twice a year beats a $2,000 mechanic’s bill. Routine maintenance on your logs or
timbers could be the difference between $2,000 every 3-5 years or $20,000 to completely redo the job. It’s truly the key to
“a better way to stain.”
1. Cleanliness is still a virtue:
• Lightly power wash your logs or timber to remove grease
spots, pollen, bird droppings and other surface contaminants.
• If mildew is present, apply Sashco’s CPR® in the cleaner
strength according to the directions, or apply fresh bleach
in a 4 parts water to 1 part bleach solution. Allow it to sit
no more than 10 minutes, and then thoroughly rinse. Allow
the surface to thoroughly dry. (This generally takes 2-4 days
in ideal weather. To know for sure, use a moisture meter to
check!)
2. One more coat, please:
• Spray on one maintenance coat of
Transformation Stain® Log & Timber. If only a
brush is used, be sure to drench-apply the stain
to ensure adequate coverage. Don’t skimp.
• Vigorously brush the stain, pushing it into the
wood, catching any drips. This promotes the
best adhesion and penetration, and leaves an
even, consistent coat of stain.
Clean Up
Clean brushes and equipment with mineral spirits. Hands may
be cleaned with citrus-based hand cleaners, and then washed
with soap and water. Follow local, state and federal guidelines
for disposing of empty cans or any unused product. For rag
disposal, see DANGER! statement.
Storage
Do not store in direct sunlight or hot conditions. Tightly
reseal opened containers and store at temperatures between
50˚F and 90˚F (10˚C - 32˚C). If skinned over, remove the skin
before thoroughly stirring the product.
View the full data sheet here.
Questions on maintaining the legacy of your wood structure? Give us a call- 1-800-359-6614
Pickup in store - or ship to your door -in whichever woods your cabin dwells.
Schroeder Log Home Supply, Inc.
1101 SE 7th Avenue
Grand Rapids MN 55744
1-800-359-6614

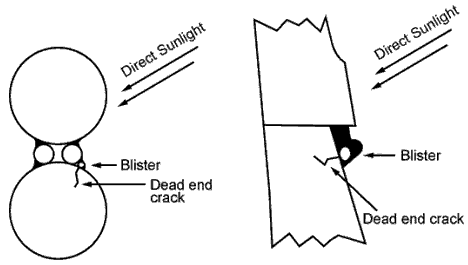
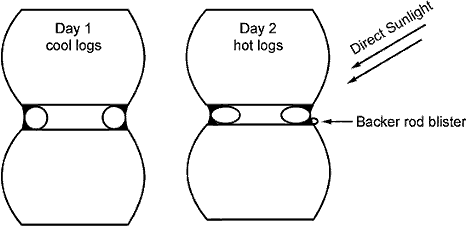
 Pitch Pockets
Logs often have what is termed "pitch pockets." These are areas of
concentrated pitch, or sap, sometimes containing several gallons! (Pitch
pockets of 50 or more gallons are known!) This sap (or its vapor) will
follow cracks in logs, coming out of the log almost anywhere. It
especially exits at the knots Where the sap flow was directed during the
life of the tree. Sap has a volatile component and, when heated, forms a
gas that causes blisters. Some blisters appear to be in the dead center
of the chinking/ caulking. Upon close investigation, however, most or
all of the bubbles are connected to a crack in the log surface. The
blisters are often the result of sap vapor, which can come through the
tiniest of holes in the wood. Pitch pockets are often the cause of
blisters, which line up in a straight row. They are simply aligned with
the crack in the log along which the sap is traveling. In the heat of
direct sunlight some of the liquid sap in the pitch pocket turns into a
gas that is under pressure and can form a blister as it tries to escape
the log.
Pitch Pockets
Logs often have what is termed "pitch pockets." These are areas of
concentrated pitch, or sap, sometimes containing several gallons! (Pitch
pockets of 50 or more gallons are known!) This sap (or its vapor) will
follow cracks in logs, coming out of the log almost anywhere. It
especially exits at the knots Where the sap flow was directed during the
life of the tree. Sap has a volatile component and, when heated, forms a
gas that causes blisters. Some blisters appear to be in the dead center
of the chinking/ caulking. Upon close investigation, however, most or
all of the bubbles are connected to a crack in the log surface. The
blisters are often the result of sap vapor, which can come through the
tiniest of holes in the wood. Pitch pockets are often the cause of
blisters, which line up in a straight row. They are simply aligned with
the crack in the log along which the sap is traveling. In the heat of
direct sunlight some of the liquid sap in the pitch pocket turns into a
gas that is under pressure and can form a blister as it tries to escape
the log.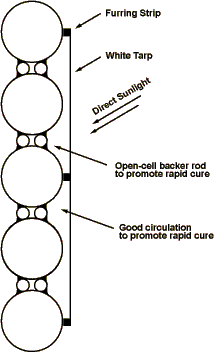
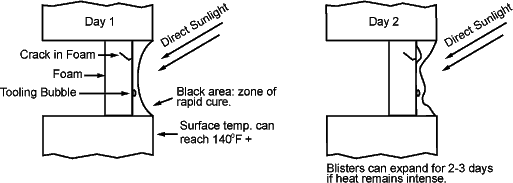
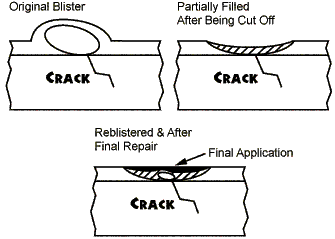 A
fresh blister can sometimes be eliminated by puncturing the surface
skin (to let the moisture vapor escape) and pushing the chinking and
caulking back into place. This step can cause marring of the chinking
finish, but can be smoothed out 2-3 days later (after the chinking has
firmed up) with a small amount of Log Jam applied and smoothed. Often
the blister will not reappear. To be effective, this action must be
taken within the first day after application, while the underlying
chinking and caulking is still wet This method can be the most effective
and efficient since the blisters are caught very early (before they
become very large) and repaired quickly.
A
fresh blister can sometimes be eliminated by puncturing the surface
skin (to let the moisture vapor escape) and pushing the chinking and
caulking back into place. This step can cause marring of the chinking
finish, but can be smoothed out 2-3 days later (after the chinking has
firmed up) with a small amount of Log Jam applied and smoothed. Often
the blister will not reappear. To be effective, this action must be
taken within the first day after application, while the underlying
chinking and caulking is still wet This method can be the most effective
and efficient since the blisters are caught very early (before they
become very large) and repaired quickly.