Friday, October 23, 2020

Wood Finish & Treatment Decisions For Lasting Log Home Protection

 By Sjoerd Bos, Managing Director at Sansin  

Whether you currently own a log home or are purchasing or building one, you no doubt appreciate the enduring beauty of wood and the log home aesthetic. To protect your investment and ensure your home stands the test of time, you will want to protect it from dirt, moisture, UV exposure and other handling damage. This means wood treatment and finishing are critical decisions. Rather than choosing a coating that creates a non-breathable, waxy film on top of the wood, there are water-borne finish options that deeply penetrate into the logs, allowing water to evaporate and preventing moisture from getting trapped and rotting the logs from within. 

For more than 30 years, the Sansin Corporation has been exclusively dedicated to the development of enviro-friendly, water-borne wood finish technologies that make wood beautiful, durable and easy-to- maintain. Sansin’s wood coatings utilize a unique water-borne alkyd formula that combines the benefits of both oil- and water-based coatings but in a formula with much lower VOC (volatile organic compounds) levels. Additionally, rather than using toxic dyes in the colorant system, Sansin utilizes nano technology to create pure pigments ground so fine that they deliver remarkably vibrant, uniform and long-lasting color. Because the finishes don’t form a film on top of the wood, the coatings won’t crack, chip or peel. Water-borne finishes also dry faster, allowing additional coats to be applied in one day rather than waiting a day or two between coats. When properly applied, the coatings offer superior UV protection and lasting durability that enables log home owners to extend the time between maintenance coats.

Sansin SDF is the company’s most versatile exterior finish and, in addition to log home restoration projects, works well on decks, docks, siding and fences. SDF’s specially-formulated oils and resins penetrate into the wood, creating a monolithic bond for outstanding weather and UV protection that won’t crack, peel or blister. SDF can be used on horizontal and vertical wood surfaces and is available in a wide range of natural, semi-transparent and even solid colors. Because SDF is designed to be highly water-repellent, it’s a natural choice for log homes in moisture-rich environments. SDF Topcoat offers additional durability and superior water repellency using a semi-film forming finish. SDF Topcoat is great for surfaces where water splash-back causes discoloration due to moisture intrusion or frequent wetting.When it comes to protecting wood during construction, Sansin Foundation, a nearly invisible penetrating base coat, is simply the best way to protect logs from damage during construction. Just give the wood a light cleaning, and then you can also use it as a base coat for Classic or SDF, creating those lighter, more natural tones but with built-in UV protection. Foundation penetrates into the wood, creating dimensional stability while reducing checks and wood movement. It is available in three tones that complement the wood species of fir, cedar and lightwood.

 Look no further than Sansin Timber-Tec for your in-yard protection. Timber-Tec is an industrial grade product that protects from UV degradation, blue stain and repels water (helping wood dry), and it also mitigates wood discoloration during the construction process. Timber-Tec can be applied to green or seasoned logs, improving dimensional stability and allowing wood to adjust gradually to moisture levels in the environment. It comes in in two formula options. M-30 provides the natural light color of fresh pine while C-20 is a clear concentrate that provides a light honey color to the wood after it dries.

Tuesday, August 25, 2020

Something to Blush About

Did your recently applied clear coat turn hazy white?

During the cooler shoulder seasons of spring and early fall, and even throughout the summer, we occasionally get concern. Water-based finishes can be sensitive to cool, wet weather. If dew or rain get onto a finish before it has fully dried or cured, there can be a startling effect called blushing. Blushing is a white appearance in the finish that happens when water reacts with an uncured finish. It will disappear and turn clear again when the finish dries and cures, but that could take a few warm, dry days. In some extreme situations it has taken several weeks for the blushing to clear up, or if it’s in the late fall it might take all winter when things warm up to cure in the spring.

Although clearing of the whiteness can be sped up through the use of a hair-dryer, it’s generally better to do nothing and let it cure out on its own. Blushing typically doesn’t affect the performance on the finish, but is merely a temporary cosmetic headache. Once the finish has cured and cleared, the blushing should not return.


Question about your log finish blushing? Contact us here.

 www.loghelp.com

Schroeder Log Home Supply, Inc.
1101 SE 7th Avenue
Grand Rapids MN 55744

1-800-359-6614

Tuesday, August 11, 2020

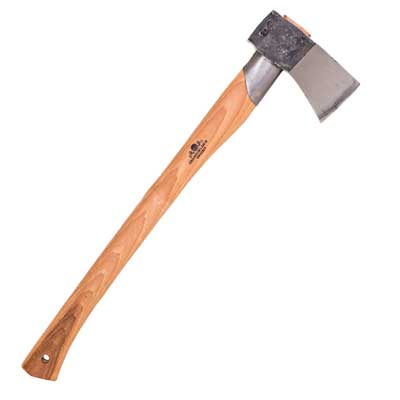
Why a Splitting Axe?


Gransfors Bruk Splitting AxeThere is satisfaction in processing your own firewood on a brisk autumn day. The smell of the wood, the physical exercise, and the activity outdoors make a fulfilling experience prepping fuel for your fire.

The process of splitting wood is essentially redirecting force. You convert the incredible downward inertia of the heavy steel head and translate that into the horizontal movement of the cloven pieces of wood. The heaver the head and the faster the swing, the more energy you have to work with. The shape of the head determines how much of that energy changes direction.

When it comes to processing firewood by hand, a splitting maul is the workhorse of the block. A thick heavy wedge on a long handle provides for plenty of leverage and heft. Such a tool can divide a large ash log like slicing butter. Although these mauls are excellent for splitting large pieces, they are also laborious to lug around.

Hults Bruk Sarek Splitting AxeIf you are planning on spending a day hiking or camping, and need to haul your tools around with you, a splittingAXE is your best friend. The shorter handle and smaller head make it a much more packable tool, while still giving you a thick wedge and a heavy enough head to split most campfire wood. These features make the splitting axe ideal for wood processing on-the-go.


See more about axes and mauls: https://www.loghelp.com/categories/axes-and-mauls.asp


Wednesday, April 8, 2020

Using a Froe

By Paul VanKeuren, Customer Service 

Everybody knows what an axe is. Many people know what an adze is. Who knows what a froe is?

A froe is an ‘L’ shaped tool for splitting wood precisely, and the process of splitting wood this way is called riving. This tool is incredibly handy for splitting wood into kindling safely and quickly or even into boards. Boards and shakes created by riving are often stronger and more dimensionally stable than sawn boards. This is because almost all the wood fibers can run all the way from one end of the board to the other. It also is less wasteful, meaning you can get more roof shakes out of a single cedar log.


 To use a froe on short stock, place the tool on the end of the log as shown. Then with a wooden mallet or cudgel, strike the back of the froe to drive it into the log. Once it is well seated in the log, use the handle like a lever and pry the log apart. Never use an axe or metal hammer on a froe, doing so may damage your tools and the shrapnel could hurt someone.


 Straight grained GREEN wood is the best to use a froe on. Knots can make riving quite difficult, but proper placement of the froe and splitting where the wood is straight can help. I have had good results with green ash and some oak. Birch is also excellent, however you will want to cut the bark off or in vertical lines as it will hold the log together when you try to split it. Cedar is the traditional wood for roof shakes/shingles, and riving is also an efficient way to split basswood into smaller blocks for figure carving. It is good to experiment with the different woods you have available.


Monday, April 6, 2020

Carpenter Bee Control for Log Homes

For Log Homes, the large carpenter bees or Xylocopa do the most damage, boring approximately 1/2" diameter tunnels into logs and other wood surfaces including decks, overhangs, fence rails, etc. Carpenter Bee tunnels become a threat for infestation of wood-decaying fungi or other insects, such as carpenter ants.

Treatments: Insecticidal sprays and dusts such as those included in the Carpenter Bee Kit are available. These types of products may need to be applied every couple of weeks for awhile to ensure effectiveness. Liquid spray concentrates like Bee-Gone are diluted in water, and then applied to the structures with a pump-style garden sprayer. Apply them at night while the hive is asleep for maximum impact. Beware that some insecticides have been banned but not yet removed from store shelves. Consider the potential health risks of using such poisons in your home (young children are the most susceptible). If you have an exterminator do the job professionally, find out what they are using and if those insecticides have been banned in your area. If you are having or have had problems with Carpenter bees, consider adding NBS 30 to your finish when you recoat your house again. If chemicals aren't your bag, you can give the kids a project with a couple of fly swatters. The males don't sting and the females are known to be more reluctant to stinging, unlike other bees, wasps, and hornets.

However you choose to rid your logs of carpenter bees, consider spraying Tim-bor or Shell Guard RTU in the tunnels afterwards to help guard against wood-decaying fungi. Just mix up some Tim-bor in a spray bottle, pump sprayer, or squeeze bottle and administer it into the holes. Also, be sure to seal off the tunnel entrances by pounding in wooden dowels or by using Caulking, wood putty, or by mixing WoodEpox and sawdust.

Wednesday, January 15, 2020

An Inside Look: A perspective on varnishing your log home interiors

by Michael McArthur

Coating interior log walls with a transparent varnish has numerous merits worth considering. The psychological difference between non-coated and varnished logs is dramatic. Varnishing the log surface will enhance the depth of the wood grain and enliven your living space.

Leaving aside the positive aesthetic benefits, there is also a health benefit to sealing your log walls. Wood is a porous material and as a result, it has a tendency not to clean or dust well if left uncoated. If you are an allergy sufferer, dust mites and other airborne particles will cause allergic reactions. Log walls are an ideal location to accumulate and hold these various irritants. Because of its porous nature, cleaning a bare wood surface with a detergent solution will raise the wood grain and further aggravate its magnetic attraction to airborne particles. By filling the wood pores with a varnish type coating, a slicker, easier to “dust and clean” surface is created thus making the control of microscopic allergens on your log walls more effective.

There are primarily two types of varnishes that can be used on log walls: solvent-based or water-based. The major advantage of a water-based varnish over the traditional solvent-based type is its lower fumes. When working indoors, the harsh fumes and odor of a solvent-based varnish can be quite unpleasant, especially when good ventilation is not possible. Also, new environmental regulations are slowly phasing most of these solvent-based varnishes off the market. It should be noted that even water-based varnishes do have differing degree of fumes, some having more than others. (PolySeal™ water-based wood varnishes are some of the lowest in the industry).

A minimum of two and usually three coats of a water-based varnish is required to insure an adequate seal of the wood pores. Additionally, by applying multiple layers of finish, a thicker film is created thus magnifying and increasing the depth and clarity of the wood grain. At the same time, it provides a smoother surface that is easier and more durable to clean. Water-based varnishes also dry faster so a project can be completed in much less time. The hardness of the coating will depend on the resins used. For maximum durability, a polyurethane resin used alone or in combination with hard acrylic resins is your best buy. On log walls, a flatter satin or matte finish is usually preferred in order to minimize the glare of indoor lighting, whereas a gloss finish tends to be too reflective.

A WORD OF CAUTION... Never varnish interior log walls that still contain excessive moisture in them, generally above 18%. The reason is that a varnish is a clear or transparent enamel type coating that is not very breathable, especially when two to three coats are applied. When the heat is turned on during cold weather, the warm interior log walls draw the moisture to their surface. If enough moisture is present in the logs, peeling of the coating may occur and/or molds will grow BENEATH the coating causing ugly discoloration. This can only be remedied by removal of the coating. A rule of thumb is to wait one year and through a heating season BEFORE applying a varnish to the interior log walls. Also, consult with the log manufacturer for feedback on this log moisture issue.
In conclusion, varnishing your interior log walls provides great advantages to the home dweller for reasons of appearance and cleanliness. It is an investment well worth the cost that will be recouped many times over in the years of comfortable living it will provide.

*Reprinted from Winter 1999 issue of Log Core Newsletter.


*Michael McArthur was manager of the Log Home Products Division of the Continental Products Co. Continental manufactures wood coatings for the log home industry including PolySeal™, a waterbased polyurethane/acrylic interior varnish.

Tuesday, January 14, 2020

Camo Your Cracks

By Robert G. Kenel, Sashco, Inc

Checking is a natural occurrence that occurs in wood as it dries and acclimates to the surrounding atmospheric conditions. There are some things that can help reduce the effect of checking. Radial checking is the most common. That’s when the log shrinks as moisture is removed. To give you a better idea of how that looks. Picture the growth rings of the tree as a length of rope. It breaks as the wood dries. Know think the length of rope, it will shrink in length and get shorter. The longer the rope the more it more it will shrink. As these checks occur some will be bigger and others smaller as the logs reach specific gravity (G). You can see more in the ICC 400 Log Standards section 302.
Those checks can be seen exterior and interior, horizontal and vertical. While some see them as part of the log, others find them very displeasing. Besides the appearance there are some things that need to be addressed when checks are on the exterior of a structure. Foremost, upward facing checks are like gutters, collecting water in all its forms. This water becomes trapped and is absorbed in the wood fibers. It then starts to decay the wood internally where it can not be seen. Even if the logs look fine on the exterior, stain and sealers are doing their job. The hidden damages can cause expensive log replacement

Bigger checks of 1" or more I like to cut out a taper in the check. Using a small saw, I use a small electric chain saw. In which I cut tapers within the check making sure to go all the way to the very ends of the check. This is important as you can not caulk or seal those small ends properly. I do this for two reasons. One, to make a space for the wooden wedge I cut to fit the check. Two to cut out all the splinters to create a good fit for the backer strips required before caulking. On the job site I will use a 2X and circular saw set at angle to cut the wooden wedge. These I like to make a bit bigger so they extend beyond the log. That way I can grind off to fit. I fill the checks with either powder or liquid borates using a squeeze bottle. Like from a dish soap of ketchup bottle. I use glue to adhere the wedges. A good all weather adhesive I use is UltraTech 0770 ADA by Loctite. After the wedge dries is fully dried, grinded down and sanded. I can then match the stain and finish as needed.

Conceal Grizzly Brown
For checks that do not need wood, proceed with the same method but use backer strips that fit the check. They come in many sizes. The use of backer is very important as it creates that all important two point adhesion that bonds much better and allows the product to stretch properly. If backer is not used product could pull from the wood and there is no mid point of expansion to stretch. Follow the curves of the check with the saw and backer. Again, don’t forget the borates. A proper backer in inserted in the check is 1/4'” – 3/8” below the surface of the face of the log. This gives a depth that will hold a good amount of caulk, but not wasting by using to much. Tool using water mixed with a little dish soap. You can use a small brush with hair or foam. Wipe any excess off with a rag wiping in the same direction each time. I like using caulk designed for applications I am doing. Textured products like Conceal have grits that make it much less noticeable when dry. Other caulks are very smooth, and wood is not so much. Colors change as they dry so always do a test area first. Stain can also be applied over these areas after proper curing.

Reprinted from 2019 GLLCA newsletter.


Sansin Dec Finish

  Sansin Dec Finish is a two-coat, specially designed formulation for decks, docks, and balconies. The modified natural oils in Sansin D...